
Jan's Working with Databases
Forms & Reports: Forms: Printable Form
What works well on the screen may not fit onto paper for printing.
Most forms are not designed for printing. You should be aware of how they will print anyway! You never know when someone might want to print.
Small problems with print layout can often be fixed in the Page Setup dialog by changing the margins or switching to Landscape orientation. Unlike with a table or query, your Page Setup choices are saved with the form. You only have to get that part right once!
Bigger problems may require you to rearrange the controls on the form itself or to make changes to properties.
Common issues with printing forms:
- Form Width/Height:
A record runs over onto a second sheet with little or no data on it.
Solution: Adjust margins or resize controls and form to fit on paper. - Background for Form and Controls:
Printing the background uses a lot of ink and makes the form slow to print.
Solution: Don't use a background or create a form just for printing that does not have a background. - Border for Controls:
Border around controls can make the print-out hard to read.
Solution: Make borders transparent. - Black and white printing:
Form is hard to read when printed with just black ink.
Solution: Make sure there is enough contrast between text and background colors to make black-and-white or gray scale print readable. Or, omit the background. - Data hidden:
By default, a printed form shows only what you can see on the screen. If a control has more content than shows, that hidden content won't print.
Solution: Set the Can Grow property for the control and for the Detail section to Yes. - Page and Form Headers and Footers:
Confusion over which prints where. (See next section)
Page Header/Footer vs. Form Header/Footer in Printing
It is rather confusing how headers and footers print with a form. It depends on which ones they are! You might expect to see the page header and footer within the top and bottom margins, like they are in Word and Excel. Not so!
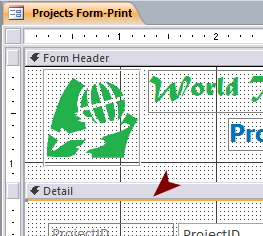
In the example below, the Page Header was designed to show the current date, at the right, like "Printed on 3/10/2016". The Page Footer was designed to show the page number and the total number of pages, like "Page 2 of 77". The Form Header contains the header that you see in Form View. The Form Footer has the same background color as the Form Header but has no controls. (I put it there just so to have something that would show for this example).
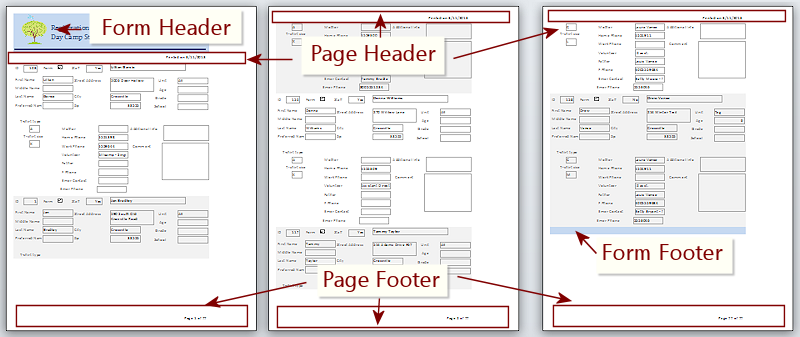
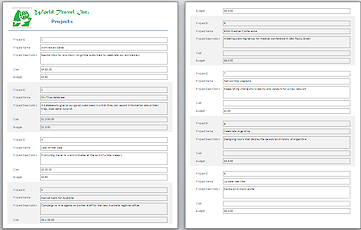
First, second, and last pages of printed form records
Margins set in Page Setup will not have anything printed in them at all. This is NOT like Word or Excel, for example.
The form header prints on the first page only above everything else.
The form footer prints on the last page only, directly below the last record, which may not be at the bottom of the page.
The page header will print on each page above the record(s). On the first page it shows below the form header.
The page footer prints on each page at the bottom of the page.
Unexpectedly, you cannot configure a page header or footer for a printed form from the Page Setup Dialog. You must be in the Form Design View. You can show the Page Header/Footer by right clicking a section bar or the Detail background and choosing Page Header/Footer from the context menu. Then you can add controls to it or format its background.
| |
Step-by-Step: Printable Form |
|
| What you will learn: | to change Page Setup for printing the form to resize form to fit on page to change Back Color to change Alternate Back Color to change control borders and Special Effect to use the CanGrow property |
Start with: ![]() , resource files, worldtravel-Lastname-Firstname.accdb from folder databases project4 as updated in the previous lesson
, resource files, worldtravel-Lastname-Firstname.accdb from folder databases project4 as updated in the previous lesson
You are going to create a form just for printing. We will take the easy way and make it very similar to the screen version.
Print Preview and Page Setup
 Open the form Projects Form-background.
-
Open Print Preview.
Print Preview is not in the list of views for forms.
Method 1: File > Print > Print Preview
Method 2: Click the Print Preview icon
 on the Quick Access Toolbar. This button is not present by default. But it is on the drop list of popular commands.
The preview looks pretty good on page 1. But... the controls are cutoff just a bit, which creates a weird and wasteful second page.
-
On the Print Preview ribbon tab, click the Page Setup button
 .
.
The Page Setup dialog appears.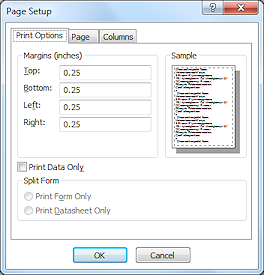 The default margins are 0.25", which is as small as most printers can get to the edges of the paper. So changing the margins is not going to help this time.
You will have to adjust the width of the form itself to fix the wasteful page.
- Click on OK, to close the dialog.
- Close Print Preview.
Resize Form to Fit Page
-
 Switch to Design View.
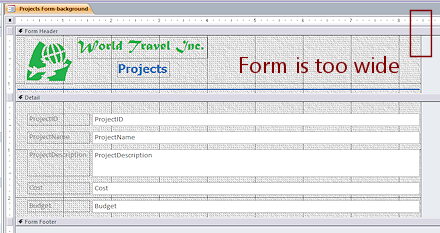
The ruler shows that the form has a width of more than 8". You used the Form button to create this form originally.The margins are 0.25" left and right for a total of ½". Letter size paper is 8½" wide. That leaves only 8" for the width of what you are printing.
Happily, the controls on this form are far wider than necessary.
- Select the data controls.
- Drag the right edge of the selected controls to the 7.75" mark.
-
Select the blue line in the header and set its Width property the 7.75".
If you try to drag the line smaller, it is very easy to make the line slant. Problem: Cannot select the line
Solution: Drag from just above the line down until the orange selection border shows.
If you accidentally select more than just the line, hold the CTRL key down and click on the parts you do not want to deselect them. -
Drag the right edge of the form to the 8" mark.
Problem: Cannot drag form edge to the left
You have a control in the way, probably the line in the Form Header.
Solution: Make sure ALL controls are narrower the desired form width. -
 Switch to Print Preview.
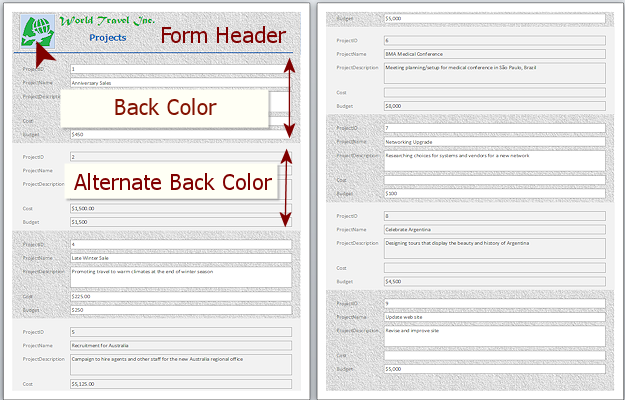
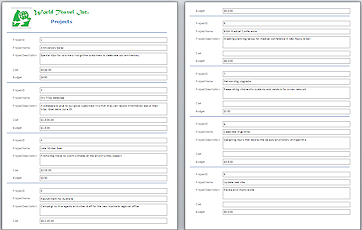
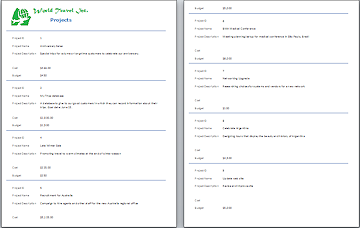
It takes two pages to print all eight records. There are no more pages with just a slice of the form. That's an improvement!
Notice how the background alternates between records. That helps the user see where a record starts and stops, but it uses a lot of ink.
Also notice that the transparent background of the logo image is letting through the background color instead of the tiled background image. Unexpected, and not like Form View at all!
Change Back Color
The backgrounds are very nice for Form View but not so much for printing. It is very useful to create a form especially for printing. Such a form should not have a background image. It is usually better to not even use a background color for the sections.
- Switch to Form Design View.
-
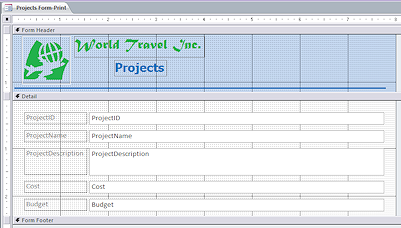
 Save the form as Projects Form - Print.
Now you can fix the background. -
 If
necessary, open the the Property Sheet.
If
necessary, open the the Property Sheet.
The dialog shows the properties for whatever is selected. -
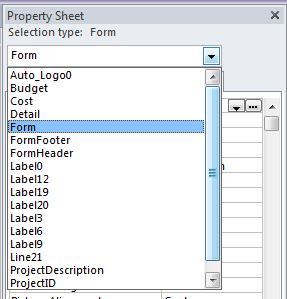
Open the drop list at the top of the dialog.
It lists every control and every section of the form in alphabetical order. -
Scroll the list and see just how many choices there are.
-
 Click on Form in the list.
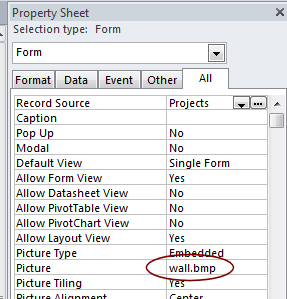
The Property Sheet now shows the properties available for the Form as a whole. -
Scroll the list and see what you can change about the form.
The Picture property shows wall.bmp. This is the image that is the form's background. Note the other Picture properties.
-
 Delete the file name for the Picture property and press Enter or click on a different property.
 Only after the focus leaves the
property does Access apply your change.
Only after the focus leaves the
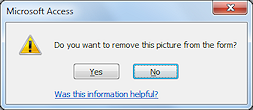
property does Access apply your change.A message appears that asks if you really want to remove the picture.
Of course you do.
-
 Click on Yes.
The image background vanishes. The original background color is still there.
Back to the Property Sheet! The background color must be changed for each section: Form Header, Detail, Form Footer.
-
Click on the selection bar for the Form Header section.
The Property Sheet changes to show properties for this section.
 Click the property Back Color.
The value showing is for the section's current background color.
The Ellipsis button appears, which tells you that there is a dialog available.
 -
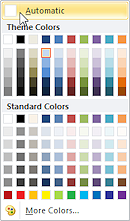
Click the Ellipsis button.
The color dialog appears. -
Click on Automatic and then on OK.
The Color dialog closes, but nothing else changes yet. -
Click on another property in the list.
The background of the Form Header section changes to white, which is the default background color for the form.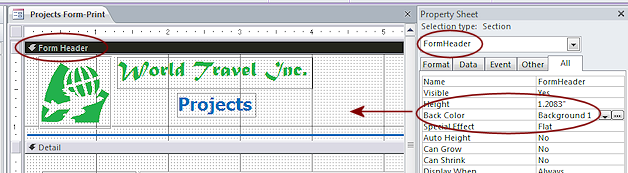
-
Check the Back Color for the Detail and Form Footer sections.
They should both have the default background color already.
Change Alternate Back Color
There is an extra property for the Detail section - Alternate Back Color.
This second color is used for background color for alternating records. This helps the user see where records change in Continuous Forms and in print-outs, but it uses a lot of ink. When you take out this color, you need to add something to help separate the records. A dividing line is an easy way to do time.
 Switch to Print Preview.
The records still alternate background color - White (Back Color) and Gray (Alternate Back Color).- Switch to Design View.
- Select the Detail section so that its properties show in the Property Sheet.
-
Change the Alternate Back Color to the same value that shows for Back Color.
Next you need to add a line to separate records now that the background colors won't do that job.
-
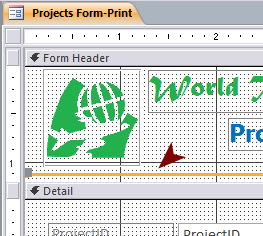 Select the horizontal line at the bottom of the Form Header.
There are multiple methods: Click on the line, drag to create a selection box that touches the line, change the drop list in the Property Sheet to the line's name, like Line21. This form currently has only one line.  Use the key combo CTRL + X to cut the selected control
- Click on the background of the Detail section.
 Use the key combo CTRL + V to paste the line.
It appears directly below the Detail selection bar.
The orange border and handles make it fairly easy to see right now.
-
 Click on the background of the Detail section and find the line.
 -
Click on the Form Header to get the selection off the Detail section.
Can you see the line now?
The illustrations show the line when the Detail section is selected and when it is not. In either case, the line is so close to the selection bar that it is hard to see in Design View.
 Switch to Print Preview.
Hmmm. This will print a lot faster and will use a lot less ink, but those boxes around the field values make this hard to read. The logo in the Form Header is showing some odd lines in some versions. More to fix!
Change Control Border and Special Effect
You will now remove the borders around the text boxes. Those are important when you are entering data but they are in the way for printing. The logo needs to lose those extra lines. They are coming from the Special Effect.
-
Switch back to Form Design View.
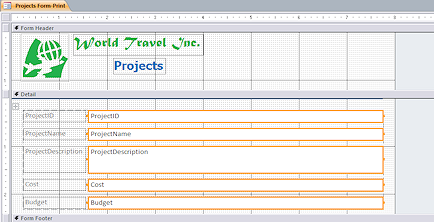
Select all of the data controls in the Detail section.
The Property Sheet changes to "Multiple Selection".The properties will be blank except where all selected controls have the same value for the property.
-
Change the Border Style property to Transparent.
-
Select the logo image in the Form Header.
-
If necessary, change the property Special Effect to Flat.
-
 Switch to Print Preview.
Much easier to read. Logo looks better, too.The controls are so wide that they are definitely wasting space.
Multiple columns might be nice. We will look at how to do that in a later lesson.
-
Save the form.
[Projects Form-Print]
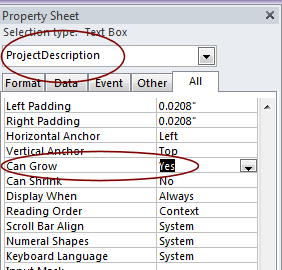
Can Grow Property
In a printed form you want to be SURE that all of the data actually prints. If the control is not large enough, your data is just cut off UNLESS you take advantage of the Can Grow property.
Thinking: Which controls on this form cut data off now? Which are most likely to cutoff
the data in the future?
Answer: The Memo/Long Text type controls, like Project Description.
-
 Switch to Form Design View.
-
Select the control Project Description.
-
Click in the box for Can Grow.
-
Change the value to Yes.
-
Click out to apply your changes.
- Select the Details section and verify that its own Can Grow property is Yes.
If not, change it.  Switch to Form View and navigate to the last record.
- Use the key combo SHIFT + ENTER to create a line break at the end of the existing text in the control Project Description.
-
Revise the data in the control to include the additional text below:
Revise and improve site.
Add pages for the special trip offers.
Add ability to share the site with Facebook, Twitter, etc.
Add a map of our locations.
Revise pages to use current HTML and CSS standards.As you type, the text will scroll inside the control. There are too many lines of text to fit in the space allowed.
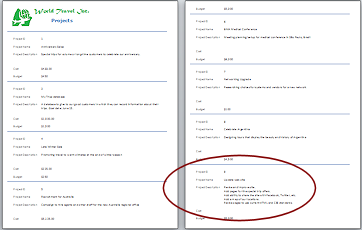 Switch to Print Preview and look at the last record.
The control grew to hold all of the data. Super!
Zoom: You can enlarge the view with
the Zoom button or the Zoom drop list at the bottom right of the Status Bar.
-
While in Print Preview, view all of the pages.
Do all pages look right? (In Access 2007 the last record is higher on the page than in the illustration.)When you allow controls to grow as needed, the form may have to enlarge to hold the new sizes. That can be an unpleasant surprise at print-out! In this case, the records still (barely) fit onto two sheets of paper.
-
Save the form.
[Projects Form-Print]
Page Setup for Printing
If you are doing these lessons for a class, your instructor may want a printed copy of this form. You need to add your name to the Page Header.
- Switch to Form Design View.
- Right click on a background area and choose Page Header/Footer.
Two new sections appear. 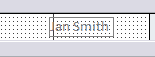 In the Page Header, add a new Label control
  at the far right .
- Type your name in the label.
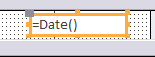 In the Page Footer, add a new unbound Text Box
  control at the far right.
- Type in the text box =Date().
This expression causes the control to show the current date in Form View. - Delete the label for this control.
-
 Save the form.
[Projects Form-Print] -
Switch to Print Preview.
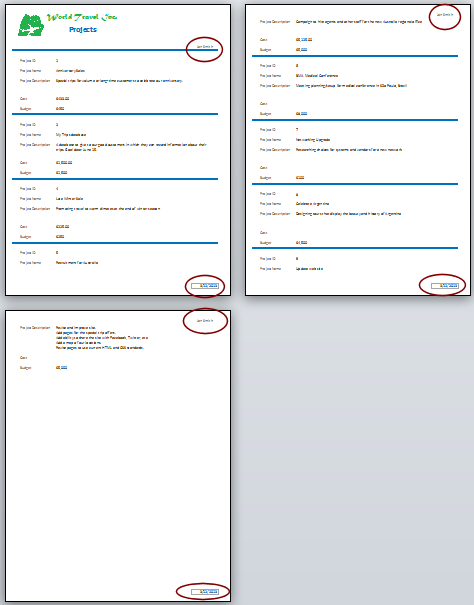
 Access 2010: Adding a Page Header and Page Footer increased the number of pages to 3.
 The label with your name does not show a border, by default. The date in the Page Footer is in a text box and does show a border by default.
-
 Print all pages.
Does the border around the date show on the printed pages? It is a pale gray that may be hard to see in print.
This is another example of how WYSIWYG (What You See Is What You Get) print previews may not quite match what your printer produces!
|
|
| © 1997-2017 Jan Smith All Rights Reserved |
Site Map What's New |
Privacy Policy Terms of Service Copyright Acknowledgements |
~~ 1 Cor. 10:31 ...whatever you do, do it all for the glory of God. ~~
Last updated: March 22, 2017