
Jan's Working with Databases
Forms & Reports: Forms: Record Images
If you want to show an image that is related to each record, the best data type for the field is Attachment. On a form an Attachment control can show a different image for each record. An Image control, however, can only show the same image in every record.
An Attachment field can contain an image, spreadsheet, word processing document, or any other kind of file. In fact, each record can have multiple files attached!
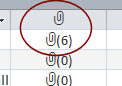
When the record opens, the file that is first alphabetically in the list of attachments shows in the Attachment control. To see other attachments, select the Attachment control. A mini-toolbar pops up with navigation arrows ![]() . Click the arrows to view each image or program icon. The form itself does not show how many attachments there are or what the file names are.
. Click the arrows to view each image or program icon. The form itself does not show how many attachments there are or what the file names are.
![]() Make it show first: Change the file name to have an underscore in front of the file name before adding it to the record. That will put the name first alphabetically, if it is the only file with an underscore as the first character.
Make it show first: Change the file name to have an underscore in front of the file name before adding it to the record. That will put the name first alphabetically, if it is the only file with an underscore as the first character.
How to Attach a File to a Record
You can attach a file to a record in Table Datasheet View, Form Datasheet View, or Form View. You cannot type anything in the control.
-
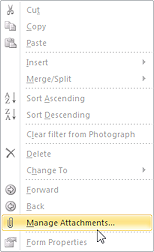
 Open the Attachment dialog with one of the following methods:
Method 1: Double click the Attachment field or control.
Method 2: Right click on the Attachment field or control and in the context menu, select Manage Attachments.
Method 3: Click the paper clip icon in the mini-toolbar
 .
.
The control must be selected for the mini-toolbar to appear.
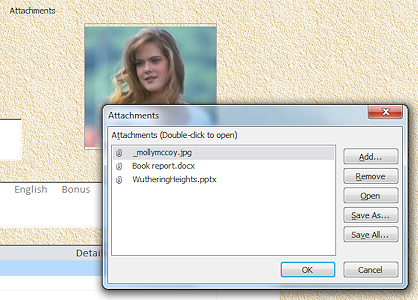
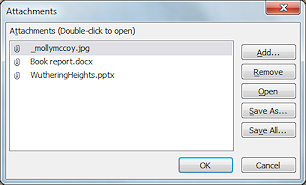
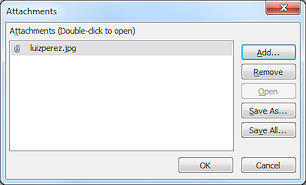
The Attachments dialog opens and lists the names of files that are already attached.
- Click the Add button.
 The Choose File dialog opens.
 -
Navigate to find the file you wish to attach, select it, and click the Open button.
The file appears in the file list.Now you can add repeat to add more files or click OK to close the dialog.
What you see after attaching a file:
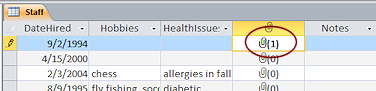
![]() Datasheet
view: A datasheet never shows the actual attached image or
document. In Datasheet View you will see only a paper clip icon and how many attached documents there are.
Datasheet
view: A datasheet never shows the actual attached image or
document. In Datasheet View you will see only a paper clip icon and how many attached documents there are.
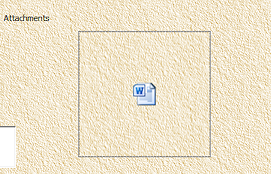
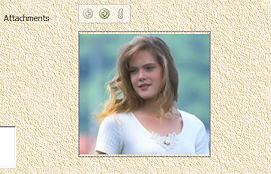
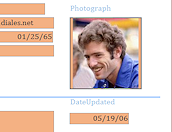
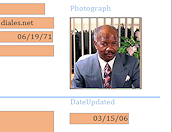
![]() Form View: The control on a form or report will show an attached image if Access understands the file format.
Form View: The control on a form or report will show an attached image if Access understands the file format.
For other kinds of attached files, it shows an icon for the program on the computer that can open that file type, if the program is installed on the computer.
Example icons: ![]()
Word, Excel, Notepad, PaintShopPro (for image files), Adobe Reader, unknown file type.
 The image or icon that shows in the control by default is the first one alphabetically in the list of files in the Attachments dialog.
Mini-toolbar ![]() : Appears only when you click in an Attachment type control on a form. It has navigation arrows to show the different images/icons. When you move to a different record and come back to the record, the control returns to the first image/icon. The paper clip button opens the Attachment dialog.
: Appears only when you click in an Attachment type control on a form. It has navigation arrows to show the different images/icons. When you move to a different record and come back to the record, the control returns to the first image/icon. The paper clip button opens the Attachment dialog.
To show ALL of the attachments without having to navigate to each one, you must use a subform. We will learn about that later in this project.
What to do about images that don't display:
Use a graphics program to convert your images to a format that Access understands.
| |
Step-by-Step: Record Images |
|
| What you will learn: | to insert images in datasheet Attachment field to format an Attachment control with Property Sheet to compare database file sizes to compact database and compare again |
Start with: ![]() , resource files, worldtravel-Lastname-Firstname.accdb from folder databases project4 as updated in the previous lesson
, resource files, worldtravel-Lastname-Firstname.accdb from folder databases project4 as updated in the previous lesson
You will add images to your Staff table records. It will be interesting to see what effect on the database's file size adding the images will have.
![]() Warning: File
Size Increase
Warning: File
Size Increase
As you add images to records in this lesson, the database file size
will increase a LOT. Be sure that the disk you are saving your database
to has LOTS of empty space.
 Backup Database
Before adding any images or new objects, you need a copy of the database at its smallest size. Backing up the database is the easiest way to get that. Besides, you should be making backups regularly anyway.
-
Close any open forms or tables and save if necessary.
-
Back up this database now so you will have a good copy to use if you need to start over. This works well while the database is small.
 Access 2007: Office button > Manage > Back Up Database
 Access 2010: File tab > Save and Publish > Back Up Database > Save As

 Access 2013, 2016: File tab > Save As > Save Database As > Back Up Database > Save As button
 If necessary, navigate to your databases project4 folder on your Class disk.
 Save with the name worldtravel-beforerecordimages-Lastname-Firstname.accdb .
The database closes. A copy is made with the name that you chose and is compacted. The original database opens.
You will see security warnings again if you saw them the first time you opened the database.
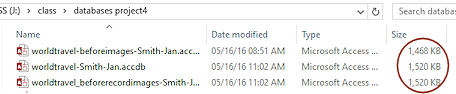
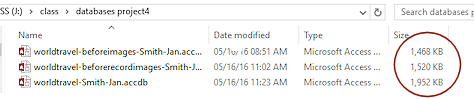
Open a File Explorer or My Computer window and navigate to your Class disk to the databases project4 folder.
You should see at least three versions of the database:worldtravel-beforeimages-Lastname-Firstname.accdb , the copy before you added a background and a logo
worldtravel-beforerecordimages-Lastname-Firstname.accdb , the copy before doing the lesson steps below on this page.
worldtravel-Lastname-Firstname.accdb, the current copy - not compacted since the 'before images' copy.Write down the sizes of these files. (They are almost certainly different from the illustration!) As you work, the database size increases. Compacting it reduces the size somewhat. When you do a backup, the file is automatically compacted as part of the process.
You can leave the File Explorer or My Computer window open.
Insert Image in Datasheet View: Attachment Field
You can add an image to a table directly in Table Datasheet View or in Form Datasheet View. The image won't display in the datasheet and it does not show the file name either. That makes it hard to tell if you got the right file! You will usually want to add an image to a record via a form.
Disclaimer: All of the images of people are from clip art collections.
 Open the table Staff.
-
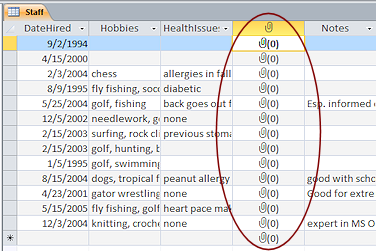
Scroll to the Photograph field.
This column shows the paper clip icon as an Attachment field instead of its name. Not very helpful!Each record shows 0 attachments.
 Double-click in the first row in the Attachment column, the record for Luis Perez.
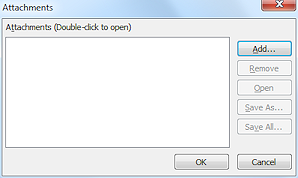
A blank Attachment dialog appears.
 Click the Add... button.
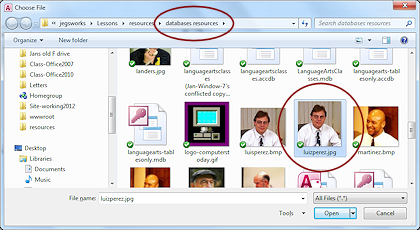
The Choose File dialog opens.
- Navigate to where you saved the resource files.
- Select the image luisperez.jpg.
-
 Click on Open.
You are back in the previous dialog, but there is a file name in the list.
 Click on OK.
The datasheet now shows one attached file.- Close the Staff table.
-

 Open the form Staff-format control to see the image.
Better!In Form View you have a chance of noticing if you inserted the wrong image since you can easily see whose record this is. In the Datasheet View the person's name was out of sight to the left and you could not see the image itself or even the file name.
Format Attachment Control with Property Sheet
Once you start putting images into your records, you may need to tweak the form layout. In this section you will look at Size Mode and Background properties.
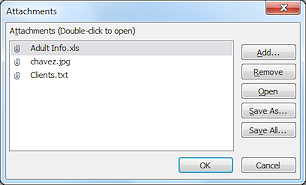
 In the Form View of the Staff-format control form, change to record #2, Hector Chavez.
- Double-click on the Photograph control.
The Attachments dialog opens.
 Repeat the steps above to attach the image chavez.jpg.
 Change to record #3 and attach the image gardner.jpg.
 Switch to Design View.
- Verify the following properties for the Photograph control.
Make changes, if necessary.- Width = 1.25"
- Height = 1.25"
- Picture Size Mode = Clip
- Picture Alignment = Center
-
Switch back to Form View and look at the three records with photos.
Parts of the photo are cut off. Not a good look!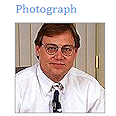
-
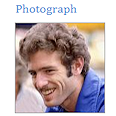
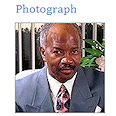
 Similarly, add JPG photos to the records of other employees from the resource files.
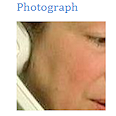
There is no photo in the JPG format for the Mr. Kennedy. Use the image photonotavailable.jpg for him, NOT the BMP format image (which is used in the lessons for Access 97 - 2003).What happened to the photo for record #7 (Sheila Landers)? The photo is far too large to fit inside this control with Size Mode = Clip. Since Picture Alignment = Center, the control shows the center part of the photo. This photo really should have been resized before being added to the database. You won't always have a choice.
 Resize
with a graphics program: Your image usually will look better if you used a graphics program to resize the image to
the correct size for your control instead of letting Access resize with Zoom. For
this form you need to crop the image to a square size and then resize,
if necessary, to 1.25" square. Then you can sharpen the image.
Resize
with a graphics program: Your image usually will look better if you used a graphics program to resize the image to
the correct size for your control instead of letting Access resize with Zoom. For
this form you need to crop the image to a square size and then resize,
if necessary, to 1.25" square. Then you can sharpen the image. - Switch to Design View.
- Change the Size Mode property back to Zoom.
Access resizes the photos to fit inside the control while keeping the proportions the same. No distortions allowed! 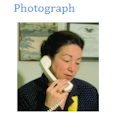 Switch back to Form View and look at all of the records.
With Zoom on, any leftover space in the control will show the control's background color. The control's border shows also.Form purpose affects design choices: - Enter new data: The user needs to clearly see where the controls are. An attachment field needs at least a border so the user will know where to click to start attaching.
- View existing data: Transparent background and border gives a clean look. Is there a default attachment, like an image that says Photo Not Available? If a record has no attached files, an Attachment control would not show at all in this case. Would that be confusing to the user?
Compare File Size, Compact, Compare Again
Now that you have added images to the records, will there be any difference in the file size?
- Verify that all database objects are saved.
 Switch to the File Explorer or My Computer window
(If necessary open one and navigate to your Class disk to the databases project4 folder. )
- Compare the current size of worldtravel-Lastname-Firstname.accdb to the size of worldtravel-beforerecordimages.mdb, which was the
size of worldtravel-Lastname-Firstname.accdb at the beginning of
this lesson. There should be a significant difference!
Note: Your file sizes are almost certainly different from mine! - Switch to the Access window for worldtravel-Lastname-Firstname.accdb.
- Compact and Repair the database.The database closes, compacts, and reopens.
- Switch to the My Computer window.
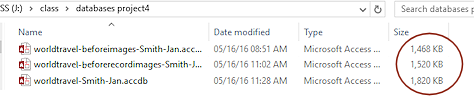 Write down the new file size.
Did the World Travel database change sizes much after compacting? Probably! How does its size now compare to the size before adding the record images?
|
|
| © 1997-2017 Jan Smith All Rights Reserved |
Site Map What's New |
Privacy Policy Terms of Service Copyright Acknowledgements |
~~ 1 Cor. 10:31 ...whatever you do, do it all for the glory of God. ~~
Last updated: March 22, 2017