|
Views
 Page View Page View
 The
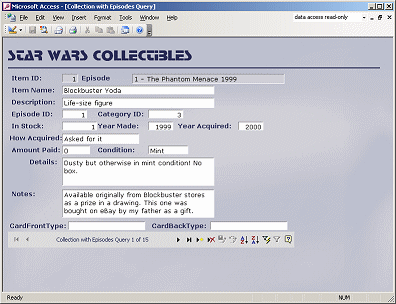
Page View for a data access page looks very much like a form and even uses
the form icon on the Views button. The
Page View for a data access page looks very much like a form and even uses
the form icon on the Views button.
You are inside Access in this view, unlike the Web Page Preview where
your page opens in a browser.

The navigation bar at the bottom of the data access page includes buttons for deleting a record, saving an edited record, undoing
an edit, sorting, Filter By Selection, remove a filter, and Help.
 Page Design View
 The
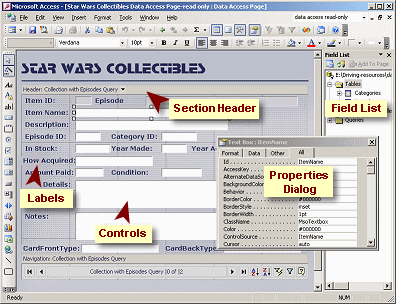
Page Design View is similar to the Design View for forms and reports. The
Page Design View is similar to the Design View for forms and reports.
You have controls with labels and a navigation bar.
Each object and section of the data access page has its own properties,
which you can view and change with the Properties dialog.
There is a pane at the right called Field List, which shows what fields
you could choose to include on this form. You can display fields from more
than one source. However, the page can be used to edit,
add,
and delete
records for only one of these objects at a time.
You cannot control as much about the features of a data access page as
you can for a form or report. Web pages and browsers have their own ways of
doing things!
Web Page Preview
 The
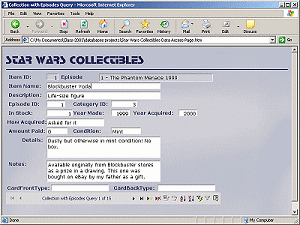
Web Page Preview opens your data access page in your browser. This
should be close to what your users will see in their browsers. They can add, delete, and
edit records in the database on the web server using this page. The
Web Page Preview opens your data access page in your browser. This
should be close to what your users will see in their browsers. They can add, delete, and
edit records in the database on the web server using this page.
You cannot edit the value in a control that has a gray background. Such a control is
either an AutoNumber field, like ItemID, or is from a different table or
query than the other controls. You can only update fields from one object
in the Field List.
 Read-only:
You can make your data access page Read-Only. Users can see all the
records and even sort and filter. They cannot make changes to the records
or add new ones. Read-only:
You can make your data access page Read-Only. Users can see all the
records and even sort and filter. They cannot make changes to the records
or add new ones.
The Navigation Bar buttons that relate to editing will be disabled or
deleted for a
read-only type of page. That's
the only difference in the appearance of the page.
Quick Page
Access provides two quick methods for creating a data access page:
AutoPage and the
Page Wizard. After creating a page, you can edit the form as you wish. Using one of
these quick methods to get your page started can be a real time-saver even
when you plan to make a lot of changes.
(Does this sound familiar??)
AutoPage
On the
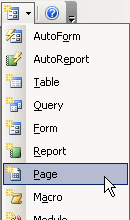
toolbar is a button for New Objects. If you
open the drop list of objects and choose
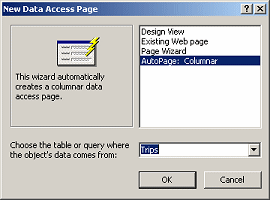
 Page, then Access opens the
New Data Access Page dialog. Page, then Access opens the
New Data Access Page dialog.
You must choose a
table or query and a method. If you choose AutoPage: Columnar in the
New Data Access Page dialog, then Access creates a page immediately.
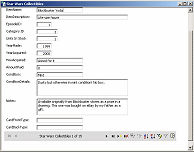
The AutoPage is a bland and boring page. It puts all of the fields from
the table or query that you picked into a single column. You can go to
Design View to revise it as you please.
Page Wizard
If
you want to make some choices for your page first, either select the New
Data Access Page Wizard and then Page Wizard, or click on Pages in the
Database Window and use the link Create data access
page by using wizard.

The wizard walks you through some choices for
your web page.
- Source for the data
- Which fields to show
- To group data (perhaps by year or region or postal code)
- To sort on up to 4 fields
- To apply a theme (set of colors, buttons,
bullets, lines, etc. for a web page)
You will still want to make adjustments to the page that the Page Wizard
creates. It is not as smart as you might think at first glance.
 |
Step-by-Step: Create a Data Access Page |
 |
What you will learn: |
to create a data access page using the wizard
to create and format a page title
to select multiple objects
to change properties in Property dialog
|
Start with:
mytrips.mdb from previous lesson
Create a Data Access Page with the Wizard
Since the AutoPage is so boring, let's try the Page Wizard to create your
first data access page.
-
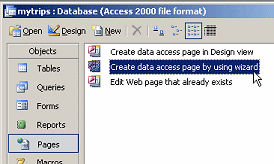 If
necessary, switch to the Database Window. If
necessary, switch to the Database Window.
- Click on Pages in the list of objects at the left.
- Double-click the link Create data access page
by using wizard.
The Page Wizard opens to the first of 4 steps
-
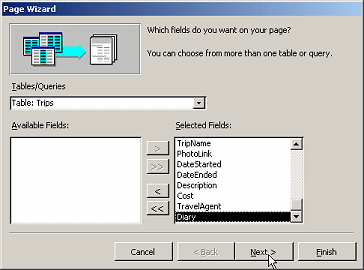 Choose
Table: Trips in the first text box. Choose
Table: Trips in the first text box.
- Click on the >> button to move all of the fields from
Available Fields to Selected Fields.
- Click on the Next button.
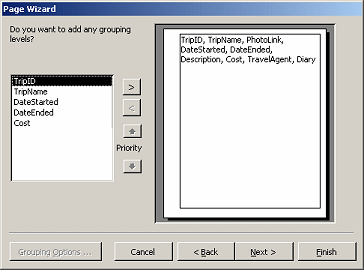 In
the second step of the wizard, you could choose a grouping level, but none
of these would be helpful for this page. In
the second step of the wizard, you could choose a grouping level, but none
of these would be helpful for this page.
- Click the Next button.
-
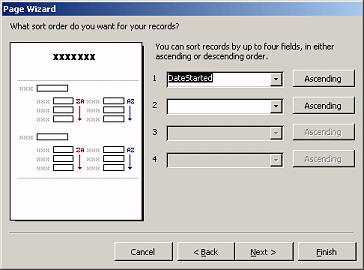 In third step
of the wizard, in the top box, select DateStarted
and Ascending for the button beside it. In third step
of the wizard, in the top box, select DateStarted
and Ascending for the button beside it.
- Click the Next button.
-
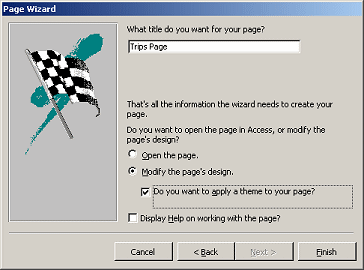 In the fourth
step of the wizard, type the name Trips Page in the text box. In the fourth
step of the wizard, type the name Trips Page in the text box.
- Click on the radio button "Modify the page's design" and
also in the checkbox for "Do you want to apply a theme to your page?"
- Click on the Finish button.
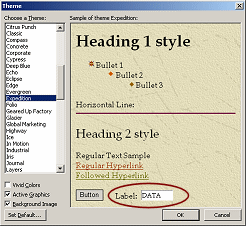 The Theme dialog appears. A pre-designed theme is a set of formats and lines
and buttons for a web page. For your data access page, you won't use many of
the design elements, but this is a fast way to get some visual interest on
your page. The Theme dialog appears. A pre-designed theme is a set of formats and lines
and buttons for a web page. For your data access page, you won't use many of
the design elements, but this is a fast way to get some visual interest on
your page.
-
Scroll
the Theme list and click on various themes.
A sample of the features of the theme shows in the right pane of the dialog
window.
Especially notice at the bottom the example of a label with data. Your
data access page will be almost entirely made up of these.
Which themes are available depends on which version of Office you have
installed. Themes may not be installed.
 Problem: Theme
must be installed: Problem: Theme
must be installed:
 When
you click on a theme, you may get a message on the right about installing
the theme. To install the missing themes, you will need to have the correct Office installation CD. Just click on the Install
button and follow the directions. You will not have to shut down Access or
reboot the computer. When
you click on a theme, you may get a message on the right about installing
the theme. To install the missing themes, you will need to have the correct Office installation CD. Just click on the Install
button and follow the directions. You will not have to shut down Access or
reboot the computer.
-
 Click
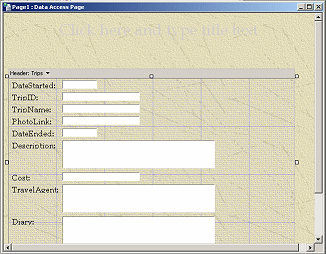
on the theme Expedition and then on OK. The theme is applied to your
page in Page Design View. Click
on the theme Expedition and then on OK. The theme is applied to your
page in Page Design View.
 Change a theme: To switch
to a different theme later, in Design View open the Format menu and select
Theme... The Theme dialog will open again. Change a theme: To switch
to a different theme later, in Design View open the Format menu and select
Theme... The Theme dialog will open again.
Page Design View: Create & Format Title
At the top of the page in Design View is an area for a title. It has some
text that is barely readable in this theme: "Click here and type title text. "

- Click in the title area and type
My Trips.
- Select what you just typed and click
 the Left Align button.
 While
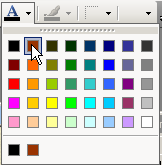
the text is still selected, open the palette of colors for
Font/Fore Color by clicking the down arrow on the toolbar button with the A. While
the text is still selected, open the palette of colors for
Font/Fore Color by clicking the down arrow on the toolbar button with the A.
- Select Brown in the top row.
-
 Click
below the title in the blank area. The cursor shows you that there is a
blank line there. Click
below the title in the blank area. The cursor shows you that there is a
blank line there.
-
 Backspace to delete the blank line. Backspace to delete the blank line.
Page Design View: Modify Labels with Property Dialog
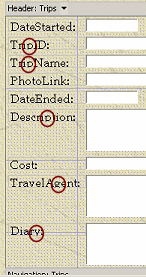
This simple layout needs some help. Do you see what the problems are?
-
 Inspect
the labels beside each control. Inspect
the labels beside each control.
Strangely, the wizard did not make the labels tall enough to show the bottoms of
letters like y and g. This is not a hard problem to fix! There are two choices
- reduce the font size or change the label height. This time we will go for
taller labels.
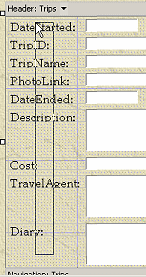
- Drag from below the label Diary straight up the page to DateStarted.
Do not drag across any of the white controls.
Release the mouse button.
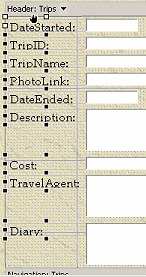
Dragging across labels; Labels selected
All of the labels now have handles (black squares), which shows that they are
selected.
Alternate method of selection: Click on the first label. Hold the
SHIFT key down and click on each of the other labels that you want to include
in the selection.
 Dragging across controls may
not select them in a Form or Report: Dragging across controls may
not select them in a Form or Report:
You can change the selection behavior to select only if completely
enclosed by the dragging rectangle or if partially enclosed. (Tools |
Options... | Forms and Report | Selection behavior.)
 Problem:
Can't select more than one object at a time: Problem:
Can't select more than one object at a time:
You must have installed Internet Explorer 5.5 or a later version.
-
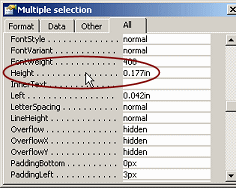 If
necesssary, click on If
necesssary, click on
 the Properties button
on the toolbar to open the Properties dialog. the Properties button
on the toolbar to open the Properties dialog.
The dialog is titled "Multiple selection".
- If necessary, click on the Format tab or the All tab.
The properties are happen to be in alphabetical order this time.
- Scroll until you can see the Height property, which is
currently set to 0.177in.
- Click on the Height property. A down arrow appears in the
white area.
-
 Click the down arrow and select auto from the
one-item list. (Other properties have more choices!) Click the down arrow and select auto from the
one-item list. (Other properties have more choices!)
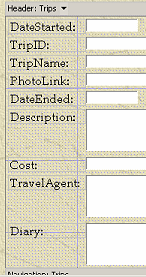 The labels all
get taller and show the letters properly. The labels all
get taller and show the letters properly.
- Inspect
the labels again to be sure that all parts of each letter are visible. If you
missed any, select the label by clicking it and change its Height property to
"auto".
Page View: Are there problems?
Now you need to check how well the data access page works when there is data
showing in the controls. Since the labels were not sized correctly, you might
suspect that there will be a problem with the controls, too.
-
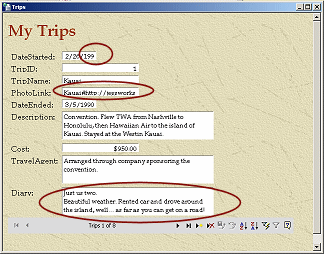 Switch to Page View by clicking Switch to Page View by clicking
 the
Views button, which should be showing the Page View icon (which looks just
like
the Form View icon!) the
Views button, which should be showing the Page View icon (which looks just
like
the Form View icon!)
- Navigate through all of the records. Do you see any problems?
- Dates: Too narrow
The DateStarted and DateEnded controls
are missing a digit in some records.
-
 Links: Too narrow, too short, not clickable Links: Too narrow, too short, not clickable
The
PhotoLink control only shows the first bit of the
link URL. Letters like j and g that hang down below the line are cut off.
The text is not a clickable link like it was in the form.
- Memos: Not large enough
The
Diary control is missing a lot of
the text in some records.
- Arrangement: not logical
Logically, the DateEnded control
ought to be up near the DateStarted, which got
moved to the top by the wizard because you sorted on it.
These problems are fixable but a couple will require more work than we want to
deal with at this point in the lessons.
- Switch back to Page Design View.
Page Design View: Resize and Move Controls
We can easily fix the size of the controls. There are actually two choices - change
the font or change the size of the control.
Dates
-
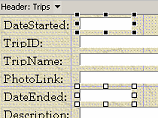 Click
on the DateStarted control. Hold the
SHIFT key down and click the DateEnded
control. Both should have handles, showing that they are both selected. Click
on the DateStarted control. Hold the
SHIFT key down and click the DateEnded
control. Both should have handles, showing that they are both selected.
-
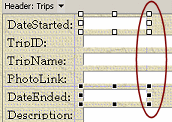 Move
your mouse pointer over the middle handle at the right edge of the
DateEnded control and drag right
until the edge is on the vertical gray line. Release the mouse
button. Move
your mouse pointer over the middle handle at the right edge of the
DateEnded control and drag right
until the edge is on the vertical gray line. Release the mouse
button.
-
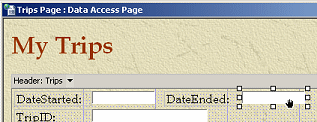 Move the mouse
over the
DateEnded control until the pointer changes to Move the mouse
over the
DateEnded control until the pointer changes to
 the hand shape.
- Drag the control (the label will move, too) up to the
top of the page level with the DateStarted
control and drop.
Hyperlink
-
 Click
on the PhotoLink control to select it. Click
on the PhotoLink control to select it.
- Move your mouse pointer over the handle in the center of
the bottom edge and double-click.
The control enlarges to the Auto size.
- Move your mouse pointer over the handle in the center of the right
edge and drag to the edge of the grid. Release the mouse.

- Switch to Page View and navigate the records. Is the PhotoLink
control OK now?
Not really! The PhotoLink control is not a clickable
hyperlink like it was in the form. It is showing the Display text and then the
hyperlink between hash marks (#). Kauai#http://jegsworks.com/Lessons/images/trips/kauai/kauai.htm#
The new size for the control shows all of the characters except
perhaps the last #. But, future links might have more characters.
There is a way around this, but it requires entering some scripting code and
the addition of another object on the page. That is beyond what we are trying
to do in this section of lessons. We will leave this problem standing for now.
Page Design View: Move Multiple Controls
There is now a blank area in the middle of the page where the
DateEnded control was. You can move the other
controls up.
-
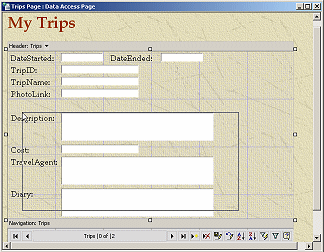 Drag
from the right of the Diary control up and over to the label
Description. Release. Drag
from the right of the Diary control up and over to the label
Description. Release.
All of the controls and labels that you touched should now be selected.
- Move the mouse pointer back over one of the selected items
until the pointer changes to
 the hand shape again.
-
 Drag
up until the Description control is just below the PhotoLink control.
Drop. Drag
up until the Description control is just below the PhotoLink control.
Drop.
- Switch to Page View and navigate through all of the records.
All dates should be showing all digits. The PhotoLinks should all fit in
the control.
Page View: Problem with Memo Controls
The Page Wizard created large controls for the fields with the Memo data
type. But the size was not picked by looking at the actual values. The
Description text seems to fit in the allowed space
for all of the records. The Diary text, however, is
much longer than will fit in the default control size. In the report we used the
Grow and Shrink properties, but those are not available for a data access page.
In the form some scroll bars appeared when there was more text than would fit.
We can add scroll bars to the page, too.
- Switch back to Page Design View.
- Click on the Diary control to select it.
-
 If the Properties dialog is not open,
right click on the Diary
control and from the popup menu, select . If the Properties dialog is not open,
right click on the Diary
control and from the popup menu, select .
-
 If
necessary, click on the All tab and scroll until you
can see the Overflow property. If
necessary, click on the All tab and scroll until you
can see the Overflow property.
- Switch back to Page View and navigate to each record.
When there is a vertical scroll bar, you know there is text that is out of
sight. Neat!
|


 If
necessary, switch to the Database Window.
 Choose
Table: Trips in the first text box.
 In
the second step of the wizard, you could choose a grouping level, but none
of these would be helpful for this page.
 In third step
of the wizard, in the top box, select DateStarted
and Ascending for the button beside it.
 In the fourth
step of the wizard, type the name Trips Page in the text box.
  The Theme dialog appears. A pre-designed theme is a set of formats and lines
and buttons for a web page. For your data access page, you won't use many of
the design elements, but this is a fast way to get some visual interest on
your page.
 When
you click on a theme, you may get a message on the right about installing
the theme. To install the missing themes, you will need to have the correct Office installation CD. Just click on the Install
button and follow the directions. You will not have to shut down Access or
reboot the computer.
 Click
on the theme Expedition and then on OK. The theme is applied to your
page in Page Design View.
Click
on the theme Expedition and then on OK. The theme is applied to your
page in Page Design View.![]() Change a theme: To switch
to a different theme later, in Design View open the Format menu and select
Theme... The Theme dialog will open again.
Change a theme: To switch
to a different theme later, in Design View open the Format menu and select
Theme... The Theme dialog will open again.
 While
the text is still selected, open the palette of colors for
Font/Fore Color by clicking the down arrow on the toolbar button with the A.
 Click
below the title in the blank area. The cursor shows you that there is a
blank line there.
  Backspace to delete the blank line.
 Inspect
the labels beside each control.

![]() Dragging across controls may
not select them in a Form or Report:
Dragging across controls may
not select them in a Form or Report:![]() Problem:
Can't select more than one object at a time:
Problem:
Can't select more than one object at a time: If
necesssary, click on
 The labels all
get taller and show the letters properly.
 Switch to Page View by clicking
 Click
on the DateStarted control. Hold the
SHIFT key down and click the DateEnded
control. Both should have handles, showing that they are both selected.
 Move
your mouse pointer over the middle handle at the right edge of the
DateEnded control and drag right
until the edge is on the vertical gray line. Release the mouse
button.
 Move the mouse
over the
DateEnded control until the pointer changes to
![]()
 Drag
from the right of the Diary control up and over to the label
Description. Release.
 Drag
up until the Description control is just below the PhotoLink control.
Drop.
 If the Properties dialog is not open,
right click on the Diary
control and from the popup menu, select .
 If
necessary, click on the All tab and scroll until you
can see the Overflow property.