Views
 Form View Form View
In Form View you work with records.
You can:
- View records
- Navigate records
- Sort, filter, or find records
- Edit records
- Add records
- Select records
- Copy or delete records
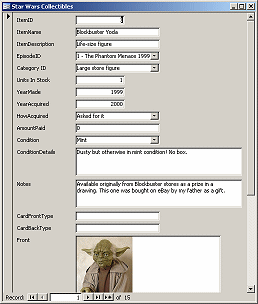
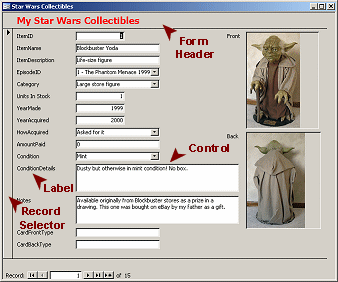 Data
is displayed on a form in various controls, each of which
normally has a
label. Data
is displayed on a form in various controls, each of which
normally has a
label.
The form header and
footer can hold a title or other information that you want to see
with each record.
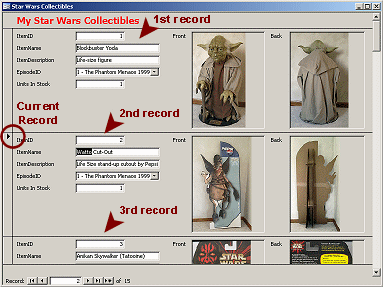
At the left of the controls is a bar that is the record
selector. In the datasheet this bar is a small square. In a form it
extends from the top to the bottom of the record. If you click on this bar,
the whole record is selected.
What would you do with one or more selected records?
Copy or delete.
Why would you copy records?
- To create a new record: If most of the data is the same, it
could save some effort to copy and paste a record and then make a few
changes to update the info.
-
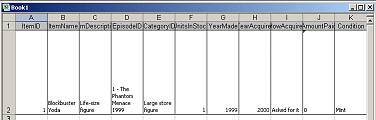 To
paste to a different program: If you copy the record and paste into
another program like Word or Excel, the data will be displayed in set of
rows and columns. The field names label the columns. To
paste to a different program: If you copy the record and paste into
another program like Word or Excel, the data will be displayed in set of
rows and columns. The field names label the columns.
A form normally shows one record at a time. A well-designed form will
arrange the fields so that
as many as possible can be seen without having to scroll.
 Some forms show records one after the other, called
continuous forms. Some forms show records one after the other, called
continuous forms.
This is only useful when a record does not have many fields to show. An arrow
 in the record selector shows which record is the current one.
 Form Datasheet View
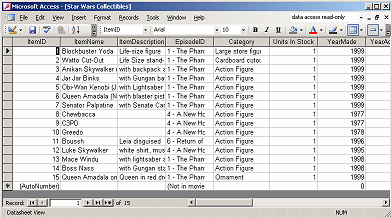 Use
Datasheet View when you need to see several records at once. Just open the
list of views on the Views button and choose Datasheet View. Use
Datasheet View when you need to see several records at once. Just open the
list of views on the Views button and choose Datasheet View.
The datasheet shows the fields in the form, which may not be all
of the fields in the source tables/queries.
 Form Design View Form Design View
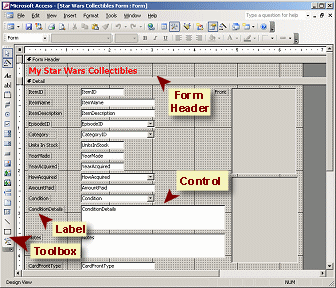 In the
Form Design View you work with the source, layout, and behavior of the
form, not the records themselves. In the
Form Design View you work with the source, layout, and behavior of the
form, not the records themselves.
You can:
- Choose which fields to use from which tables or queries
- Choose the type of control for each field
- Format all parts of the form
- Choose a look for controls, labels, and other objects on the form
- Arrange and size all parts
- Choose fonts, font colors, font sizes
- Choose background color or image
- Add titles or other text
- Add decorative lines and images
- Assign responses to actions like clicking on a control or closing the
form.
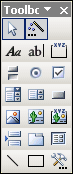 The
Toolbox toolbar shows by default at the left of the window. It can also
float. This toolbar has buttons for each of the types of controls that you
can create while in Design View. The buttons are the same for Form and
Report Design View. They are a little different for Page Design View. The
Toolbox toolbar shows by default at the left of the window. It can also
float. This toolbar has buttons for each of the types of controls that you
can create while in Design View. The buttons are the same for Form and
Report Design View. They are a little different for Page Design View.
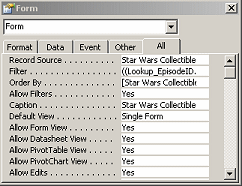 The
form and each of its parts has its own properties,
which you can see in the Properties dialog. There are usually several tabs
in this dialog, but the All tab lists all available properties.
You will work with this dialog later. The
form and each of its parts has its own properties,
which you can see in the Properties dialog. There are usually several tabs
in this dialog, but the All tab lists all available properties.
You will work with this dialog later.
 By
default, the text in the label for a control is the name of
the field. You can edit or even delete the labels without affecting the
values that show up in the control. By
default, the text in the label for a control is the name of
the field. You can edit or even delete the labels without affecting the
values that show up in the control.
What are the dots?
The background of the form in Design View has a lot of annoying dots and lines.
They are there to help you get the controls and labels lined up neatly. The
labels may be hard to read in this view!
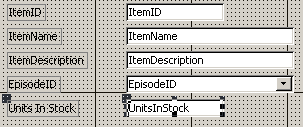
Handles:
When you click or TAB to a control to select it,
handles (black squares) appear at the corners and the middle of each
side. The illustration shows the UnitsInStock control after it has been selected. The upper left
handle of the control UnitsInStock is bigger
than the other handles. The label also got a single large handle at the
upper left. These large handles are for moving the object. The smaller
handles are for changing the width and height.
Quick Forms
Access provides two quick methods for creating a form: AutoForm and the
Form Wizard. After creating a form, you can edit the form as you wish. Using one of
these quick methods to get your form started can be a real time-saver.
AutoForm
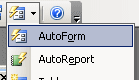 On the
toolbar is a button for New Objects. This button is not available unless
you have a table or query open or selected in the Database Window. If you
open the drop list of objects and choose AutoForm, then Access immediately creates a
simple form based on the selected table or query. On the
toolbar is a button for New Objects. This button is not available unless
you have a table or query open or selected in the Database Window. If you
open the drop list of objects and choose AutoForm, then Access immediately creates a
simple form based on the selected table or query.
Form By Wizard
 The link to the Form Wizard is in the Database Window, in the Forms list. The link to the Form Wizard is in the Database Window, in the Forms list.
The wizard walks you through a number of choices for your form. You can choose:
- Source for the data
- Which fields to show
- One of 6 layouts
- One of 10 pre-installed styles plus any custom styles you created for colors and formatting
- Form's title
In this lesson we will use the AutoForm. You will work with the Form
Wizard later as well as learn how to create a form from scratch.
 |
Step-by-Step: Create a Form with AutoForm |
|
What you will learn: |
to create a form with AutoForm
to navigate records & fields in a form
to use a form to add records
to create a hyperlink with display text
to use a form to edit records
to select a record in Form View
to copy a record and paste in Excel
to select/move a control in Design View
to resize a control in Design View
|
Start with:
mytrips.mdb from previous lesson
Create a Form with AutoForm
A simple form is very easy to create with AutoForm. There are a number of
things you could do to improve the layout, but for this lesson we mostly will settle for what Access
provides. Later you will learn how to change all the characteristics of a form.
-
 If
necessary, switch to the Database Window and select
Tables. If
necessary, switch to the Database Window and select
Tables.
The only table is Trips, so it will be selected automatically. This table
will be the source of records for the new form.
-
On the
menu, click the arrow on the New Objects button and select
. (Your button may show a different
icon depending on what was used last.)
The screen may blink and you may briefly see a minimized window at the
bottom of your Access window while Access creates the form. Then the new
form will open automatically to the first record.
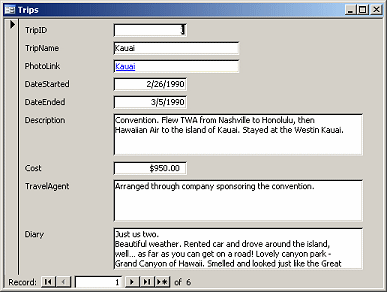
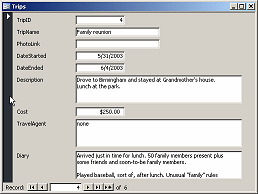
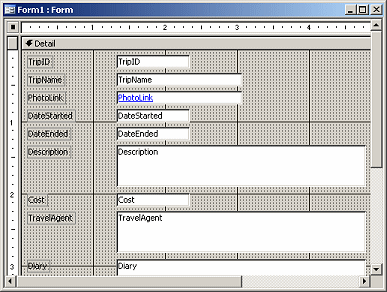
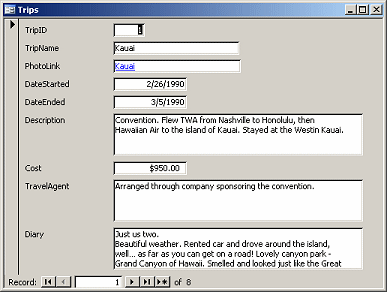
Trips form created with AutoForm
All fields in the Trips table are here and
use the default size for the control
 Records out
of order or missing: Records out
of order or missing:
The form shows the records in the same way that the table does, including any
sorting or filtering that you left in place.
Simple Solution: (for AutoForms)
Close and delete the AutoForm. Open the table in Table Datasheet View, remove
any filters, sort in the order that you want, save the table. Recreate your
AutoForm.
Advanced Solution: (for complex or formatted forms that you don't want to
recreate)
Open the form in Form Design View. Open the Properties dialog for the form.
Remove the entry in the OrderBy property.
Form View: Navigate Between Records
The form has the same Navigation Bar that datasheets have. You can also move
through the records using the Page Up and Page Down keys on your keyboard. (The
Home, End, and arrow keys move you between the controls on a form.)
- Click on each of the navigation buttons in the Navigation Bar at
the bottom of the form window. Type in a record number.

- If your mouse has a scroll wheel, turn the scroll wheel forward and
back. You can flip through the records very quickly this way!
-
 Press the Page Up and Page Down keys to navigate through
the records.
Press the Page Up and Page Down keys to navigate through
the records.
- Use the method of your choice to return to the first record.
Form View: Navigate the Fields in a Record
It is awkward to switch back and forth between the
mouse and the keyboard. So how do you change from field to field with the keys?
-
Press
the TAB key to move through each field in the record until you change
to the next record.
-
Use the key combo SHIFT + TAB to move backwards through the fields to
the first field in the first record.
Alternate Method: The
arrow keys also work, unless you are in Edit mode in a control. Then they
move the insertion point around in the control. The Home key takes you to the
first control in the Tab Order. The End key takes you to the last control in
the Tab Order.
 Tab Order: In an AutoForm
the tab order for the fields is easy to understand - straight down the one
column of fields. That order can be changed. When you create a form
yourself, you must be careful that the tab order you wind up with is logical. Tab Order: In an AutoForm
the tab order for the fields is easy to understand - straight down the one
column of fields. That order can be changed. When you create a form
yourself, you must be careful that the tab order you wind up with is logical.
Form View: Add Record
Now that you can get around in the records, it's time to add some more records.
- Click on the
 New Record button on the Navigation bar.
A blank record appears in the form.
- Type the following data into the appropriate fields. The memo
fields will scroll when you reach the end of the space.
|
TripName |
Ireland |
|
DateStarted |
6/4/1992 |
|
DateEnded |
6/17/1992 |
|
Description |
Took the girls with us to convention in Ireland. Toured western Ireland. |
|
Cost |
$2,000.00 |
|
Travel Agent |
Jorge Martinez, World Travel Inc, jmartinez@worldtravelinc.net |
|
Diary |
Arrived at Limerick airport. Rented a car. Hit the outside mirror on a dump
truck before we got out of the airport! They drive on the left in Ireland.
Terrifying!!
As we drove, we kept seeing old ruined castles and abbeys. Beautiful
scenery.
Took the girls to see the Blarney stone. They kissed it. You have to bend
over backwards!
Had dinner at a restored medieval castle. Low doors, small rooms. Stone
everywhere. Little furniture. They must not have had many clothes at all. |
Form View: Create Hyperlink with Display Text
- In the PhotoLink control, type Ireland. It
is formatted to look like a link, Ireland, but clicking
it won't take you anywhere. You need to edit the link.
- Right click on the PhotoLink control and
choose
and then . The Insert
Hyperlink dialog appears. It does
not matter what items show in the list of folders and files.
- Type or copy and paste the following URL into the Address box:
http://jegsworks.com/Lessons/images/trips/ireland/ireland.htm
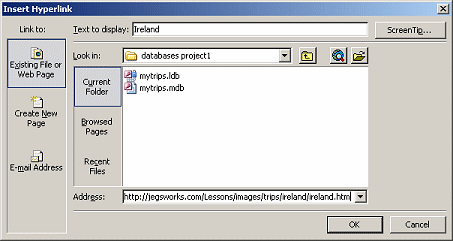
- Click on OK to close the dialog. The link Ireland looks the
same.
- Hover the mouse pointer over the link Ireland. A popup tip shows
the address that the link will take you to.

- Click in the Diary control and press
the TAB key. The form changes to the next record, which is a new blank record.
- Enter the data below for yet another trip record.
|
TripName |
Italy |
|
PhotoLink |
Use Italy as the Display Text
Edit the hyperlink to use the URL below:
http://jegsworks.com/Lessons/images/trips/italy/italy.htm |
|
DateStarted |
5/11/2001 |
|
DateEnded |
5/21/2001 |
|
Description |
Toured Rome and Pompeii and Venice. |
|
Cost |
$6000.00 |
|
Travel Agent |
Hector Chavez, World Travel Inc, hchavez@worldtravelinc.net |
|
Diary |
Saw the Trivi Fountain, ate gelato (ice cream). Toured St. Peter's Basilica
and the Sistene Chapel. Huge! Gorgeous now that most parts are restored.
Pompeii was covered in volcanic ash for centuries. Many buildings have been
excavated. Painted murals and mosaics abound.
Venice has waterways for streets. Many tiny ones. Water taxis and gondolas.
Did not ride a gondola. The water taxis are faster! |
Most people find that it is easier to enter data on a form than directly in a
datasheet. What do you think?
Form View: Edit Record
Everyone makes mistakes when entering new records. Fingers do their own thing
sometimes. Even after you have carefully entered the information, it can be
wrong one day. People get new phone numbers or move. Postal codes and telephone
area codes change. At least it is easy enough to edit an existing record.
- If necessary, switch to the record of the Italy trip.
If you typed the information for the records accurately, you have a
spelling error.
- In the Diary memo field, click in the word "Trivi" between the r
and the i.
- Press the Delete key to remove the i.
- Now type an e, so that the word
reads Trevi.
There are likely more errors in more records. Spell Check is a big help!
- Click on
 the Spell
Check button. the Spell
Check button.
A dialog opens which will look for errors in all of the records.
-
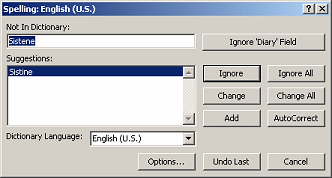 Correct
all errors, including changing "Sistene" to Sistine
. Correct
all errors, including changing "Sistene" to Sistine
.
There are a number of corrections to make, if you typed what you were told to
type before. Yes, there were deliberate errors included!!
Some "errors" are not really errors, including "Saxman" and "cel".
Form View: Select Record
The record selector is much taller than in a datasheet since the fields are
now arranged vertically instead of in a row.
- Switch to record #4, the Family reunion.
-
 Click
on the Record Selector, the tall gray bar at the left of the form. The
bar turns black, indicating that the whole record is selected. Click
on the Record Selector, the tall gray bar at the left of the form. The
bar turns black, indicating that the whole record is selected.
 Be
careful what you do while a record is selected! Deleting a record cannot be
undone. Be
careful what you do while a record is selected! Deleting a record cannot be
undone.
Form View: Copy/Paste Record
The only reason to select a record is to do something with it! Deleting is
easy. Just press the DELETE key. Copying and pasting are easy, but you must
paste to the right kind of place - another table with the correct fields in the
same order or to a blank document in another program, like a spreadsheet. Copy
and paste is often the easiest way to move a small number of records between
programs.
- Use the key combo CTRL + C to copy the record.
-
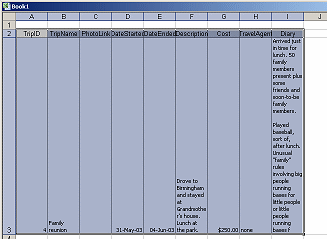 Open
Excel or another spreadsheet program, click in the first cell at the top and paste with the
key combo CTRL + V. Open
Excel or another spreadsheet program, click in the first cell at the top and paste with the
key combo CTRL + V.
Quite a mess but easy to fix. The columns are all the same width so the memo
fields make the row very tall.
- Close Excel without saving.
- Click somewhere in the background of the Trips form to deselect the record.
Form Design View: Select/Move Control
AutoForm has the controls and their labels neatly lined up in a single
column. What if you want two columns or you don't want so much space between
the label and the control? What if you delete a control and have a lot of blank
space? You can move the controls and labels around to suit yourself!
A control and its label normally move together, but
you can move them separately... if you grab the correct handle.
- Click on
the
Views button, which currently shows the Design View icon.
The Forms Design View opens. The window is the same size as the Form View
window.
Each control in this form is a text box containing a field. In other forms
a control might be calculated.
There
are many kinds of controls. Each type has a default size that you may want
to change.
Each control has a label to its left. By default the label is
the name of the field.
The Form Design View does not show actual data. You will have to guess
about the new widths that you want!
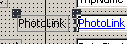
-
 Click
on the control for PhotoLink (the text box where
you would enter data). Click
on the control for PhotoLink (the text box where
you would enter data).
Handles appear at the corners and middles of each side.
The upper left corner of the text box and of its label each have a larger
square box handle. The text box is the item that is selected. The label is
along for the ride this time.
-
 Move
the control and NOT the label: Move
the control and NOT the label:
Move
the mouse pointer until it is over the large handle on the PhotoLink text box.
The pointer changes to
 a pointing hand.
- Drag to the right but do not release the mouse button.
An outline of the text box shifts as you drag to show you where it will be if
you let go of the mouse to drop the box. The label did NOT move!
- Press the ESC key. The text box returns to its original
location.
Problem: You
accidentally moved the control.
If you released the mouse button while dragging, then the box actually moved to the new
location. Solution: Click the Undo button to return it to the original location.
-
 Move
both the control AND its label with mouse: Move
both the control AND its label with mouse:
Move
the mouse pointer until it is over the bottom edge of the PhotoLink text box.
The pointer shape changes to
 the open hand shape.
- Drag to the right again. The text box AND its label move as
you drag.
- Press the ESC key to return the control to its original
location.
- Move
both the control AND its label with keyboard:
While the control is selected, press an arrow key on
the keyboard. The control and its label move!
Practice with these keys but for less than 20 moves.
Undo only remembers 20
actions. Each time you press an arrow key counts as a separate action in the
Undo list. They add up to 20 quickly!
How far the control moves with
the arrow keys:
If Snap to Grid is on, then the control moves to the next grid position.
If it is off, the control moves one pixel. (A pixel is the smallest dot on a
screen.)
- Click on
 the Undo
button to return the label to its original location. the Undo
button to return the label to its original location.
Problem: Undo
does not get the control back to the original position
You have done more than 20 actions.
Solution: You will have to position the control yourself by dragging or
with the arrow keys.
-
 Move
the label and not the text box: Move
the label and not the text box:
Move the mouse pointer until it is over the large handle on the label. The
pointer changes to
a pointing hand.
-
 Drag
to the right until the label is next to the PhotoLink text box and
drop. Drag
to the right until the label is next to the PhotoLink text box and
drop.
- Click on
the Undo
button to return the label to its original location.
Form Design View: Change Size of Control
You probably noticed that the TripID text box is
much wider than necessary.
Changing the width is an easy adjustment in Form Design View. We will wait on
anything fancier for a later lesson.
- Resize the text box:
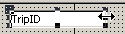 Move the mouse pointer over the handle in the middle of the right
side of the text box. The pointer changes to Move the mouse pointer over the handle in the middle of the right
side of the text box. The pointer changes to
 the Horizontal Resize shape.
-
 Drag to the
left until the right edge of the text box is at the 1.75 mark on the
ruler. Drag to the
left until the right edge of the text box is at the 1.75 mark on the
ruler.
- Release the mouse button. The text box resizes. TaDa!
-
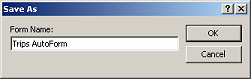  Click on Click on
 the Save button.
Since the form has not been saved yet, a Save As dialog appears. the Save button.
Since the form has not been saved yet, a Save As dialog appears.
- Type Trips AutoForm as the form's name
and click on OK.
This Save As dialog is not like
the one you use in programs like Word and Excel. That is because you
are saving your form inside the database file, not as a separate file.
-
 Click on
the
Views button, which currently shows the Forms icon, to return to Form
View. Click on
the
Views button, which currently shows the Forms icon, to return to Form
View.
The form shows the new size for the TripID control.
It should be wide enough for a lifetime of trips!
- Return to Design View and experiment with moving and
resizing the controls. Can you come up with a better arrangement of the
fields?
- Save the
form with a new name and close it.
|