 |
When a program cannot view
Access database tables/queries directly, you can share data by
exporting it from Access. You must choose
another file format that both understand, like csv (comma separated
values), which is a text format, or perhaps one of the
dbf formats.
|
 |

Where you are:
JegsWorks >
Lessons >
Databases
Before
you start...
Project 1: Intro
Project 2: Access Basics
Project 3: Tables & Queries Project 4: Forms & Reports

Import/Export/Link

 Import
Spreadsheet Import
Spreadsheet
 Import
Text File Import
Text File
 Import
Access Objects Import
Access Objects
 Link Link
 Export
from Access Export
from Access
Designing Forms
Designing Reports
Special Forms & Reports
Summary
Quiz
Exercises
Search
Glossary
Appendix
|
|
What You Can Export
- A complete table with its data
- Just the structure of a table
- Results of a query, form, or report as a datasheet.
- Database objects, including forms and reports, to another Access
database.
Methods of Exporting
There are a number of ways to get data out of Access into a form that
another program can use.
- Make-Table query:
Choose to create the table in another Access database instead of the
current one. The database must already exist.
- Menu:
Select object to export. | Select the file type and file name of the destination file- another Access database,
another kind of database, a spreadsheet, or a text format. A database must
already exist before you can export to it.
Exporting a form or report to another Access database just puts a copy of
the design in the database. Exporting a form or report to a text or spreadsheet format will
copy the data shown by the form or report.
Using the command | will also export your object
as an attachment. You must have an email account like Outlook that can
handle MAPI mail to use this feature.
- Publish It with Word:
Select the object in the Database Window
or select part of a datasheet. From the menu select | | . A Word document is created and
opened.
Tables and datasheets are often far too wide to fit onto the paper,
so this command is not likely to be useful for a them. Forms and
reports often export quite neatly to Word.
- Analyze It with Excel:
Select the object in the Database Window
or select part of a datasheet. From the menu select ||. An Excel document is created and
opened.
- Copy and Paste:
Select data in a datasheet. Copy. Switch to
your destination file and paste.
 |
Step-by-Step: Export Table from Access |
 |
|
What you will learn: |
to export as text file
to export as spreadsheet file
to export to another Access database |
Start with:
 ,
resource files,
worldtravel.mdb ,
resource files,
worldtravel.mdb
World Travel Inc. needs to share its Staff
table with some of its offices that have not yet started using Access.
The table needs to exported as a comma-delimited text file (csv)
and also as an Excel spreadsheet (xls) since
different offices have been using different software. (It is a BAD PLAN
for different parts of a company to use different software, but is not
unusual in the real world!)
Once you have other kinds of objects in Access, you can export them
similarly.
Export Table as Text File
- If necessary, open the database
worldtravel.mdb which you created earlier and have been
modifying.
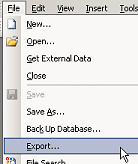 Select
the table Staff in the Database Window. Select
the table Staff in the Database Window.
- From the menu select |.
The Export dialog appears.
 Problem:
The command Export is grayed out (not available) Problem:
The command Export is grayed out (not available)
You did not select an object to export in the Database Window.
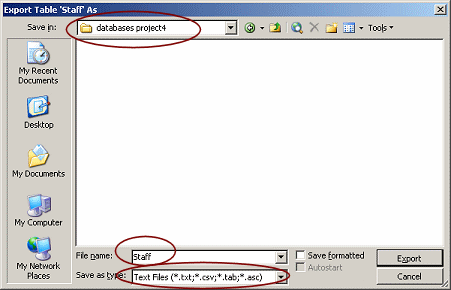 Navigate,
if necessary, to the folder databases project4
on your Class disk. Navigate,
if necessary, to the folder databases project4
on your Class disk.
The File name box should say "Staff" and the Title bar should read
"Export Table 'Staff' As".
 Problem:
File name is not Staff Problem:
File name is not Staff
You did not select the Staff table in the Database Window.
Solution: Close this dialog and start over.
- Change the "Save as type" box to Text Files.
- Click on the Export button.
The Export Text Wizard appears. You will have to make several choices,
like you did in the Import Text Wizard.
-
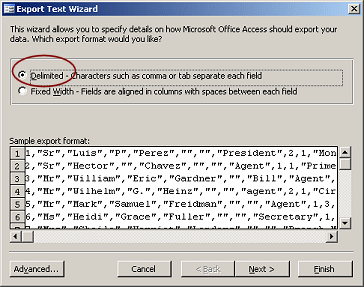 In
step 1, choose Delimited, which is the default choice.. In
step 1, choose Delimited, which is the default choice..
- Click on Next.
-
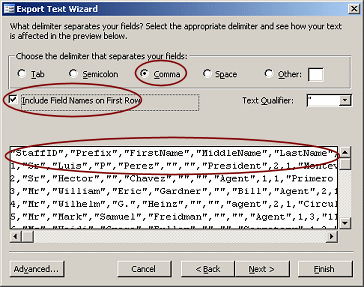 In
step 2, select Comma as the delimiter and check the
box for Field Names on First Row. In
step 2, select Comma as the delimiter and check the
box for Field Names on First Row.
- Click on Next.
-
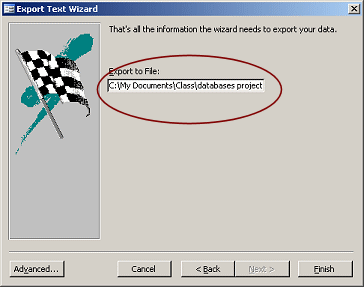 In
step 3, verify the path to where the wizard is going to save the
file. It should be on your Class disk in the folder for databases
project4. (Your path may be different from the illustration.) In
step 3, verify the path to where the wizard is going to save the
file. It should be on your Class disk in the folder for databases
project4. (Your path may be different from the illustration.)
- Click on Finish.
A message appears when the export is done.

- Click on OK. The box closes and you are back in the
Database Window.
Export as Spreadsheet
- In the Database Window, again select the table
Staff.
The Export dialog appears.
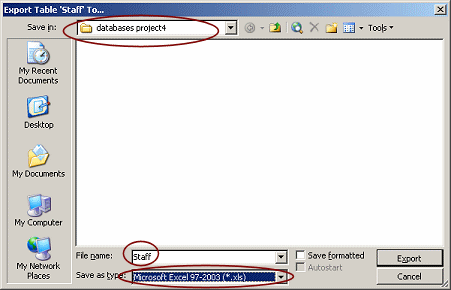 If
necessary, navigate to your Class disk to the folder
databases project4. If
necessary, navigate to your Class disk to the folder
databases project4.
- Change the "Save as type" box to Microsoft Excel 97-2003
(*.xls).
 Know
which software version will be used: Know
which software version will be used:
Versions of Excel before 97 will not be able to open a file in the
format you just chose. Those are really old programs now, but
there are many old programs still in use. When in doubt, ASK the users!
- Click on the Export button.
This time no wizard is needed. Access quietly creates the file and
puts you back in the Database Window.
Verify Files
It is ALWAYS a good idea to make sure that the file you exported will
actually open the way you expect it to do! Of course you won't be able to
verify if you do not have the correct software to open the exported
data.
-
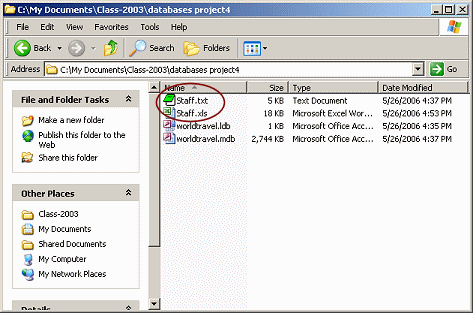 In
an Explorer window, navigate to your Class disk and open
the folder databases project4 where you just
saved the text and spreadsheet files. In
an Explorer window, navigate to your Class disk and open
the folder databases project4 where you just
saved the text and spreadsheet files.
 Temporary
file: This folder will have 3 or 4 files. The file
worldtravel.ldb is a temporary file that
appears only while the database worldtravel.mdb
is open. Temporary
file: This folder will have 3 or 4 files. The file
worldtravel.ldb is a temporary file that
appears only while the database worldtravel.mdb
is open.
-
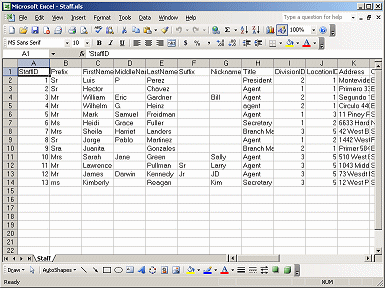 If
you have Excel installed on this computer, double-click on
the file Staff.xls. If
you have Excel installed on this computer, double-click on
the file Staff.xls.
The file opens in Excel. Scroll to make sure that all the columns were
exported correctly.
Success!
- Close Excel.
-
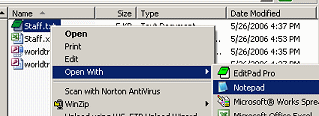 In
the Explorer window, right click on the file
Staff.txt and choose | from the popup menu. In
the Explorer window, right click on the file
Staff.txt and choose | from the popup menu.
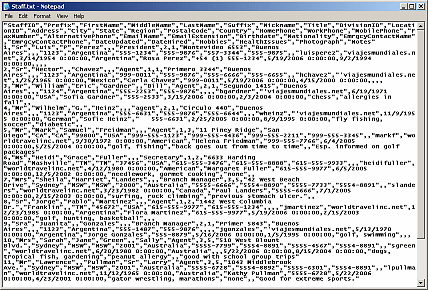
Notepad opens the text file. It's hard to know if this is all
correct, but at least we know that data was exported.
- Close Notepad.
|

