Switchboard Manager
 Access
provides a special tool, Switchboard Manager,
for creating and managing a switchboard form,
which can have several switchboard pages. This
is somewhat like the tab control for forms in that one object has several pages but only one page shows at a time. The example above has 3 pages
- Main Switchboard, Forms Switchboard, and Reports Switchboard. Access
provides a special tool, Switchboard Manager,
for creating and managing a switchboard form,
which can have several switchboard pages. This
is somewhat like the tab control for forms in that one object has several pages but only one page shows at a time. The example above has 3 pages
- Main Switchboard, Forms Switchboard, and Reports Switchboard.
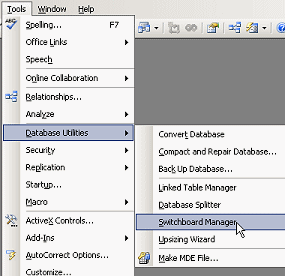
The command to open the Switchboard Manager is buried under
|.
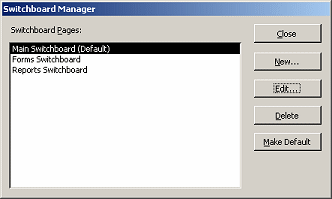 The
first window in the Switchboard Manager shows a list of existing
switchboard pages and has several buttons for actions you can perform on
these pages. The
first window in the Switchboard Manager shows a list of existing
switchboard pages and has several buttons for actions you can perform on
these pages.
- New: Opens a window for creating a new switchboard page
- Edit: Opens a window for making changes to the selected
switchboard page
- Delete: Deletes the selected switchboard page. This does not
remove buttons on other pages that open the switchboard that you are
deleting.
- Make Default: Picks which page shows when you open the
Switchboard form.
If you create several switchboard pages, you need to create an item on the main switchboard
page for each of them. You cannot
open the other switchboards any other way! All switchboard pages
are part of a single object, which just looks like separate
forms. Access is being tricky but helpful here!
Create a New Switchboard Page
 When
you click the New button on the Switchboard Manager, a dialog appears for
you to enter a name for the new switchboard page. The default name, New
Switchboard Page, is uninspiring! When
you click the New button on the Switchboard Manager, a dialog appears for
you to enter a name for the new switchboard page. The default name, New
Switchboard Page, is uninspiring!
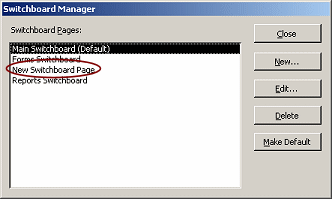 The
new page appears in the list in the Switchboard Manager. You are not
automatically sent to edit the blank switchboard page that you just
created! You must select the page and click on Edit so that you can add items to the new
page. The
new page appears in the list in the Switchboard Manager. You are not
automatically sent to edit the blank switchboard page that you just
created! You must select the page and click on Edit so that you can add items to the new
page.
You must also go to the default switchboard and create a button to open
your new switchboard page. Surprisingly, this is not done
automatically for you.
Add/Edit Items on a Switchboard Page
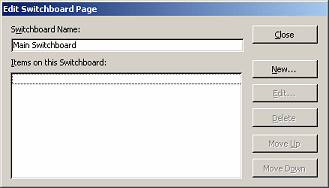
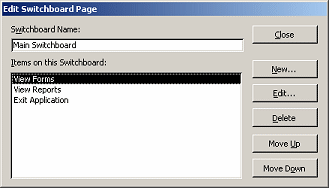 When
you select a switchboard page in the Switchboard Manager and click the
Edit button, the Edit Switchboard Page window opens.
This lists each of the items that are on the switchboard you are
editing. (It will be blank if you just created the switchboard.) When
you select a switchboard page in the Switchboard Manager and click the
Edit button, the Edit Switchboard Page window opens.
This lists each of the items that are on the switchboard you are
editing. (It will be blank if you just created the switchboard.)
Use the buttons to create new items, edit the existing ones, delete
items, and
rearrange the order of items (with the Move Up and Move Down buttons).
The Edit and New buttons open a different kind of window,
Edit Switchboard Item. There are three text boxes in this dialog.
 Text:
What you want to see beside the button in the switchboard window.
Be descriptive but short. Text:
What you want to see beside the button in the switchboard window.
Be descriptive but short.
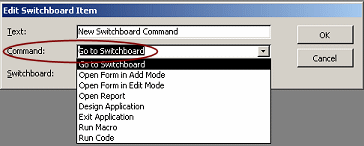 Command:
What should happen when the item is clicked. Command:
What should happen when the item is clicked.
There is a drop list of actions - Go to Switchboard, Open Form in
Add Mode,
Open Report, Exit Application, etc. If you can write a macro or code
segment, you can do more than just open an existing form or report. You
are limited only by your imagination and your coding skills!
Open Form in Add Mode opens the form directly to a blank form, ready for you to create
a new record.
 The
third text box provides the arguments for
the command that you chose. So it depends on what you selected as the command!
For example, if you choose Go to Switchboard, the third box is a drop
list of the switchboards in the database. The
third text box provides the arguments for
the command that you chose. So it depends on what you selected as the command!
For example, if you choose Go to Switchboard, the third box is a drop
list of the switchboards in the database.
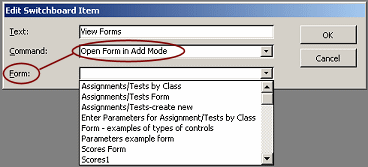 If
you choose Open Form in Add Mode or Open Form in Edit Mode, then the
third text box shows a list of forms in the database. If
you choose Open Form in Add Mode or Open Form in Edit Mode, then the
third text box shows a list of forms in the database.
 If
you choose Exit Application, there is no third box at all. That command
does not require any additional information. If
you choose Exit Application, there is no third box at all. That command
does not require any additional information.
 Changes
don't show after closing Switchboard Manager: Changes
don't show after closing Switchboard Manager:
Cause: The Switchboard form was open while you made changes.
Solution: Close and reopen the form or else switch to Form Design
View and back to Form View to refresh the window.
Table for Switchboard
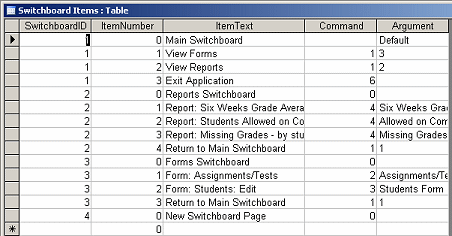 When
you create a switchboard form, Access automatically creates a new table
called Switchboard Items. This lists all of the items on all
of the switchboard pages. When
you create a switchboard form, Access automatically creates a new table
called Switchboard Items. This lists all of the items on all
of the switchboard pages.
Do not edit this table directly or delete it or rename it. You will
break your switchboard. Use the Switchboard Manager to make any changes.
- SwitchboardID: Identifies which
switchboard page the item is on.
- ItemNumber: Sets the order of items on the page,
where 0 is the item number of the page itself.
- ItemText: What shows in the title bar of
a page or
beside the action button on the page.
- Command: A code for the action that you
selected in the Command text box.
- Argument: A code or name of the object
that you selected in
the third text box of the Edit Switchboard Item dialog. Value is blank if
there is no argument required.
Switchboard at Startup
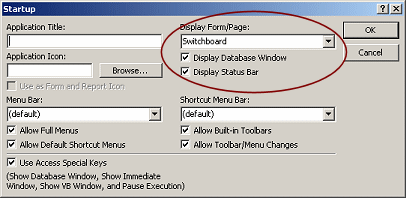 If
you create a database with the Database Wizard using a database template, a switchboard is
automatically created that will open whenever the database opens. If
you create a database with the Database Wizard using a database template, a switchboard is
automatically created that will open whenever the database opens.
If you use the Switchboard Manager to create your switchboard, you must
tell Access if you want the switchboard to open when the database
opens.
|
opens the Startup dialog. Set Display Form/Page to your switchboard.
Notice that you can choose to not show the Database Window or the
Status Bar. You would make those choices only if your users are not allowed to make changes to the database objects nor
to create new
objects.
Switchboard Design View
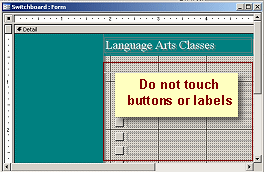 Cannot
edit: You cannot edit the buttons or the button labels on a
switchboard in Form Design View. That must be done from the Switchboard
Manager. You cannot format the label text. Cannot
edit: You cannot edit the buttons or the button labels on a
switchboard in Form Design View. That must be done from the Switchboard
Manager. You cannot format the label text.
 If you try to edit a
label beside a button, the label will vanish. When you try to
switch to Form View or to open the form after saving it, you will get an
error message and the form will not open! If you have not yet saved, you
should close the form without saving changes. You will lose any
changes, of course, but at least you will not have to reconstruct the
whole form. If you already saved the form with this error, you must
reconstruct the form from Switchboard Manager. It is not at all obvious
which button is which since no labels are visible. If you try to edit a
label beside a button, the label will vanish. When you try to
switch to Form View or to open the form after saving it, you will get an
error message and the form will not open! If you have not yet saved, you
should close the form without saving changes. You will lose any
changes, of course, but at least you will not have to reconstruct the
whole form. If you already saved the form with this error, you must
reconstruct the form from Switchboard Manager. It is not at all obvious
which button is which since no labels are visible.
Can edit: You can change the properties for the Detail
section and the text above the section with the buttons. You can add
other text boxes or shapes or pictures as you wish. They will show in all
switchboard pages.
The default switchboard form is more complex than it may look at first.
The teal color on the left side of the form is actually a picture. Across
the top is a rectangle shape with a background color that matches the
picture. The dark gray bar between the teal and light gray sections is
another colored rectangle. The gray section with buttons is all that is
showing of the underlying Detail section.
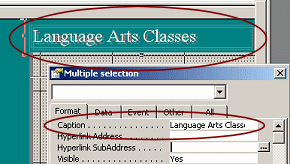 The
text above the buttons, Language Arts Classes, is in the Caption property
for the text box, which is actually a grouped object. The group
includes a label for white text and one for the gray shadow text. So now
you know a trick for creating your own shadowed text! The
text above the buttons, Language Arts Classes, is in the Caption property
for the text box, which is actually a grouped object. The group
includes a label for white text and one for the gray shadow text. So now
you know a trick for creating your own shadowed text!
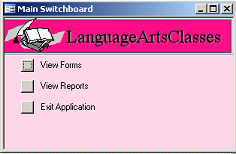 You
can change a lot in the Form Design View. You can change colors, add
pictures, move the buttons and labels. Just don't try to edit those buttons
and labels! You
can change a lot in the Form Design View. You can change colors, add
pictures, move the buttons and labels. Just don't try to edit those buttons
and labels!
 |
Step-by-Step: Switchboard Form |
 |
|
What you will learn: |
to create a switchboard
to inspect how a switchboard works |
Start with:
 ,
resource files,
worldtravel.mdb from the previous lesson ,
resource files,
worldtravel.mdb from the previous lesson
Now that you have several forms and reports, you can create a
switchboard form for the items that you expect to use the most often.
Create a Switchboard
-
 From
the menu select
|| From
the menu select
||
Since this database does not have any switchboards yet, you see a
message offering to create one.

- Click on Yes.
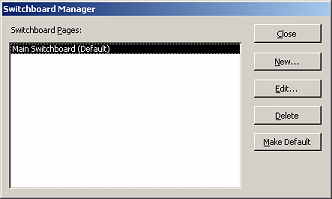 The
Switchboard Manager appears with one switchboard showing,
Main, which is the default. The
Switchboard Manager appears with one switchboard showing,
Main, which is the default.
You are ready to add some items to the switchboard.
Edit Main Switchboard
The New... button in the current window is for creating additional switchboard
pages. To add items to the switchboard you just created, you must
use the Edit button.
-
 Click
on the Edit... button. Click
on the Edit... button.
The Edit Switchboard Page dialog appears.
In this dialog, the New... and Close buttons are the only buttons available,
until you actually add some items to the switchboard.
-
 Click
on New... Click
on New...
The dialog Edit Switchboard Item appears with default choices.
-
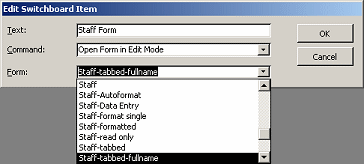 For
Text, type Staff Form. For
Text, type Staff Form.
- For Command, choose Open Form in Edit Mode.
- For Form, select Staff-tabbed-fullname.
- Click on OK.
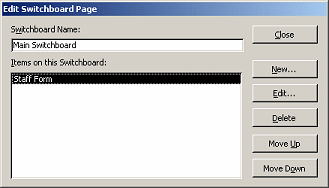 The Edit Switchboard Page dialog now shows your new item. The Edit Switchboard Page dialog now shows your new item.
- Click on New... again.
-
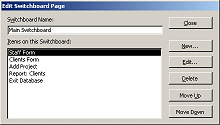 Create
the following new items Create
the following new items
- Text = Clients Form
- Open Form in Edit Mode
-
Clients-header
- Text = Add Project
- Open Form in Add Mode
-
Projects Form
- Text = Report: Clients
- Open Report
-
Clients - country totals
- Text = Exit Database
- Click on Close and on Close again, to close
all of the switchboard windows.
-
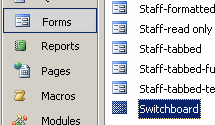 In
the Database Window, show the list of Forms. In
the Database Window, show the list of Forms.
- Double-click the new form Switchboard.
The new switchboard opens with your choices as buttons.
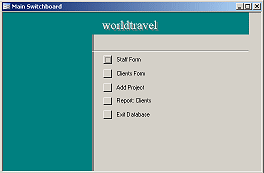
- Starting from the top of the list, click each of the
buttons to be sure that they do what you expect. Verify that it was what
you meant to choose. Close the window and click the next button.
Be warned - the last choice, Exit Database, will close the
database. Access will remain open, with no database showing. This is
useful only if you plan to open another database right away!
- Reopen the database.
(Hint: File | most recently used files list at the bottom of the menu)
The switchboard does not open automatically! You have to tell
Access that you want that to happen.
Switchboard Loads at Startup
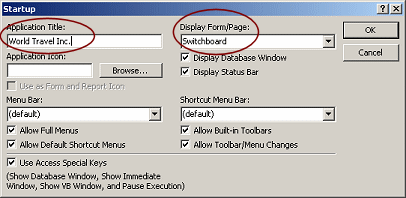
Since you created your switchboard with the Switchboard Manager, you
must tell Access to open it when the database opens. That choice is in a
special dialog, Startup.
-
 From
the menu select |
. From
the menu select |
.
The Startup dialog appears.
- In the box Display Form/Report, choose Switchboard
from the drop list.
- While you are here, for Application Title, type World Travel
Inc.
- Click on OK.
- Close the database and reopen it.
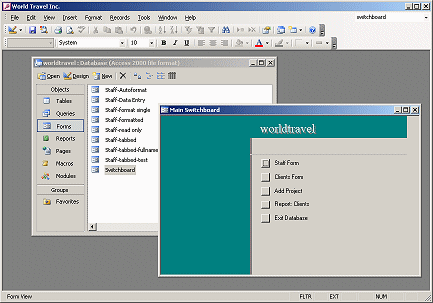
This time the switchboard opens automatically and the application's
title bar shows your new title. The Database Window still shows the
file name, worldtravel.
Form Design View: Switchboard
If you do not like what you see in the Switchboard, you can do some
editing in Form Design View. But you must be very careful or you can
break the form. The text on the form is safe to edit. You cannot edit the buttons or the button labels on a
switchboard in Form Design View. That must be done from the Switchboard
Manager. You cannot format the label text.
-
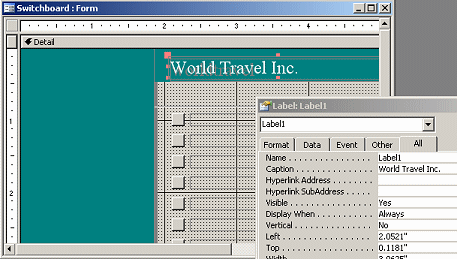 Switch to
Form Design View for the Switchboard form. Switch to
Form Design View for the Switchboard form.
- Click on the text box containing the text worldtravel.
- In the Properties dialog, change the Caption property
to read World Travel Inc.
If you try to edit directly in the text box, the whole box turns white
and your white text is invisible!
- Click out to another text box to accept the change.
 Save
your form and close it. Save
your form and close it.
| 
