 |
A subreport
is similar in most ways to a subform. The same methods for creating and
managing apply, for the most part.
A subreport cannot be put on a form but a subform can go
onto a report.
Combining reports: An unbound report can be a container for two or more
subreports, which do not have to be related to each other at all.
A report that is bound to a table or query can include
one or more subreports that are bound to the same table/query or to a
related table/query. Such subreports can be put into the Detail section,
Group Header/Footer, or Report Header/Footer. Subreports cannot go into
the Page Header/Footer.
Nesting: As with subforms, a report can contain subreports or
subforms which are nested up to 7 levels deep. There is no limit on the
number of subreports or subforms that are not nested.
|
 |

Where you are:
JegsWorks >
Lessons >
Databases
Before you start...
Project 1: Intro
Project 2: Access Basics
Project 3: Tables & Queries
Project 4: Forms & Reports

Import/Export/Link
Designing Forms
Designing Reports
Special Forms & Reports

 Switchboard
Form Switchboard
Form
 Custom
Dialog Custom
Dialog
 Label Wizard Label Wizard
 Chart
Wizard Chart
Wizard
 Multiple Columns Multiple Columns
Subform/Subreport
 Subforms Subforms
 Subreports Subreports
Summary
Quiz
Exercises
Search
Glossary
Appendix
|
|
Creating a Subreport
You can create a subreport by
dragging an existing table, query, or form and dropping it onto the main
report. Or you can use the Subform/Subreport tool from the Toolbox bar. The
Subreport Wizard will open in either case and
take you through a few choices to create a new report. The wizard automatically
adds it to the list of
Reports in the Database Window. You can open the new report (your
subreport) and make changes,
just like any other report.
Common
Problems with Subreports
 Problem:
Subreport is too wide and is cut off at the right. Problem:
Subreport is too wide and is cut off at the right.
A subreport is actually a report itself and has its own
properties, such as width. The control that is showing the
subreport can have a different width!
Solution: Change with width of the control that displays the
subreport. If there is not enough room in the report, you will have to
edit the subreport to fit in the available space. Be careful to notice
whether you are changing properties for the control or for the subreport
by checking the title of the Properties dialog.
 Problem: Data in subreport not synchronized with
main report. All data shows instead. Problem: Data in subreport not synchronized with
main report. All data shows instead.
The properties Link Child Fields and Link Master Fields are what link
a subreport to the report.
Check the following for the Link Child Fields
and Link Master Fields properties:
-
Correct field names, spelled correctly.
-
Fields are in the record source.
(They do not have to appear on the subreport or report but they MUST
be in the sources.)
-
Use the actual field names and not the names of
the controls on the report and subreport, which can be different.
-
Data types for the fields are the same or
are compatible.
A common source of trouble - An
AutoNumber field is only compatible with a Number field whose
FieldSize property is set to Long
Integer.
 Problem: Column headings in subreport don't show Problem: Column headings in subreport don't show
Subreports don't display page header or footer. If you put your
column labels in the Page Header as is common, they won't show in a
subreport.
Solution: A subreport's Report Header/Footer
do show, so you could put the column labels in the report's Header, IF
you think the whole subreport will fit on one page. If not, use a Group
Header in the subreport for the labels with the
RepeatSection property of the group header to Yes.
 Problem: Only one column in the subreport instead of
the number planned Problem: Only one column in the subreport instead of
the number planned
This problem occurs when you made two particular choices:
- In the subreport, the Column Layout property is
set to Down, Then Across on the Columns
tab in the Page Setup dialog box
AND
- In the main report, the CanGrow property is set to
Yes for the subreport control.
Logically, this combination of properties lets the
subreport control continue to grow in height. There is never a reason to
move over to another column!
Possible Solutions:
- Change column direction: In the subreport, change
Column Layout to Across, Then Down
and, on the main report, leave the CanGrow property
set to Yes for the subreport control. The subreport
control will display multiple columns and expand as needed.
Disadvantage:
You may
not like having the records go across first.
- Don't let control grow: In the subreport, leave
Column Layout set to Down, Then Across.
On the main report, size the subreport control to fit the maximum
number of records, and set its CanGrow property to
No.
Disadvantage: If the number of records is greater than
the maximum number you anticipated, records that don't fit in the
subreport control will be truncated.
- Rethink the report: Instead of using a subreport, perhaps
you could put the controls that print the data in the main report in a
group header and
put the controls that print the data in the subreport in the detail
section.
 |
Step-by-Step: Subreports |
 |
|
What you will learn: |
to add a subreport using drag-and-drop
to add a subreport to report's Detail
to hide duplicate records
to remove unwanted white space with Can Shrink |
Start with:
 ,
resource files,
worldtravel.mdb from the previous lesson ,
resource files,
worldtravel.mdb from the previous lesson
Create a Subreport with Drag-and-Drop
You will use two reports that you created earlier. One will be the main
report and another will be the subreport.
-
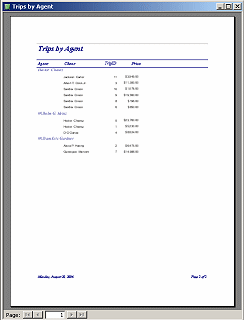 Open
the report Trips by Agent, which you
created in a previous lesson. (This
is the first version of the report. You saved several versions of
this while working on totals.) Open
the report Trips by Agent, which you
created in a previous lesson. (This
is the first version of the report. You saved several versions of
this while working on totals.)
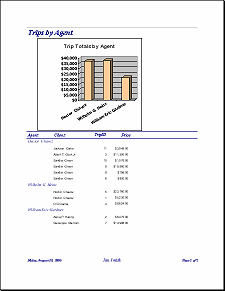
This report shows the agents with a list of their clients and the cost
of each trip.
- Switch to Report Design View.
Recall that the window size depends on which view you opened first. You
can resize as necessary.
-
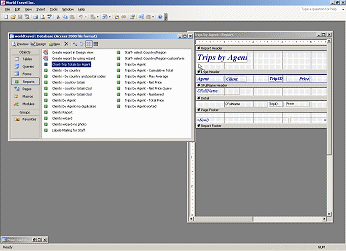 Adjust
the window size and position as necessary to see both the Database
Window and the Report Header of the report. Adjust
the window size and position as necessary to see both the Database
Window and the Report Header of the report.
-
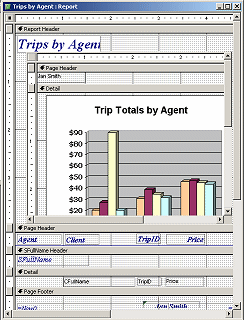 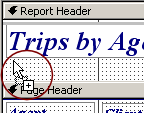 Drag
the report Chart-Trip Totals by Agent
from the Database Window over to the report. The mouse pointer changes. Drag
the report Chart-Trip Totals by Agent
from the Database Window over to the report. The mouse pointer changes.
You created this report in the lesson on
charts.
- Drop it below the title label in the Report Header.
The header section automatically enlarges to hold the report.
- Select the label for the new control and delete it.
- Add a label to the center of the Page Footer and
type your name in it.
- Switch to Print Preview.
Wow!
 Problem: Chart does not
completely show Problem: Chart does not
completely show
If you drop too far from the left edge, the width of the subreport
may run past the width of the report. That will cut off part of the
subreport.
Solution: Delete the subreport and try again.
 Save
the report as Trips by Agent - with Chart Save
the report as Trips by Agent - with Chart
 Print. (There should be only 1 page.)
 Problem:
Report uses 2 pages Problem:
Report uses 2 pages
Solution:
Resize the chart to be shorter until the whole report fits on 1
page.
Create Agent Report
You will create a new report and a new subreport.
The previous lesson on subforms left us with an awkward listing of clients on the
Agent Form. A client showed up once for each trip. The duplication of names cannot be
resolved easily for a form, but it can be fixed in a report. But first
you will have to create the report!
-
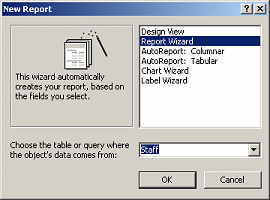 Start a new report
with the Report Wizard Start a new report
with the Report Wizard
(New Object | Report Wizard)
- Select the table Staff.
-
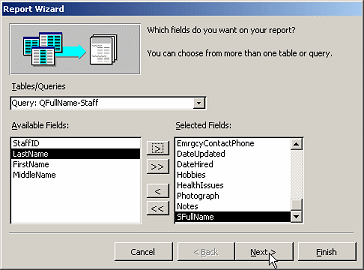 In
the first page of the wizard, select all of the fields in
the Staff table to be in the new report. In
the first page of the wizard, select all of the fields in
the Staff table to be in the new report.
- From the query QFullname-Staff,
select the field SFullName.
- Click on Next.
- No groupings are needed, so click on Next.
- Sort Ascending on LastName,
FirstName, MiddleName.
- Click on Next.
-
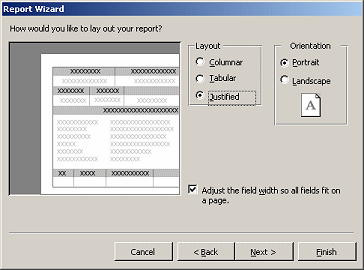 For
report layout, select Justified. For
report layout, select Justified.
- Click on Next.
-
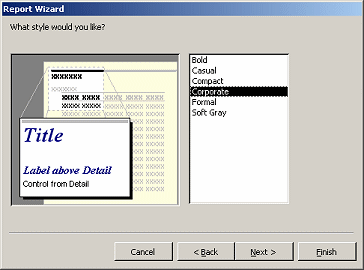 For
style select Corporate. For
style select Corporate.
- Click on Next.
- For the name of the report, type Agent
Info.
- Click on Finish.
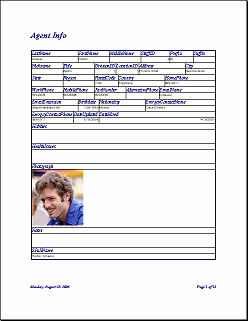
The report opens in Print Preview. View each of the records.
This report style is not very pretty. It duplicates the look of many
paper forms, so it has its uses, I suppose. What makes it useful right
now is the blank area toward the bottom. Looks like a good spot for a
subreport.
Change Report Source
The page footer of the report shows that there are 13 pages. Some of
these staff members are not agents! You need to restrict the records by
changing the record source.
- Switch to Report Design View.
- If necessary, open the Properties dialog to the
report's properties.
The Record Source shows a SQL statement.
-
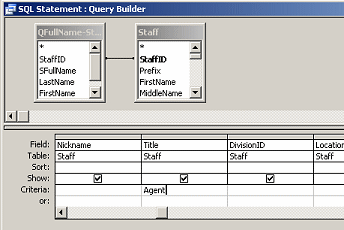 Click
in the Record Source property and then on the ellipsis
button that appear. Click
in the Record Source property and then on the ellipsis
button that appear.
The Query Builder opens, showing the query the the wizard created as the
source.
- Scroll to the Title column.
- Type in the Criteria row under Title the text
Agent.
- Close the Query Builder by clicking its Close button,
choosing Yes to the message box about saving changes.
You are returned to Report Design View.
- Switch to Print Preview.
The report footer now says that there are 8 records.
- Navigate through the records and check the Title values.
All should show Agent now.
 Save
the report. (Agent Info) Save
the report. (Agent Info)
Edit Report Design
The full name for the agent wound up at the bottom of the page. It
would make more sense for it to be above all the other controls. This
AutoFormat does not make it easy to move things around, but you can do
it. You will have to move parts out of the way in order to select the
rest for moving.
- Switch back to Report Design View.
-
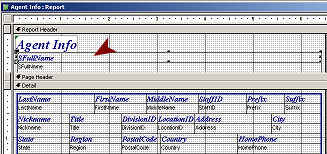 Click
on the control SFullName at the bottom of
the Detail section. Click
on the control SFullName at the bottom of
the Detail section.
- Drag the control and its label and drop them in the
Report Header, below the title.
This is just to get them out of the way for a moment.
- Use the key combo CTRL + A to select all of the controls on
the report.
- Hold the SHIFT key down and click on the controls in
the Report Header and Page Footer to remove them from the selection.
Now you should have only the controls in the Detail section selected.
-
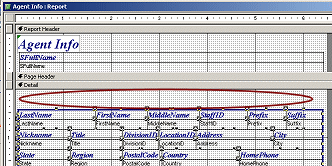 Move
your mouse over the selected controls until the mouse pointer
turns to the open hand shape Move
your mouse over the selected controls until the mouse pointer
turns to the open hand shape
 . .
- Drag down about a half inch and drop.
You created some empty space at the top.
-
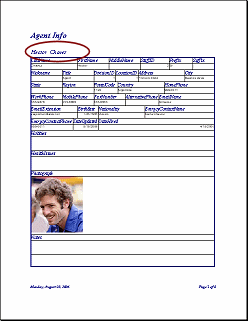 Drag
the SFullName control down from the Report
Header and drop it in the empty space at the top of the Detail
section. Drag
the SFullName control down from the Report
Header and drop it in the empty space at the top of the Detail
section.
- Delete the label.
- Format the SFullName control
using the toolbar and Properties dialog:
Color: Navy
Italics
Font Size: 14pt
Border Style: Transparent
- Switch to Print Preview.
Now you are ready to add a subreport to the blank area beside the
photo.
 Save
the report. (Agent Info) Save
the report. (Agent Info)
Create Subreport with Subform/Subreport Tool
You do not have to have a report already created to put a subreport
into your report. When you use the Subform/Subreport Tool from the
Toolbox bar, the Subreport wizard will appear.
- Switch to Report Design View.
-
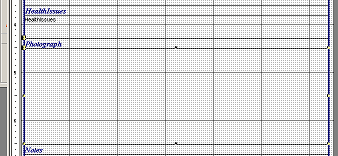 Click
below the label Photograph. Click
below the label Photograph.
That's where the Photograph control
should be, though it is not clearly showing.
Whoops! Look at where the handles are. The control runs all the way
across the page!
We know that the photos are not that big. This width is coming from
your choice of the Justified layout. The memo fields are formatted
this way, too. It is not necessary for the photos.
- Drag the right edge of the
Photograph control to the left to about the 3" line on
the ruler.
- Click on the Subform/Subreport tool
 on the Toolbox bar.
- Drag in the white space to the right of the
Photograph control to create a new
subreport.
The subreport wizard opens.
- Select to use an existing Table/Query and click
on Next.
-
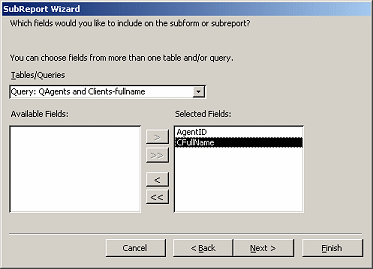 Select
the query QAgents and Clients-fullname. Select
the query QAgents and Clients-fullname.
- Select both fields and move them to the right.
- Click on Next.
-
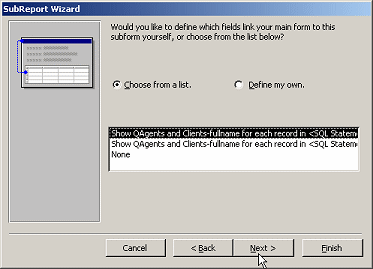 Accept
the default suggestion for how to link the report and subreport. Accept
the default suggestion for how to link the report and subreport.
Apparently there are two ways to link, but seem to be the same.
- Click on Next.
-
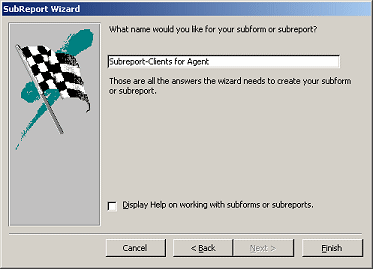 Enter
the name Subreport-Clients for Agent. Enter
the name Subreport-Clients for Agent.
- Click on Finish.
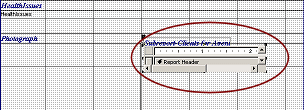
Access creates a very small subreport, no matter how large you
dragged the tool. The report is also added to the Database Window in
the Reports category.
-
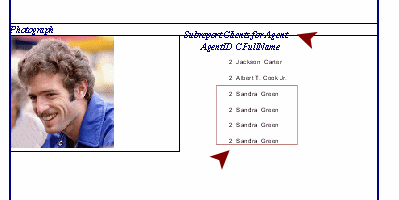 Switch
to Print Preview. Switch
to Print Preview.
- Navigate the records.
How well does the subreport work?
Depending on how you dragged, the label may be in a bad position.
You don't need the AgentID numbers, which will match the current
agent and you don't need the column labels.
The clients are still showing up multiple times if they booked
multiple trips.
This time you can fix that!
 Save the report. (Agent Info)
Hide Duplicates
Report controls have a property that form controls do not: Hide
Duplicates. When this property is set to Yes, duplicate entries will
not show. But... the entries must be sorted so that duplicates are next
to each other. Hiding the entry does not hide any extra white space above
or below the control in the Detail section. So you can get some
unexpected spacing if you are not careful. You will also need to set a
couple of things to allow shrinking.
- Switch to Report Design View.
- Select the subreport control.
-
 From the View menu, select From the View menu, select
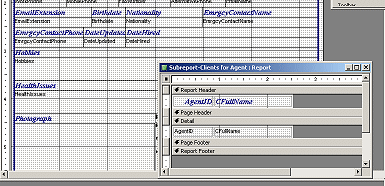 A new window appears but it is
about the same size and position as the subreport control. It can
be hard to tell that it is a new window. A new window appears but it is
about the same size and position as the subreport control. It can
be hard to tell that it is a new window.
- Resize the new window so you can see the design view
inside.
- Delete the two labels from the Report Header.
- Drag the bottom edge of the Report Header up to
meet the top edge.
Now the header will not show in the subreport.
-
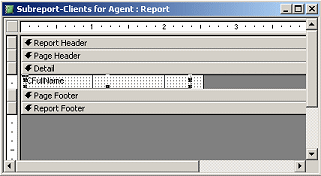 Delete
the AgentID control from the Detail
section. Delete
the AgentID control from the Detail
section.
- Move the CFullName control
to the left and enlarge it to the width of the report.
- Move the control up to the top of the Detail.
- Drag the bottom edge of the Detail up to meet the
bottom edge of the control.
This will avoid extra white space when you hide duplicates.
-
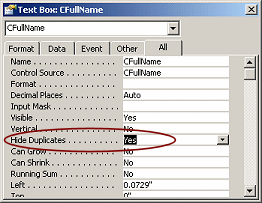 In
the Properties dialog for the control
CFullName, set the Hide Duplicates property to
Yes. In
the Properties dialog for the control
CFullName, set the Hide Duplicates property to
Yes.
-
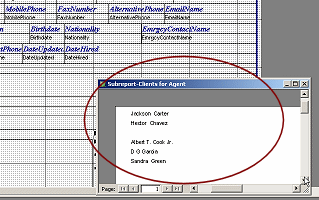 Switch
to Print Preview. Switch
to Print Preview.
Whoops. You were still in the subreport window. What a strange
and useless report this is all by itself!
- Close the subreport window and save your
changes when prompted.
The main report now shows a blank control for the subreport. This
is normal!
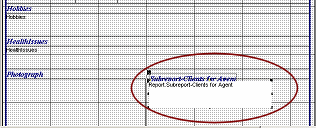
- Edit the label for the subreport to read just
Clients for Agent and align it with the
Photograph label.
The Photograph label also stretches across the whole page, like
the Photograph control did. You can overlap it with your
subreport's label. Not a problem.
-
 Switch
to Print Preview. Switch
to Print Preview.
Is this better?
Yes, but the record for Heinz shows a big gap between the two
clients. He had duplicate clients in the middle of the list.
There are two more properties that you should set.
Remove Unwanted White Space with Can Shrink
Both the control and the Detail section must be allowed to shrink to
get rid of the unwanted white space that shows up when duplicates are
hidden. So much to think of!
- Switch to Report Design View.
- Open the subform in a new window again.
- Select the control CFullName.
- In the Properties dialog for the control, set the
property Can Shrink to Yes.
- Select the Detail section and set its
Can Shrink property to Yes.
Now when a record is hidden, the Detail can shrink to zero!
- Close and save the subreport.
- Add a label to the Page footer and put your name
in it.
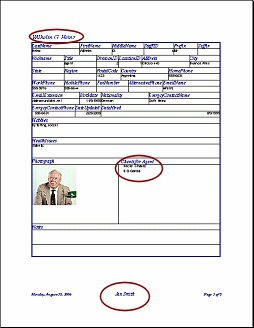
- Switch to Print Preview.
- Navigate the records.
Heinz looks much better now!
 Save the report. (Agent Info)
 Print page 5, the record for Wilhelm G. Heinz.
|

