
Working with Numbers
Intro: Select & Navigate: Range
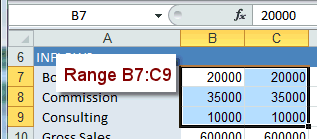
A range is a rectangle of cells. The normal form for the range reference lists the upper left cell first, then the lower right cell, like B7:C9 or b7:c9. (The column letters do not have to be capitalized.)
Range = upper left cell : lower right cell
Name Box shows
upper left only
To select more than one cell is not hard, if the cells are next to each other. Just drag over the cells that you want.
For cells and ranges that are scattered around (non-adjacent), you will need to use the CTRL key along with your mouse. The SHIFT key is a great help when you need to select large numbers of cells that are next to each other (adjacent).
Highlight Colors
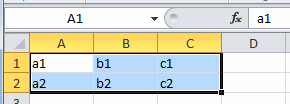
When you select more than one cell, Excel highlights all but the first cell in the selection. The highlight color combines with any existing colors. When you select cells that have a dark background, the highlighting can be very hard to see, but the column and row headers for the selection change also, which is easier to spot. You just have to remember to look! The border around the selected cells changes color. The border itself may not show well at the edges of the sheet, next to the headers.
|
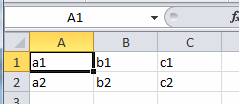
Original Cells |
Selected A1:C2 |
  |
 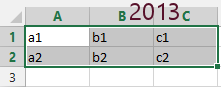 |
| Black text on white; border is thick |
Black text; colored background except upper left cell; border is thick |
|
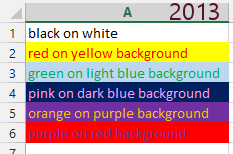
Original Cells
|
Selected A1:A4 |
  |
 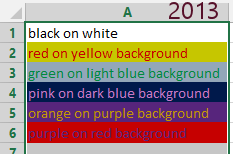 |
| Highlighting dims and darkens the
colors. Excel 2007 and 2010: Border color is pale over dark backgrounds and light over dark background. |
| |
Step-by-Step: Select Range |
|
| What you will learn: | to select a range of cells by - dragging keys range reference name to name a range to select non-adjacent cells to extend or reduce a selection |
Start with: ![]() budget-2010-Lastname-Firstname.xlsx from resource
files
budget-2010-Lastname-Firstname.xlsx from resource
files
You will not be saving any changes in this lesson but your instructor may want you to capture some screen shots to prove you did the lesson. Ask.
Select Range: Drag
It's easy to drag to select when the corners of the range are fairly close together.
-
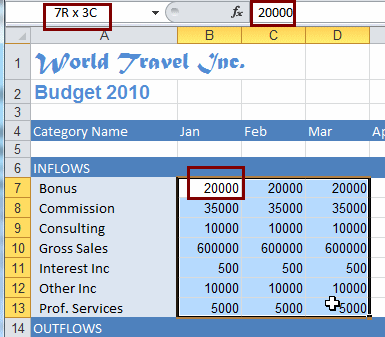 Drag from cell B7 to cell D13, the opposite corner of the range.
While you are dragging, the Name Box shows the number of rows and columns in your selection.When you release the mouse button, you have selected all the cells in range B7:D13. The Name Box shows B7 and the Formula Bar shows what is in cell B7 = 20000.
- Click on a cell outside the range to deselect the range.
-
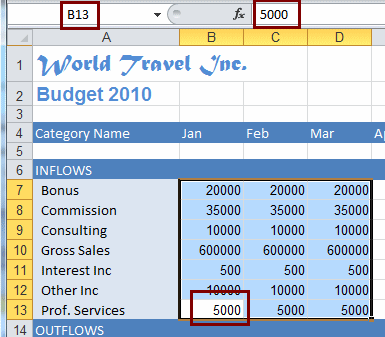 Drag from cell B13 to cell D7 (the other corners of the
range you selected before) and release the mouse button.
Drag from cell B13 to cell D7 (the other corners of the
range you selected before) and release the mouse button.
The same cells are selected but the Name Box shows B13 this time and the Formula Bar shows 5000, the contents of cell B13. B13 was your starting point.
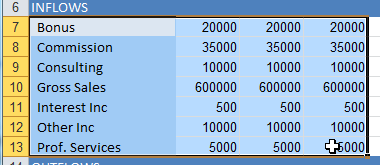
The row and column headings for the selected cells are colored to help you see what you are selecting. Once you release the mouse button, the Name Box will
always show just the cell reference of the cell you started with. The Formula bar shows the contents of
that cell the whole time.
Select Range: Keys
This technique is especially useful when the corners of the range are far apart. You do not have to select the upper left and then the lower right cell in the range. Either pair of diagonal corners in any order will do. However you select, the range reference is normally written as upper left: lower right.
-
 Select one corner of the range: cell A7.
- Hold the SHIFT key down and select the opposite corner, cell D13.
All cells are selected in the rectangle with these two cells as the corners.
- Click out of the range somewhere to de-select the range.
- Select cell A7 again.
- Hold the SHIFT key down and use the arrow keys to move to cell
D13. Then release the SHIFT key. The range A7:D13 is selected.
Select Range: Range Reference
When you know the cell references for the corners, the Name Box is even easier than dragging.
-
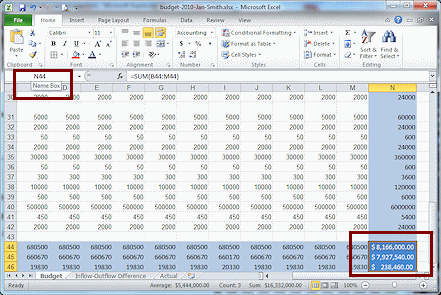 Click in the Name Box and type
the range reference n44:n46 and press ENTER.
Click in the Name Box and type
the range reference n44:n46 and press ENTER.
The display scrolls directly to the range and the cells are all selected.
Again the Name Box shows only the upper left cell of the range and the Formula Bar shows what is in that cell. In this case there is a formula in the cell.
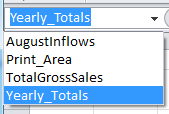
Select Range: Name
Cell references are hard to remember. Give a name to cells that you will be looking at often.
-
 If
necessary, select the range N44:N46.
If
necessary, select the range N44:N46.
- To name the selected range, click in the Name Box, type Yearly_Totals and press ENTER.
 Use an underscore in the name
when you want some space. Spaces are not allowed in cell or range names.
Use an underscore in the name
when you want some space. Spaces are not allowed in cell or range names.
- Return to cell A1. (Hint: Use CTRL + HOME)
- Open the drop list for the Name Box and select the name Yearly_Totals
You are returned to range N44:N46 and it is selected again. Success!
Select Cells/Ranges: Not Adjacent - CTRL key
A range is a set of adjacent cells. They are right next to each other. You can also select non-adjacent cells, ranges, or a combination. These are not next to each other. The CTRL key gives you the power to skip around with your selections.
-
 Select cell C4.
(Hint: Type the cell reference in the Name Box and press ENTER. This will avoid the long scroll from N44:N46.)
- Non-adjacent cells: Hold down the CTRL key and click on cells E4 and G4.
In some versions of Excel it is hard to tell that those cells in row 4 are part of the selection because the highlighting does not make a big difference with this background color.

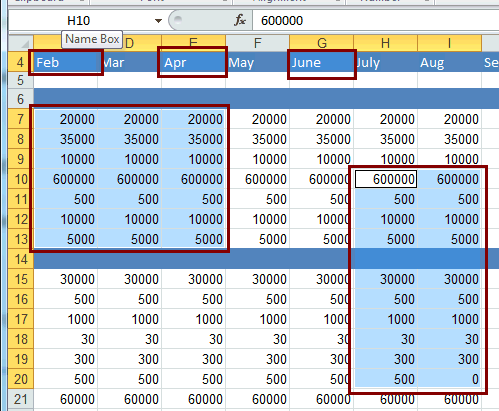
- Non-adjacent range - Drag: While you hold down the CTRL key, drag to select the range C7:E13.
Now your selection includes 3 separate cells and a range.
- Non-adjacent range - Name Box: Release the CTRL key but don't click
anywhere so your selections will remain selected. In the Name Box, type h10:i20 and then
hold the CTRL key down while you press ENTER.
The range H10:I20 is added to the selection. So you have 3 cells and 2 ranges selected.
![]() The Name Box shows the cell reference for the last cell or range you chose.
It cannot show all the parts that are selected.
The Name Box shows the cell reference for the last cell or range you chose.
It cannot show all the parts that are selected.
Select Cells/Ranges: Extend or Reduce Selection - SHIFT key
Suppose you have a selection that is one row too short. Or perhaps it is a column too wide. You don't have to start your selection all over. You can extend or reduce it using the SHIFT key.
-
 Extend single cell selection: Select cell B4. Hold the SHIFT key down and click cell G4. Your selection is
extended to G4.
Extend single cell selection: Select cell B4. Hold the SHIFT key down and click cell G4. Your selection is
extended to G4. - Select the range A7:D12.
- Extend the selection by one row: Hold the SHIFT key down and click cell D13.
- Reduce the selection by one column: Hold the SHIFT key down and click cell C13.
- To change both width and height at the same time: Hold the SHIFT key down and click cell F20.
- Use CTRL + HOME to return to cell A1.
|
|
| © 1997-2017 Jan Smith All Rights Reserved |
Site Map What's New |
Privacy Policy Terms of Service Copyright Acknowledgements |
~~ 1 Cor. 10:31 ...whatever you do, do it all for the glory of God. ~~
Last updated: March 27, 2017
Saving Screen Shots
It can be handy to save a picture of what is on your screen. There are several ways to do that. Here are two that do not require special software.
Method 1: Print Screen
The key is often labeled with an abbreviation, like PRT SCRN or Print Scr.
Active window only: ALT + PRT SCRN
Your captured image is copied to the Windows Clipboard (which is a section of memory).
Method 2: (Vista, Win7, Win8, Win8.1, Win10) Snipping Tool
If you choose Window Snip, the current active window is captured.
If you choose Full-screen Snip, the capture includes whatever is showing on your computer's screen.
If you choose Free-form or Rectangular Snip, your mouse pointer changes to the Precision Select shape