
Jan's Working with Presentations
Advanced: Exercise PPT 3-1
 You need to use what you just learned, and maybe learn a little more. Complete all parts of the following exercises. Don't forget to backup your Class disk when you have
completed the exercises or whenever you stop for the day and saved a document
along the way.
You need to use what you just learned, and maybe learn a little more. Complete all parts of the following exercises. Don't forget to backup your Class disk when you have
completed the exercises or whenever you stop for the day and saved a document
along the way.
Exercise PowerPoint 3-1: Outline, Images, Table
| What you will do: | Create a presentation from an existing outline. Apply a slide layout. Apply a transition and animations to Slide Master. Use the Pre-Print Checklist. Use Spell Check. Print an outline with header. Apply a design Theme. Edit Slide Master. Use the Selection Pane. Save As a template. Insert images from file and from clip art. Create a table. Manage animation of images. |
Start with: theater seats.rtf from resource files.
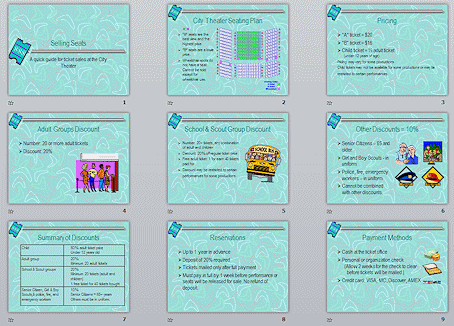
The City Theater wants you to create a training presentation for volunteers who will handle ticket sales. The volunteers need to understand the different types of tickets, the ticket prices, what discounts are available, and who qualifies for a discount. The theater's manager has written a Rich Text Format document in outline form for you to use to create the presentation. You will make a few corrections and add formatting, images, transitions, and animations.
[Note: Illustrations use the 4:3 slide format but PowerPoint 2013 and 2016 use 16:9 by default. It makes a difference in how things can fit on the slide.]
- From inside PowerPoint, open the Rich Text File theater seats.rtf from the resource files
 .
.
 Problem:
The file theater seats.rtf is not in the list
Problem:
The file theater seats.rtf is not in the list
Solution: In the Open dialog, change the file type box to All Files or to All Outlines.
 Save as ex3-1-SellingSeats-Lastname-Firstname.pptx to your Class disk in the powerpoint project3 folder.
 - Title slide: Apply the Title Slide layout to the first slide.
-
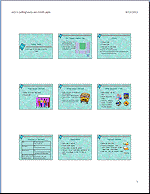
 Slide: Summary of Discounts:
Click in the bullet list on the slide. The AutoFit Options button appears at the bottom left of the slide. This means that there was too much text to fit on this slide at the default font size so PowerPoint changed the font size! Did you notice that the font size was different from the other slides? There are no other clues!
 Experiment:
AutoFit Options
Experiment:
AutoFit Options
-
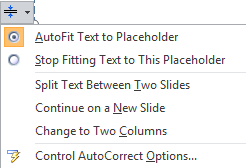 Click the AutoFit Options button and
then click its arrow to open the menu of options.
Click the AutoFit Options button and
then click its arrow to open the menu of options. - Click on Stop Fitting Text to This Placeholder. Wow. Lots of text falls off the slide.
- Undo.
- Click on Split Text Between Two Slides.
Do you like this arrangement? - Undo.
- Open the AutoFit Options menu again and try the next option, Continue on a New Slide.
- Undo.
- Try the third option, Change to
Two Columns.
This is a Summary slide, so we really need all of the information on one slide. There is another approach
When you are ready to continue...
 Use the Increase List Level button
  or the
TAB key to change the list level of the lines in
the bullet list where necessary to look like the illustration.
or the
TAB key to change the list level of the lines in
the bullet list where necessary to look like the illustration. Scout groups are listed in two categories! Edit the text of the third first level bullet to read School Groups.
-
- Transition: In the Slide Master, apply the Push Down/Push - From Top transition.
- Animation: In the Slide Master, apply the Zoom animation to the Title placeholder and change Start to With Previous, so that the title will appear without needing a click.
Apply the animation Float In - By paragraphs > 2nd level paragraphs to the text placeholder so that the bullet points will appear one paragraph at a time, including sub-points.
- Use the Pre-Print Check list,
especially Spell Check which is on the Review ribbon tab. (Yes, there are errors!)
Edit slide #5 so that the title is just, School Group Discount.
The Scout groups are listed on Slide 6: Other Groups.
- Save.
[ex3-1-SellingSeats-Lastname-Firstname.pptx]
Print Outline
-
Print Preview: View the outline in Print Preview.
(Choose the Outline layout in Print Preview)There are bullets without text on several slides. There must be extra blank paragraphs on the slides that are not showing in the Slide Pane. Who knew??
-
Choose Scale to Fit Paper.
 PowerPoint 2007: Print Preview > Options button

 PowerPoint 2010, 2013, 2016: Print Preview > Print Layout button
(PowerPoint 2007 and 2010 have different margins. PowerPoint 2013 and 2016 take 2 pages.)
- Remove extra blank paragraphs: Return to editing view. Click after the
last visible text on a slide to get the cursor at the end of the paragraph on the slide. Press the DELETE key.
This should remove any hidden blank paragraphs.
 Header: In the header of the outline, put the filename on
the left. Put the date on the right and update it automatically.
Header: In the header of the outline, put the filename on
the left. Put the date on the right and update it automatically.
- Check Print Preview again and correct any problems you see.
-
 Print the outline.
Apply Theme and Edit Masters
-
 Design
Theme: Apply the theme laverne.thmx from
your resource files.
Design
Theme: Apply the theme laverne.thmx from
your resource files.
(Use Browse for theme in the palette of themes.)
Problem:
Cannot find the theme
Solution: Download it from the online resources or your local copy of the lessons, laverne.thmx, and save it to a location that you can find. - Slide Master: Replacing template image
 Title
layout: Click on the boomerang on the Title layout. It is a part of a
group of images.
Title
layout: Click on the boomerang on the Title layout. It is a part of a
group of images. - On the Home ribbon tab, click the Select button at the far right and
then click on Selection Pane.
A task pane opens that lists all of the objects on the slide. Objects that have been grouped together to move as a single object will have a sublist. In Normal view you cannot see which are separate objects. - Experiment:
Selection Pane
- Click on each item listed in the Selection Pane. It will show handles in the Slide Pane.
- Click the
visibility icon
 to the
right of an item that is not selected. It vanishes without
losing the selection. Useful for figuring out which object is which
on the slide.
to the
right of an item that is not selected. It vanishes without
losing the selection. Useful for figuring out which object is which
on the slide. - Click the visibility icon again to make the object
show.
You cannot select a group that is part of a larger group. Unexpected! You have to Ungroup first.
 Right click on the boomerang, hover over Group to expand its menu
and then click on Ungroup.
Right click on the boomerang, hover over Group to expand its menu
and then click on Ungroup.
A whole little nest of borders and resizing handles shows up. These are the objects that were grouped together. The Selection pane highlights several groups and a freeform shape. One group has a LONG list of freeform shapes in it.- Click off to deselect the ungrouped images and then click on the boomerang to
select just it.
Notice what is selected in the Selection Pane, Group 92. The boomerang is a group inside a group. - Press the DELETE key.
The boomerang vanishes. - Select the shadow that was under the boomerang and delete it.
-
 Insert the image ticket.gif from
your resource files at 120% of
original size and position it to replace the boomerang.
Insert the image ticket.gif from
your resource files at 120% of
original size and position it to replace the boomerang. - Select the Slide Master layout (first at the top of the layouts), and delete its boomerang and replace it with ticket.gif at 75% of original size.
- Change the bullet image for Level 1 paragraphs to a right arrow
 .
.
- Save
and then Save As a template on your Class disk with the name SellingSeats-Lastname-Firstname.potx in the powerpoint project3 folder.
Don't forget that PowerPoint will now be showing the template and not your presentation! - Close the template and reopen the presentation from the list of recent presentations.
Edit Slides
- Slide 2: Seating Plan
-
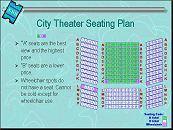 Insert the image theaterseatingplan.png from your resource files at 90% of
original size. Position it on the right side of the slide.
Insert the image theaterseatingplan.png from your resource files at 90% of
original size. Position it on the right side of the slide. - Change the font size for the bullet lines to 24.
- Resize the text placeholder narrow enough to not be under the seating plan image.
- Insert the image seatcodes.gif and
position it centered above the bullet list.

In PowerPoint 2013 and 2016, as you drag the image on the slide, guide lines will pop up when the image border or center aligns with the border or center of another object. - Select both images and right click the selection.
Hover over Group
and then click on Group from the context menu.
- Apply the Entrance animation Fade to the grouped images.
-
- Slide 3: Pricing
- Remove bullets for last two items.
- Change the font size to 24 starting with (under12 years of age) and continuing to the end of the slide.
- Slide 4: Adult Groups
-


 Insert a clip art or online image of a group of adults in a ticket line or at a theater
or traveling together. Try the
keyword "theater line" for your search.
Insert a clip art or online image of a group of adults in a ticket line or at a theater
or traveling together. Try the
keyword "theater line" for your search. - Resize the image as needed and position it toward the bottom right of the slide.
- Transparent Color: If your image has a solid color background, select the image. Then choose, Picture Tools: Format > Color > Set Transparent Color.
The pointer changes shape. Click on the background of the image to make it transparent.
-
- Slide 5: School Discount
-
 Insert a clip
art or online image of a school bus. (Use keywords "school bus".)
Insert a clip
art or online image of a school bus. (Use keywords "school bus".) - Resize and position at the right middle of the slide.
- Change the white background to transparent, as you did above.
- Change the font size of the text to 24.
- Resize the text placeholder to get all of the text on the slide, without running underneath the bus.
-
- Slide 6: Other Discounts
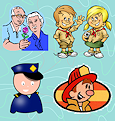
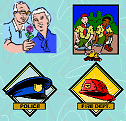 Insert the image seniorcitizens.gif from your resource files.
- Insert clip art or online pictures for scouts, police, and fire. (Use keywords "scouts", "police", and "fireman". Choose similar images if you do not find these particular images.
- Line the images up on the right of the slide in two rows with two columns.
- Resize the text placeholder and/or change the font size so that no text is underneath the four images.
- Use the Align Center and Align Middle commands with selected images so that they form neat rows and
columns.
- Select all 4 images and group them.
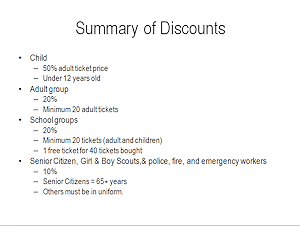
- Slide 7: Summary of Discounts
-
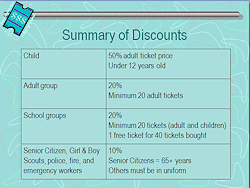 Create a table with condensed information to replace
the bulleted list.
Create a table with condensed information to replace
the bulleted list.
Use the illustration as a guide for size.
Child 50% adult ticket price
Under 12 years oldAdult group 20%
Minimum 20 adult ticketsSchool groups 20%
Minimum 20 tickets (adult and children)
1 free ticket for 40 tickets boughtSenior Citizen, Girl & Boy Scouts,
police, fire, and emergency workers10%
Senior Citizens = 65+ years
Others must be in uniform - Select the table and use the
 Shape Fill button to
color the background of the cells with Aqua,
Background 1, Lighter 60%. The table should have borders between cells.
Shape Fill button to
color the background of the cells with Aqua,
Background 1, Lighter 60%. The table should have borders between cells.
-
- Slide 9: Payment Methods
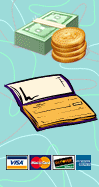 Insert the image creditcards.gif from your resource files and position at the right.
- Insert online clip art images of money and a check book and position at the right. If you cannot find the images in the illustration, use something similar. Images come and go in online collections without notice!
- Edit on your own: Edit text and resize text placeholders to improve the slides.
Animations
- Animations: Add the animations of your
choice to the images on slides 4, 5, 6, and 9 and to the table on slide
7 so that they move onto the slide after the text.
 Save.
Save.
[ex3-1-SellingSeats-Lastname-Firstname.pptx] (Not in .potx format!)
Print and Package for CD
-
Print a handout with 9 slides per page. Include the file
name and the date in the header of the handout.
-
Use Package for CD with the name Ex3-1-InitialLastname to save your presentation to your Class disk.
PowerPoint 2007: You will need about 7.25
MB free on the flash drive because the PowerPoint Viewer 2007 is included.
 PowerPoint 2010, 2013, 2016: You will need just over 1
MB free on the flash drive.
PowerPoint 2010, 2013, 2016: You will need just over 1
MB free on the flash drive.
|
|
| © 1997-2017 Jan Smith All Rights Reserved |
Site Map What's New |
Privacy Policy Terms of Service Copyright Acknowledgements |
~~ 1 Cor. 10:31 ...whatever you do, do it all for the glory of God. ~~
Last updated: March 22, 2017
These exercises may use one or more files from the presentations resource files . Save the changed documents to your Class disk. This
keeps the original resource files intact in case you need to start over or
another student will be using this same computer.
. Save the changed documents to your Class disk. This
keeps the original resource files intact in case you need to start over or
another student will be using this same computer.