Animation Choices
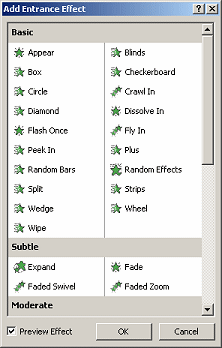 You
have a wide choice of animation effects, including many that are similar to
the transition effects. Too many to list here! You
have a wide choice of animation effects, including many that are similar to
the transition effects. Too many to list here!
There are three aspects of your objects that can be controlled with animations. You can
combine these to create complex behaviors.
-
 Entrance - how the object or text comes onto the slide
-
 Emphasis - a change that occurs after the object or text is fully
in view
-
 Exit - how the object or text leaves the slide
You can apply animations using a pre-set animation scheme or create
a custom animation from the various choices.
 Not
too much: A cute and interesting effect can quickly become highly
annoying when used too often! Not
too much: A cute and interesting effect can quickly become highly
annoying when used too often!
Animation Schemes
 PowerPoint has a number of pre-set combinations of animations
and slide transitions, called
animation schemes. The animations apply only to the
standard
placeholders on a slide. Objects like textboxes, images, and charts
may inherit the body text animation. If they do not, you must create a Custom Animation
for each such object. PowerPoint has a number of pre-set combinations of animations
and slide transitions, called
animation schemes. The animations apply only to the
standard
placeholders on a slide. Objects like textboxes, images, and charts
may inherit the body text animation. If they do not, you must create a Custom Animation
for each such object.
Animation Schemes are found in the task pane as a choice on the Slide
Design task pane. On the Slide Show menu, Animation Schemes...
 will also open this
task pane. will also open this
task pane.
At the top of the pane are schemes used recently, then
No Animation. Below those are all of the available animations, grouped as Subtle, Moderate, and
Exciting.
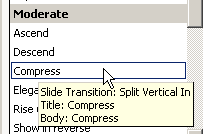  What
effects are in an Animation Scheme? What
effects are in an Animation Scheme?
Hover over an animation scheme in the task pane. A popup tip will tell
you what animations and transitions will be applied to which placeholders!
 Choosing
No Animation will remove your slide transitions as
well as any animations applied to the selected slides. However, if you
remove an animation scheme, any objects that had inherited animations
before may still have those animations! So confusing!!! You can remove
those unwanted animations in the Custom Animation task pane. Choosing
No Animation will remove your slide transitions as
well as any animations applied to the selected slides. However, if you
remove an animation scheme, any objects that had inherited animations
before may still have those animations! So confusing!!! You can remove
those unwanted animations in the Custom Animation task pane.
Custom Animation
 If none of the existing animation schemes suit you or if you want to animate
something besides a placeholder, you can create a Custom Animation. If none of the existing animation schemes suit you or if you want to animate
something besides a placeholder, you can create a Custom Animation.
Custom Animation is a choice in the drop list at the top of the Task Pane.
It is also on the Slide Show menu
 . .
With a custom animation you can be very selective. You can apply the
animation to selected objects on the slide, to a placeholder, or to just a
paragraph. You also choose whether to play the animation automatically or after a
delay or only after a click.
The animations you select are listed in the task pane in the order in
which they run. A matching numbered square appears in the Slide Pane next to the
slide part that is animated.
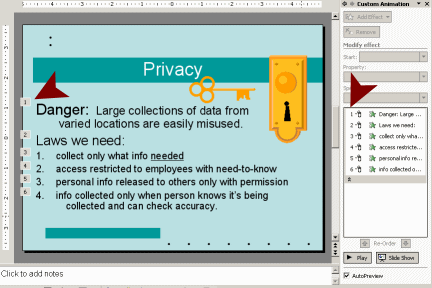
Text animation: You can apply most text animations either
letter by letter, word by word, to the whole paragraph at once, or to the
whole placeholder at once.
Configure a Custom Animation
You can control how an animation behaves from the task
pane or from a popup menu.
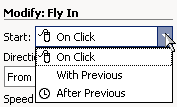 Start:
You can control when an animation starts Start:
You can control when an animation starts
 AutoAdvance:
For a slide show to run automatically, all animations must run either
with or after the previous animation, plus slide transitions must advance
on a timer also. AutoAdvance:
For a slide show to run automatically, all animations must run either
with or after the previous animation, plus slide transitions must advance
on a timer also.
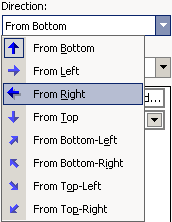 Property:
For most animations you can modify a property, like the direction of
the motion, the font style or color, or the degree of rotation. Property:
For most animations you can modify a property, like the direction of
the motion, the font style or color, or the degree of rotation.
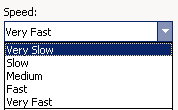 Speed:
For most animations you can select a speed. Speed:
For most animations you can select a speed.
 |
Step-by-Step:Animations |
 |
What you will learn: |
to apply an animation scheme
to apply a custom animation
to modify a custom animation in task pane
to modify a custom animation with Effects dialog
to remove an animation
to apply animations to the Master slide
|
Start with:
 Anniversary
Trips Offer4.ppt from the Class disk Anniversary
Trips Offer4.ppt from the Class disk
Apply Animation Scheme
-
 Open Anniversary Trips Offer4.ppt
from your Class disk. (NOT the autorun version you created last in the
previous lesson which was saved as Anniversary Trips
Offer4-auto.ppt.) Open Anniversary Trips Offer4.ppt
from your Class disk. (NOT the autorun version you created last in the
previous lesson which was saved as Anniversary Trips
Offer4-auto.ppt.)
-
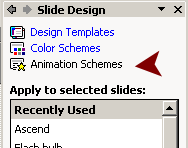 From the menu select
| From the menu select
|
The Task Pane changes to the Slide Design pane, with the 3rd choice, Animation
Schemes, displayed. (It's a bit confusing to have 3 choices on the Slide
Design task pane plus more in the task pane drop list!)
-
Select the first two slide thumbnails at
the left.
-
Click on a scheme in the list and then on
 the Play
button at the bottom of the task pane. The Slide Pane runs the animation scheme you chose, but just for Slide #1. the Play
button at the bottom of the task pane. The Slide Pane runs the animation scheme you chose, but just for Slide #1.
What happened to the Newsflash transition that you applied to Slide #1?? The animation scheme has changed the slide transition also.
Unexpected!
-
Select Slide #1 and
click
 the Slide Show
button. Advance the slide show by clicking the screen. The slide
transitions and animations play. But wait! Nothing is happening on Slide
#2 to the Actual text. the Slide Show
button. Advance the slide show by clicking the screen. The slide
transitions and animations play. But wait! Nothing is happening on Slide
#2 to the Actual text.
The bullet point Actual and sub-point under it are in a second placeholder.
 How to tell: Right
click on the box and the popup menu shows the command Format
Placeholder. How to tell: Right
click on the box and the popup menu shows the command Format
Placeholder.
The AutoContent wizard set it up that way when you
created the presentation. The animation schemes recognize only one Body text placeholder on a
slide. Another unexpected complication!
 A custom animation applied to the slide will work for both text
placeholders. You will create one in the next set of steps. A custom animation applied to the slide will work for both text
placeholders. You will create one in the next set of steps.
-
Experiment by trying out each of the animation
schemes in the list. Can you guess from the names what the motion or
change will be?
-
Close the presentation without saving
any of your changes. (You may not be able to Undo enough to get rid of
all the changes.)
Apply Custom Animation
You have a lot of control and more choices when you create a
custom animation. The effect you pick is applied to the parts of the
slide that are currently selected. The disadvantage is that you cannot apply
the same effect to different slides at the same time.
-
  Reopen Anniversary Trips Offer4.ppt. Reopen Anniversary Trips Offer4.ppt.
-
Show
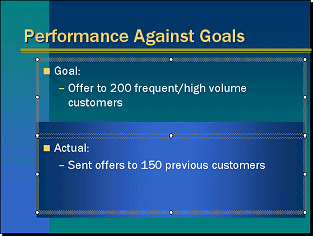
Slide #2 in the Slide Pane.
-
Click on the word Goal, hold the SHIFT key
down, and click on the word Actual. Now both placeholders are
selected.
-
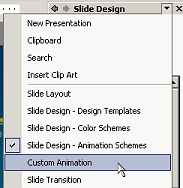 If
necessary,
show the Task Pane and then open the Custom Animation task pane from
the drop list at the top of the task pane. If
necessary,
show the Task Pane and then open the Custom Animation task pane from
the drop list at the top of the task pane.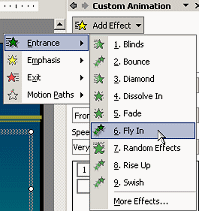
-
Click on
 the Add Effect button to open a menu. You have four choices: Entrance,
Emphasis, Exit, Motion Paths. Each of these will open a list of choices.
-
Hover over Entrance. A list of commonly used
effects appears, with a link to More Effects... at the bottom.
-
Click on the choice Fly In. The default
configuration of this effect is applied to your selected placeholder and
the effect immediately plays in the Slide Pane. It is easy to miss
seeing the preview.
 If you do
not see Fly In in the numbered list of Entrance effects, click on More
Effects... at the bottom of the list and look through the expanded list. If you do
not see Fly In in the numbered list of Entrance effects, click on More
Effects... at the bottom of the list and look through the expanded list.
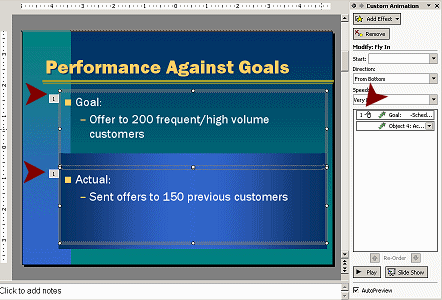
 PowerPoint 2002 - 2 animations
Run after a single click
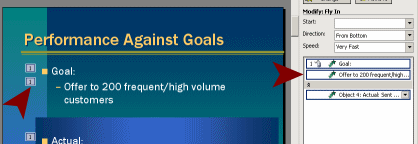
 PowerPoint 2003 - three animations.
Run after a single click
The Custom Animation task pane now shows multiple animations in the list, but only
the first one is numbered. The
placeholders in the Slide Pane are all labeled with
 the
a gray box showing the number 1 . All of the objects with the same number run
their animations at the same time. the
a gray box showing the number 1 . All of the objects with the same number run
their animations at the same time.
-
Click on
 the Play button to see the effect in the Slide Pane.
The text in both placeholders moves into view all at once from the bottom
of the slide.
-
Click on
 the Slide Show button to view the actual show.
 The preview
of animation effects in the Slide Pane never waits on a click. Always check the Slide Show itself
to be sure the effect is behaving the way you intended. The preview
of animation effects in the Slide Pane never waits on a click. Always check the Slide Show itself
to be sure the effect is behaving the way you intended.
Modify Custom Animation: Task Pane
The default settings for a custom animation may not do
quite what you'd like to see. You can change a number of behaviors about
an animation.
-
Click on
 the number 1 beside the Goal placeholder in the Slide Pane. The
animation in the list in the Task Pane now has a blue border.

-
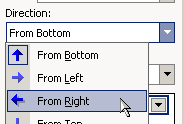 Change
the Direction to From Right. Change
the Direction to From Right.
 Only
the changed animation will play in the Slide Pane, not the whole sequence
for the slide. Only
the changed animation will play in the Slide Pane, not the whole sequence
for the slide.
-
 Repeat for the animation of the second line - Offer to
200 frequent/high volume customers
-
Click on
 the number 1 beside the Actual placeholder in
the Slide Pane.
-
Change its Direction to From Right
also.
-
Change its Start setting to On click.
The animation is now numbered 2 in the list, showing that it is part of a
separate animation sequence. Now the second placeholder's text will not
show up until you click.
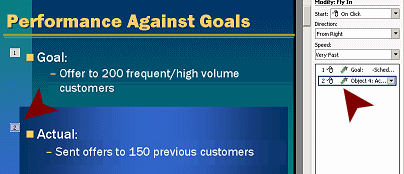
 PowerPoint 2002 - 2 separate animations
Click to run each.

 PowerPoint 2003 - 3 separate animations
Click runs first two. Click again to run last one.
Modify Custom Animation: Effects Options
The Effects Options dialog offers even more control over an
animation effect than the Task Pane.
-
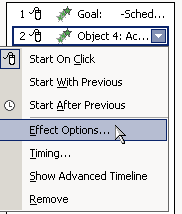 Click
the arrow at the right end of animation #2 (for Actual) in the list in
the task pane to open the menu. (Or right click the item in the list.) Click
the arrow at the right end of animation #2 (for Actual) in the list in
the task pane to open the menu. (Or right click the item in the list.)
-
From the menu select A dialog appears with tabs. What tabs and choices you
see will vary, depending on what animation has been applied.
-
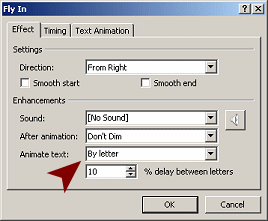 On
the Effect tab, change the item Animate text to
By letter and click on OK.
The Slide Pane runs a preview of the changed animation. On
the Effect tab, change the item Animate text to
By letter and click on OK.
The Slide Pane runs a preview of the changed animation.
 Evaluate:
Do you like this effect? Is it helpful? Interesting? Annoying? Evaluate:
Do you like this effect? Is it helpful? Interesting? Annoying?
Remove Custom Animation
Let's suppose that you decide you don't like the changed
animation. You can dump the whole thing with the Remove command, but you
may lose more than you expected.
-
Select the second animation in the list.
-
Click on
 the
Remove button at the top of the task pane. The whole animation is
gone. the
Remove button at the top of the task pane. The whole animation is
gone.
-
Click on the Play button to see how the
animations are working now. Whoops. That's not quite what we need. We do
want the Actual text to fly in. Maybe Undo can save the day.
-
Click on the arrow at the right of the Undo
button
 on the toolbar to
open the list of actions. You may see quite a number of Custom Animation
items in this list. on the toolbar to
open the list of actions. You may see quite a number of Custom Animation
items in this list.
-
Click on the first Custom Animation at the top.
You should be back to where you were before you changed the effect to
By letter.
-
Check the change: Click the Play button to
preview the slide's animations. If you went back too far, click the Redo
button. If you have not gone back far enough, click the Undo button
again. Play the slide animations again. Keep trying until you get the
correct effect. (If you get entirely too frustrated, you can always
re-create the animation!)
Apply Custom Animation to Master
Now that you have created a custom animation, you should
use the same animation on the other slides. There is no way to copy and
paste this formatting of animations. Happily, you can apply your
animation to the Master.
-
Open the Master View.
-
Select the body text placeholder.
-
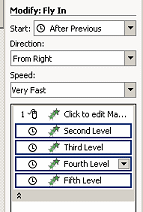
Apply the Fly In effect with -
Start: On Click
Direction: From Right
Speed: Very Fast
-
Play the animation. All of the bullet levels fly in
together. Not what we wanted.
-
 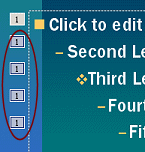 Hold
the SHIFT key down and click on each of the number
squares EXCEPT the first one. Hold
the SHIFT key down and click on each of the number
squares EXCEPT the first one.
-
In the Custom Animation task pane, change the Start
setting to After Previous. All the selected
animations are changed.
-
Close the Master View.
-
Play the Slide Show. Look carefully at how Slide #2
plays. The custom animation you applied to the first placeholder is
running in addition to the animation from the Master. Odd effect!
-
Return to Normal view.
-
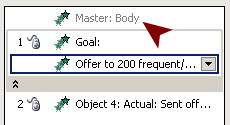 Select
Slide #2 again and look at the list of animations. At
the top is a new entry- Master: Body. You no longer need
the animation you applied earlier. Select
Slide #2 again and look at the list of animations. At
the top is a new entry- Master: Body. You no longer need
the animation you applied earlier.
-
Remove each of the animations in the list below
Master: Body.
 You cannot delete animations
applied by the Master slide from here. If you want to do something
different on a particular slide, you could: You cannot delete animations
applied by the Master slide from here. If you want to do something
different on a particular slide, you could:
-
Play the Slide Show again. All should work
as planned now. If not, go back and fix any errors.
-
 Save
As Anniversary Trips Offers5.ppt
to your Class disk. Save
As Anniversary Trips Offers5.ppt
to your Class disk.
 How to handle a full Class disk
   
~~ 1 Cor. 10:31 ...whatever you do, do it all for the
glory of God. ~~
Last updated:
30 Apr 2012 |

