Jan's Working with Windows:
Files: Backup Data
Now that you have created some documents, you need to consider how to safeguard your files. Nothing is like that horrible sinking, sick feeling that you get when you realize that you've destroyed/damaged/lost the one and only copy of something that took days to create.
Since removable disks are easy to lose or damage, you should have at least one copy of your work besides the working copy on your Class disk. Such a copy is called your backup, so we will call this disk the Backup disk.
When working with your own computer at work or home, your files will normally be stored on a hard disk. To back up those files, you have several choices. Each is useful in certain circumstances. The more copies you have, the more protected you are from lost or damaged files.
Recommended for this class: If you do not have a network drive to save on, copy your work to a second removable disk as a backup and also keep a copy of completed files on your home or laptop computer. Think about how important the files are and hard it would be to do the work over again. More than one backup is a really good idea!
Backup Choices
- Copy files to a separate folder on the same computer.
- Copy files to a removable disk or a rewritable CD or DVD.
- Burn a set of files to a CD or DVD.
- Upload the files to network storage space or to another computer on the network where you have login privileges.
- Upload the files to online storage, like DropBox, OneDrive, or Google Drive.
The hardest part of any backup plan is remembering to do it! Many online storage services will synchronize files automatically and let you access them from any computer that has Internet access, including a tablet or smart phone. You will have a user name and password to remember, of course.
If you have a lot of files to backup, you will want to use some kind of backup software that will manage the files to simplify things.
| |
Step-by-Step: Backup Copy |
|
| What you will learn: | to create a backup copy |
Start with:![]()
![]()
![]()
Create the Backup Copy
 Insert your Class disk into its drive.
If necessary, display the contents of the drive in a Computer window.
 Refresh the view with the key combo: F5
There are other methods but the key combo is fastest.Be sure that the disk is your Class disk. This is your source disk for the sequence to follow.
-
 Insert you other drive (the Backup drive or destination disk) into a different USB port.
If necessary, display the contents of the drive in a Computer window. - In the display of your Class disk, select the files or folders that you wish
to copy to the second disk.
 Use the key combo CTRL + C to copy what
is selected.
- Switch to the window for your second device.
 Use the key combo CTRL + V to paste
your files to this device.
The files are copied. It can take a long time when you are copying a large amount of data. You will see a progress bar in that case.

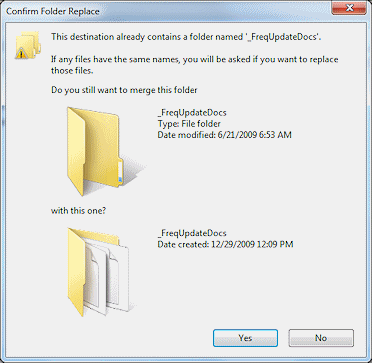
 Problem: Folder or files already exist
You will see a message about that. Choose Yes to replace the files to have an exact duplicate. Or, if you wish, you can choose No and then create a new folder on the second device to hold the current versions of your work. That way you can keep the old versions, too. Just be careful to name the folders that hold different versions in a way that makes it clear which is which.
