
Jan's Working with Windows:
Files: Image - Create & Save
 Everyone likes
pictures. They perk up a page of dull text and make it bearable. (Hmm. Like this one?) Plus, some things just can't be expressed as well in words.
Everyone likes
pictures. They perk up a page of dull text and make it bearable. (Hmm. Like this one?) Plus, some things just can't be expressed as well in words.
Are picture files different from text files? Not really. Both are sets of 1's and 0's stored on the computer. The biggest difference is that image files are often quite large. The file name extensions are different for image files, of course.
You have the same kinds of tasks to learn that you had for text files. Create a new document, save it, edit it, save it again, print it. So, in this section you will review or see another way to do the tasks you have already learned. Plus you get to play with Microsoft Paint. Be careful not to neglect your other work! Paint can be addicting, even if you are not artistic!!
What is Microsoft Paint?
Paint is a simple program with basic tools for creating bitmap pictures. That means that you define the color of each little dot, called a pixel, in the image. In the hands of a patient person, however, Paint can be used to create some spectacular images. It would be a lot easier in one of the advanced graphics programs!
Why Learn About Paint?
Paint will be used in other lessons to save screenshots of your work. This enables you to submit pictures to your instructor about things that don't produce a document to print. Outside the classroom, Paint is useful when dealing with tech support. You can capture a picture of an error message or a glitch in behavior that will show tech support exactly what you are dealing with. Powerful!
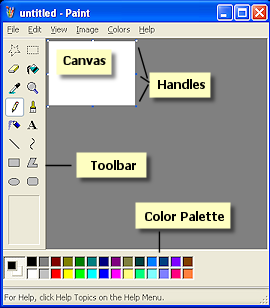
Parts of the Paint window:
- Canvas: the drawing area
- Handle: a small box which you can drag to resize the canvas
- Toolbar/Ribbon: buttons for various tools for drawing such as selecting, writing text, drawing lines, filling areas with color.
- Color Palette: Displays colors that you can use, like a box of watercolor paints. Displays the two currently selected colors, a foreground color (Color 1) and a background color (Color 2).
Paint: WinXP, Vista, and Win7/Win8/Win8.1
| |
Step-by-Step: Create & Save Image |
|
Start with: ![]()
![]()
| What you will learn: | to open a program from Run (WinXP) to open a program from Search (Vista, Win7, Win8, Win8.1) to resize the canvas to create a text image with Paint to save an image |
 WinXP: Start a
Program from Run
WinXP: Start a
Program from Run
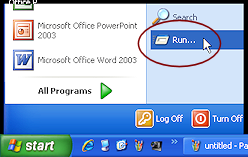 Open the Start menu and choose .
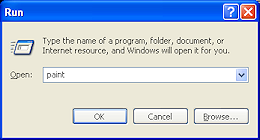 In the Run dialog box, type paint and
  click on the OK button. Windows looks for a file that it can run, like paint.exe.
-
 Error: You will see an error message
because Windows can not find the file.
Error: You will see an error message
because Windows can not find the file.
The problem in this case is that the file that starts Paint is actually named mspaint.exe instead of just paint. Run is smart enough to figure it out if the file uses a common extension for program files, like exe or dll or com. But it is totally fooled by the wrong name!
 When this happens, first check the file name for misspellings. If the spelling is right,
you may have to type in the full path to the file, like: c:\windows\system32\mspaint.exe
When this happens, first check the file name for misspellings. If the spelling is right,
you may have to type in the full path to the file, like: c:\windows\system32\mspaint.exeThat's an awful lot of trouble!!
Or, you can use the Browse button in the Run dialog to get to a folder tree, find the right file, and double-click on it, which puts the full path into the Run text box.
- Click on the OK button in the error message box.
- Highlight the word paint in the text box labeled Open: and type mspaint .
- Click on the OK button.
Paint will open. (Yes, even without the extension! I told you that Run was smart!)The size of the window and the size of the blank canvas depend on their sizes the last time Paint was used.


 Vista, Win7, Win8, Win8.1: Start
a Program from Windows Search
Vista, Win7, Win8, Win8.1: Start
a Program from Windows Search
The Run command used in the WinXP section above is still available in Vista, Win7, and Win8. But Run is not as smart as Windows Search at providing the result that you actually want.
- Click on the Start button or switch to the Start screen (Win8, Win8.1).
Vista, Win7: The cursor is already in the Search box at the bottom of
the menu.
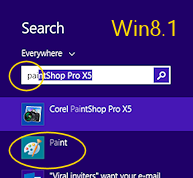
Win8, Win8.1: No search box is visible but you can start typing anyway! -
Type the letter p.
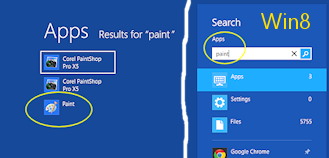
The Results list shows and changes as you type to show objects on the computer whose names start with the letter p. Programs (apps) are listed first.
Vista, Win7: At the bottom of the list there is a link to show all of the results. This is
very useful when there are too many results to fit and the one you want is not
showing.
 Problem: Paint is not showing in the list
Sometimes Search is too "smart" for its own good. If you have several programs that start with "p" that you use more often than Paint, they may show up in the Search list and Paint may not show at first.Solution: Keep typing. By the time you get the whole word typed in, Search will have found the program. Keep this behavior in mind when you are looking for other programs or files.
- If necessary, click Paint in the list to select it.
- Press the
ENTER key.
The program starts. The size of the window and the size of the blank canvas depend on their sizes the last time Paint was used.
Alternate methods:- Double click if the item in the list is not currently selected.
- Use the arrow keys to select the item and then press the ENTER key.
For experience, let's see what happens if you type more letters.
-
Open the Start menu or Start screen again.
-
Slowly type the whole word paint in the Search box.
As you type each letter, watch how the results list changes.

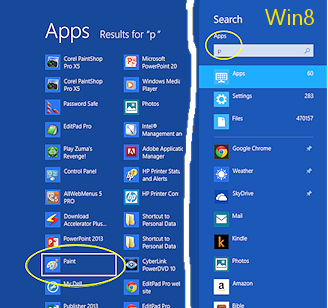
The program Paint is still in the list. You may see other programs or files that have the word paint in the name or as part of the attributes.
Remember that Win8 divides the results into different categories so the left side will show only Apps. Other versions will show files as well as programs. Win8.1 includes settings also.
- Delete the word paint from the Search box.
In the previous section on the Run box in WinXP, we had to type the actual name of the file that opens the Paint program, which is mspaint.exe. Let's try that in Windows Search. -
In the Search box, type the word mspaint. As you type, watch the changes in the list.
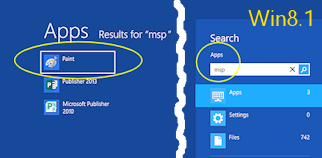
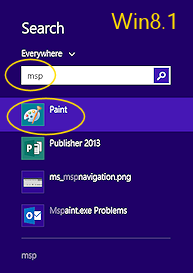
There may be no matches at all when you have only typed a few characters, depending on what documents and programs you have on your computer.After typing 'msp', my Win8 computer showed Paint, MS Publisher, and MS PowerPoint. After upgrading to Win8.1, the computer showed only two applications, Paint and Publisher 2013.
Vista and Win7 did not show anything useful after typing 'msp'. They were still searching. After a wait, Vista and Win7 did show the file name mspaint.exe, instead listing the Paint program name. Unexpected!
-
Return to the Desktop:
Vista, Win7: Press the ESC key  at the upper left of your keyboard to close the Start
menu.
at the upper left of your keyboard to close the Start
menu.
Win8, Win8.1: Press the Windows key  to close the search results. Press the Windows key again to return to the Desktop.
Paint is still open from your earlier work.
Resize Canvas
Paint remembers the size of the last picture you worked with. If the canvas size is too small or too large to work with comfortably, you can resize it. You are going to be typing in your name in a large font size. How large a canvas you will need will depend on how long your name is!
- If necessary, resize the window itself to be large enough to hold the canvas size you want by dragging a corner or side of the window.
-
Resize the white canvas by dragging on the tiny handles

 at the right and bottom edges of the canvas to make the
drawing area the size that you want to work in. Problem: Cannot see the bottom and far right edge handles
at the right and bottom edges of the canvas to make the
drawing area the size that you want to work in. Problem: Cannot see the bottom and far right edge handles
The canvas is larger than the window.
Solution: Use Zoom out to reduce the size of the image in the window.
Vista, Win7: On the menu, select View and then Zoom and then an appropriate percentage.
Win8, Win8.1: Use the Zoom slide on the Status bar to reduce the size in the window.
Create a Text Image
-
 Select the Text tool

 by clicking on it.
- Move your pointer to the white canvas and
 drag from the upper left of
the canvas. A box of dashed lines (a marquee) will appear. Your text will go inside this box shortly.
drag from the upper left of
the canvas. A box of dashed lines (a marquee) will appear. Your text will go inside this box shortly.
Make your box large. Your name must fit inside!
-
Release the mouse button.
A Text
toolbar appears.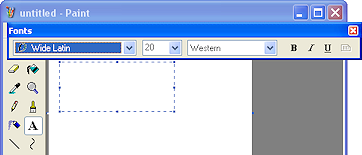
 Problem: The
Text toolbar does not appear.
Problem: The
Text toolbar does not appear.
Solution: Select from the menu >. Win7, Win8, Win8.1: A new ribbon tab,
Text Tools: Text, appears on the ribbon.
Win7, Win8, Win8.1: A new ribbon tab,
Text Tools: Text, appears on the ribbon. - Click on the down arrow in the box that shows
names of the fonts that are installed on this
computer.
(The fonts listed depend on which version of Windows you have and on what other programs have been installed.) - Scroll until you find Wide Latin.
If Wide Latin is not on the list, look for Impact.
Only WinXP comes with Wide Latin but you may have it from other software like Microsoft Office.
- Click on Wide Latin or Impact (or another font with wide, bold letters) to select it.
- Select the font size 20 in a similar way.
- Click inside the marquee box.
Your pointer turns to a vertical line cursor to show where your typing will appear.
Text converts to picture: As long as you don't click outside the box, you
can edit what you type by selecting, backspacing, and deleting. BUT...once you click
outside the box, the text becomes part of the picture. Then you make any
changes only with graphics methods like erasing. No more backspacing and
deleting! - Type your name in the marquee box.
The marquee box can enlarge down as you type, as far as the edge of the canvas, but it will not get any wider automatically. What won't fit on the canvas will be chopped off after you click outside the selection box.
Win7: If you type more than will fit in the marquee selection box, the text
will start to scroll up. Once you click elsewhere, only the visible text
will be left.
Problem: Name
does not fit on canvas
Solution: Enlarge the canvas by dragging the handles.
You may need to use the scrollbars to bring the bottom and right edges of the canvas into view.Problem: Name
does not fit neatly in marquee box
When a marquee box automatically gets taller, some letters of a word may be on different lines.
Solution: Drag the handles of the marquee box wider.
If your name still won't fit, you may need to enlarge the canvas (see solution above) and start over with a new box. Use > , and press the DELETE key to remove everything from the canvas. Enlarge the canvas as necessary. Then drag a larger box, and try again. - Find unavailable commands:
 WinXP, Vista: From the menu bar select and inspect the menu that appears.
Any commands that are gray are not currently available.
Notice that many of the menu commands have a keyboard shortcut.
 Win7, Win8, Win8.1: Observe the
Clipboard section of the Text Tools ribbon at the far left.
Win7, Win8, Win8.1: Observe the
Clipboard section of the Text Tools ribbon at the far left.
It contains buttons for the most common commands: Cut, Copy, Paste. They are gray because they are not available at the moment. Something must be selected before you can copy or cut. Something must be copied or cut before you can paste.
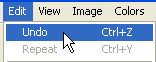
Undo and Redo are arrow buttons at the top of the window in the Quick Access toolbar.
 Key combos:
 Undo = CTRL + Z reverses your last action.
Redo = CTRL + Y reverses your last Undo.
Cut = CTRL + X removes the selection and copies it to the Windows Clipboard
Copy = CTRL + C copies the selection to the Windows Clipboard and leaves the selection in place
Paste = CTRL + V places whatever was on the Windows Clipboard at the cursor's locationMany applications use CTRL + Z for Undo and CTRL + Y for Redo/Repeat. These
are a
particularly useful key combos to learn to use. It is MUCH faster to
execute menu commands from the keyboard, so watch for the ones that execute
the commands you use a lot. Undo certainly gets a lot of work! - Press CTRL + Z to undo what you just did.
Your typing vanishes! But do not despair.
 Warning: Everything you do in the marquee box counts as 1 action, so it is easy to wipe
out all of your text!
Undo limits: Paint will allow you to undo up to three actions in WinXP
and ten actions in Vista. Paint in Win7 and Win8
remembers many more actions. (I stopped counting at somewhere over 40.)
Warning: Everything you do in the marquee box counts as 1 action, so it is easy to wipe
out all of your text!
Undo limits: Paint will allow you to undo up to three actions in WinXP
and ten actions in Vista. Paint in Win7 and Win8
remembers many more actions. (I stopped counting at somewhere over 40.)Some programs only remember the last action. Others allow you to select how many steps to remember. Sometimes there is a question about what a program counts as an "action". Selecting is usually an action. Clicking the mouse somewhere is usually an action, too.
- Use the key combo
to redo the step that you just undid.
(CTRL + Y)
Voila! Your name appears again. Rescued!!No visible Undo list: Since Paint does not
keep a visible list of what actions it is remembering, it is easy to get
confused when going back and forth between Undo and Redo.  Experiment: Font, Font Sizes
- Select your name inside the selection box.
- Apply different fonts and font sizes.
You can apply your changes to just part of the name, or use several copies of your name to show the difference.
- Use the keystrokes you just learned to undo the changes that you make and to recover your deletions when you change your mind.
- Don't click outside the box yet or you will have to start all over (see the comment at step 8).
- Experiment: Change Colors
WinXP, Vista:

- Click on a color square in
the Color Palate at the bottom of the window. The top color box on the left
changes and your text changes color!
-
 Right
click on a color square.
Right
click on a color square.
The bottom color box on the left changes and the background behind your text changes color, but not the whole canvas.
Win7, Win8, Win8.1:

- Click on the Color 1 box to select it. The box highlights to show it is
selected.
- Drag across your name to select it.
- Click on one of the colors on the Color
Palette to change the primary color, Color 1.
Your typing changes color. Color 1 is the foreground color and is used by text and the borders of shapes.
- Click on the Color 2 box and then on one of the Color Palette colors to
change the secondary color, Color 2. The background color of the text box changes to match Color 2. Color 2 is used as the color of the inside of a shape and the background color that appears if you delete part of the picture.
- Try out different colors for Color 1 and Color 2.
- Create a custom color:
- WinXP, Vista: On the menu click on
Win7, Win8, Win8.1: Click the Edit Colors button  .
.
A palette of standard colors opens.  If necessary, click the button Define Custom Color.
The palette expands to the right.- Drag to slide the cross-hairs
to a new position.
You can also drag or click the vertical color bar to select a shade of the new color, from very pale to very dark. -
Save you new color to the palette by clicking on Add to Custom Colors.
The new color is now the foreground color.
Win7, Win8, and Win8.1 have a row for custom colors on the ribbon.
If you want to save additional custom colors, click on an empty Custom color square first. Then create the color and add it to the palette. Otherwise a new custom color will replace an existing custom color.
-
Use your custom color in your picture somewhere.
- When you are satisfied with the appearance of your art work, click on the canvas somewhere outside of the box. Your name is now part of the picture and you can no longer use the Text tools on it.
- Experiment: Other Tools
Try out the rest of Paint's tools - Fill, Shapes, Lines, Eraser.
You can look at Paint's Help information if you get stuck. -
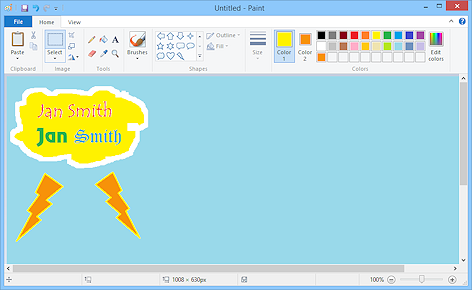
Create a drawing that includes your name one or more times and uses at least two text colors, two fonts, at least one shape, and a background color that is not white. Your picture should NOT match the example below.
Example: (Win8) Using fonts, font size, text color, background color, shape, eraser.
Save a Picture
 Insert the Class
disk into the drive if it is not already there.
Insert the Class
disk into the drive if it is not already there. - Save the file:
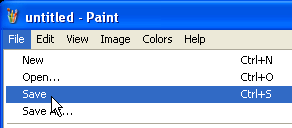
WinXP, Vista:
From the menu bar select > .
 Win7:
Click the Paint button
Win7:
Click the Paint button  Then choose on the menu that appears.
 Win8, Win8.1:
Click the File ribbon tab and then the command .
Win8, Win8.1:
Click the File ribbon tab and then the command .

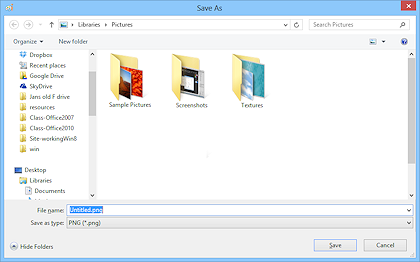 Since the picture has never been saved before, the Save As dialog
box appears. The default file type is PNG in recent versions of Paint.
Since the picture has never been saved before, the Save As dialog
box appears. The default file type is PNG in recent versions of Paint.The default folder for WinXP is Desktop. The default folder for Vista, Win7, and Win8 is the Pictures folder in your personal folders. That makes sense since you are saving a picture.
But, Paint remembers the last location you used.
- Instead of maneuvering through the folder tree to your Class drive, type in the File name text box
the full path to where the file should go, using the letter for your
removable disk drive:
e:\my docs\paint docs\myname.bmp
(Type this exactly as written here or copy and paste it, except use the correct drive letter for your own removable disk. Yes, the path is wrong on purpose!)
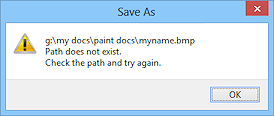 Error: An error message appears saying either that the path you typed does not exist or that the file name is invalid.
 The problem is that we previously renamed the folder paint docs to win project2 so part of the path does not exist.
Many programs will, instead of this error message, ask if you want to create the missing folder. A very useful feature! Paint is not that cooperative. You must create the folder yourself.
Other error messages:
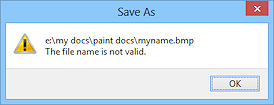 File name not valid: This message might mean that you have tried to use an illegal character in the file's name or path. But it can also mean that Windows just cannot find the location.
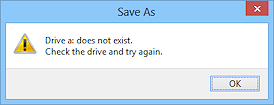 No such drive: You type a drive letter that does not match any of
the drives on the computer. The message will say that the path is not valid or
that the drive does not exist.
No such drive: You type a drive letter that does not match any of
the drives on the computer. The message will say that the path is not valid or
that the drive does not exist.
 No media in the drive: There is no disk in the drive. The message
says that Windows is unable to read the drive.
No media in the drive: There is no disk in the drive. The message
says that Windows is unable to read the drive.
Spaces and spelling: These are important in file
names! It is easy to make a mistake with spaces! Work around for path with spaces: When you are using an application that doesn't like spaces in the name, put quotes " " around the whole path like: "e:\my docs\paint docs\myname.bmp". - Click the OK button in the error message.
- To edit the path, click in the space between the words paint and docs in the File name text box.
- Press the DELETE key enough times to erase the word docs .
- Press the BACKSPACE key enough times to remove the word paint .
- Type win project2
This folder was created on your Class disk in a previous lesson so it should be there! - If necessary, select the file type from the drop list.
Paint remembers the last file type you used.
This file format is not normally the best choice because the file size will be larger than with other formats that Paint can use. In the next lesson you will use this file while learning how to reduce the file size. - Click on the Save button.
Problem:
Error message appears again after entering the correct path
Solution: Close the Save As dialog and start over, typing in the correct path this time.File Size: If your canvas is really large
and you are saving in a BMP format, the file
can be really large. Will it fit on your disk? If you get a message that there
is not enough space on your disk, use the technique in the
section Resize Canvas above to reduce the canvas to a more reasonable size. - Close Paint for now.
Your creative image is safely stored on your Class disk.
|
|
| © 1997-2017 Jan Smith All Rights Reserved |
Site Map What's New |
Privacy Policy Terms of Service Copyright Acknowledgements |
~~ 1 Cor. 10:31 ...whatever you do, do it all for the glory of God. ~~
Last updated: March 22, 2017