
Jan's Working with Windows:
Folders: Move, Delete, Rename
You will change your mind ... about where you put a folder ... about what you named it ... about having the folder at all. In this section you will learn how handle these changes.
Windows offers so many ways to do things that it can sometimes be confusing. Not to worry! As long as you learn at least one way, you can manage. As you become more familiar with Windows, you should look for other methods might work better for you. Some folks never want to use the mouse if they can use the keyboard, and others are just the opposite. That's the beauty of modern computing - Different strokes for different folks.
| |
Step-by-Step: Move, Delete, & Rename |
|
| What you will learn: | to move/copy a folder between windows by dragging and
right-dragging to drag to select multiple folders to move/copy multiple folders at once to undo a move to delete a folder to rename a folder to undo a rename |
Start with: ![]() , two windows
from the previous lesson - one showing what is on your removable
Class disk and one showing the contents of the folder my docs on the Class disk. Both windows show Icons (WinXP) or Medium Icons (Vista, Win7, Win8).
, two windows
from the previous lesson - one showing what is on your removable
Class disk and one showing the contents of the folder my docs on the Class disk. Both windows show Icons (WinXP) or Medium Icons (Vista, Win7, Win8).
The methods you will be using work for both files and folders.
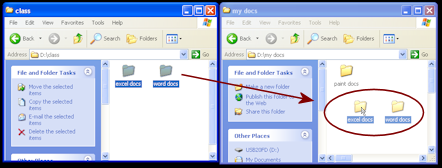
Move by Dragging
Drag and drop: Select something. With the mouse pointer over the selection, press down the left mouse button and hold it down while moving the mouse. The object is dragged along with the mouse pointer. When you release the left mouse button, the object is dropped at the spot where the mouse pointer is.
-
 Drag the title bar of each of the two windows (the
contents of the removable drive and of the folder my docs) so that the windows do not overlap.
Resize the windows, if you need to, so that they fit side-by-side on your monitor.
Drag the title bar of each of the two windows (the
contents of the removable drive and of the folder my docs) so that the windows do not overlap.
Resize the windows, if you need to, so that they fit side-by-side on your monitor.
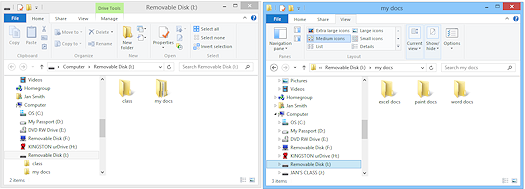
 Drag the folder excel docs from the my docs window until your pointer is over folder class in the drive window.
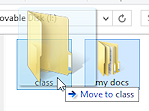
The icon for this folder class is highlighted once it is selected.Screen Tip:
Except for WinXP, a screen tip tells you whether you are about to Move or to Copy the folder. Excellent feature! Remember to pay attention to that!- Drop the folder excel doc on top of the folder class by releasing the mouse button that you were holding down.
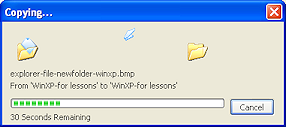
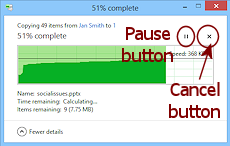
The folder location is changed to where the pointer was, or, in this case, to the object that was highlighted.Progress Dialog: Except for small jobs, a dialog displays while the computer moves, copies, or deletes folders and files. A progress bar gradually extends to show you how much of the job has been done. (The job in this lesson will finish before such a dialog can display!) There is a Cancel button you can click... if you are fast enough!
![]()
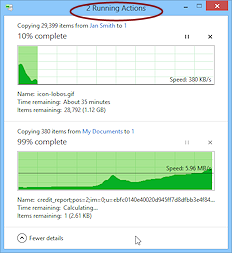
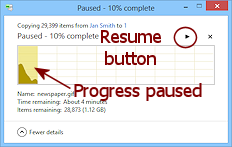
![]() Win8, Win8.1: Progress Dialog: Adds new features and more details to the progress window, including transfer speed and a more accurate estimate of the time remaining. There is a Pause button || and a Cancel button X. You can even do multiple copies or moves at once and see the progress of each one separately, but in the same window.
Win8, Win8.1: Progress Dialog: Adds new features and more details to the progress window, including transfer speed and a more accurate estimate of the time remaining. There is a Pause button || and a Cancel button X. You can even do multiple copies or moves at once and see the progress of each one separately, but in the same window.
 |
 |
 |
![]() Moving or Copying? It is easy to move when you meant to copy. Read the dialog box carefully. It tells you what action is happening, Moving, Copying, Deleting, Recycling. Always check on what you just
did!
Moving or Copying? It is easy to move when you meant to copy. Read the dialog box carefully. It tells you what action is happening, Moving, Copying, Deleting, Recycling. Always check on what you just
did!
![]() When does dragging move
and when does it
copy?
When does dragging move
and when does it
copy?
When the original location and the destination
location are on the same drive, the folder is moved when you drag. If
the destination location is on a different drive, the folder is copied.
![]() Problem: Not
enough space
Problem: Not
enough space
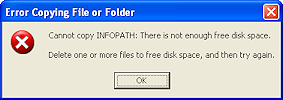
If there is not enough free space on the drive to hold what you are copying or
moving, you will get a message.

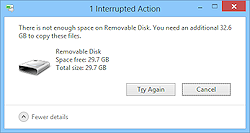
Solution 1: Leave the message open while you delete or move
files/folders on the destination disk to make more space. Then click the Retry or Try Again button.
This way you don't have to select again!
Solution 2: Choose Cancel and find a different location for your copy/move.
Solution 3: Choose Cancel and select a smaller set of files and then try
again.
Why is it hard to know if there is enough
space ahead of time?
Files can take more space on one drive than they do
on another. That happens when the drives are formatted with different rules,
which is common when there are two different types of storage, such as a hard
disk and a USB drive.
-
The error message has only one button, OK.
You may have to select your files/folders again after clearing out space on the destination disk. -
WinXP starts writing files and folders without checking whether there is enough free space for all of them. You will not see the error message until WinXP comes to a file that will not fit in the remaining free space. That might be after an hour of copying! Not a good plan!!
Move with Right Drag
Right drag: Hold down the right mouse button and drag the mouse.
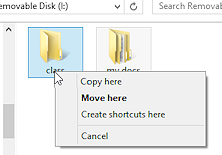
 Right drag the folder word docs to the folder class .
When you release the mouse button to drop the folder, a context menu appears.- Choose .
Notice all the choices: Cancel, Copy Here, Move Here, or Create Shortcut(s) Here (to the object that you right dragged). The one in bold is what will happen if you don't choose something from the menu.
 Recommended: Right drag files and folders always and you won't have to remember whether the object will be copied or moved. The menu will always give you a choice!
Undo and Redo Move
Windows keeps track of your actions. Often you can reverse those actions with the Undo command. If you find that you were right the first time, the Redo command will do what you just undid. But you have to be quick. The commands are not available forever.
![]() WinXP: Does not put the Undo or Redo commands on a context menu. The Undo command is in the Edit menu from the Menu bar, but there is no Redo in WinXP for a My Computer window.
WinXP: Does not put the Undo or Redo commands on a context menu. The Undo command is in the Edit menu from the Menu bar, but there is no Redo in WinXP for a My Computer window.

 Open the folder class by double-clicking it.
The window shows the two folders you moved here: excel docs and word docs
-
Right click in a blank area of the window and from the context menu, select .
(The menu item changes to show the last action that you took.) WinXP: Menu bar:
 The word docs folder vanishes from the window.
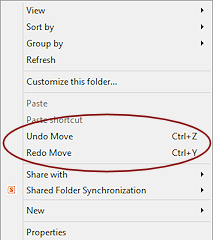
- Repeat to get the menu back again.
A new command shows, Redo Move, along with Undo Move.
WinXP: No Redo command on the context menu or the Edit menu.  Click on Undo Move.
The excel docs folder vanishes.- Show the menu again and select .
The excel docs folder comes back. - Redo again.
The word docs folder returns. Hurrah!  Practice the Undo and Redo actions using the key combos, CTRL + Z to undo and CTRL + Y to redo.
When you are finished practicing, the class folder should contain the folders excel docs and word docs again.
It would be nice to see a list of the actions that are available to Undo and Redo, but there is not one for this type of window.
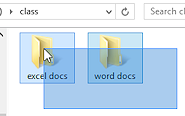
Select and Move Multiple Folders: Marquee Select
There are several ways to select multiple folders. The marquee select method used here is particularly useful when the icons for your files and folders are next to each other.
 Click in a blank spot
in the window showing the contents of the class folder and drag.
Click in a blank spot
in the window showing the contents of the class folder and drag.
A box called the marquee appears as you drag. (Pronounced . It's French.)
- Keep dragging until the box covers enough of the icons for the two folders excel docs and word
docs that the icons become highlighted, which shows that they are selected.
(Your marquee box does not have to completely enclose the icons.) - Now release the mouse button.
This method is called marquee select. -
Drag either of the selected folders over to the my docs window and drop.
Both folders are dragged since both were selected!
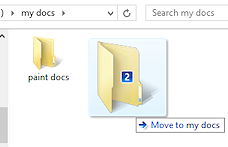
The dragged icon shows the number of objects you are dragging, except in WinXP. This is very helpful when you are moving or copying a large number of items.
Delete Folder
- Click on the folder paint docs in the window for my docs to select it.
- Press the DELETE key on your keyboard.
One of two dialog boxes will appear asking you to confirm that you want to delete this folder.- Send to Recycle Bin: If what you are deleting can be saved in the Recycle Bin and therefore can be undeleted later, you will see a dialog with the icon for the Recycle Bin, like:
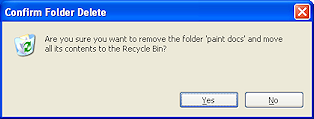
- Permanently delete: If what you are deleting cannot be put in the Recycle Bin, because it is on removable media or is too large to fit in the available space in the Recycle Bin, then you will see a somewhat different dialog:
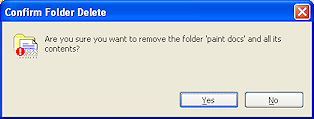
 You cannot use Undo to get
back anything that was permanently deleted!!! Recycle Bin and a USB drive: Your computer
will
not usually allow files and folders from a USB drive to go to the Recycle
Bin. It seems to depend on whether or not your computer 'sees' the USB drive as
a removable drive or instead as an additional drive.
You cannot use Undo to get
back anything that was permanently deleted!!! Recycle Bin and a USB drive: Your computer
will
not usually allow files and folders from a USB drive to go to the Recycle
Bin. It seems to depend on whether or not your computer 'sees' the USB drive as
a removable drive or instead as an additional drive.
- Click on the Yes button.
Your folder is deleted. Which type of deletion - to Recycle Bin or permanent? - Use the key combo CTRL + Z to attempt to recover what you deleted.
If you saw a message about a permanent deletion, this won't work! That would be normal for a removable drive. - If necessary, recreate the folder paint docs.
Recover a
deleted file from the Recycle Bin:
If the item went to the Recycle Bin but it is too late to use Undo, you may be able to recover deleted items, if you act soon enough. The Recycle Bin will only hold so much and will clean itself out as it needs space for new deletions. So you can't undo your deletions forever. If you are deleting a large number of files or very large files, the Recycle Bin may not have room for them at all.

If the Undo option is not still available, open the Recycle Bin by double-clicking its Desktop icon.
A Computer/File Explorer window opens.- Select the item(s) you want to restore.
- Use one of the following methods to restore:
- Right click on selection >
-

 Win8, Win8.1: Ribbon button: Restore selected item(s).
To permanently
delete files or folders immediately:
Hold the SHIFT key down while pressing the DELETE key. The selected item(s) will NOT be put in the Recycle Bin even if they could have fit in it. They are destroyed. Fancy file recovery software may be able to get them back. Maybe! Check confirmation box for type of deletion: If the icon is the Recycle Bin, then you can undelete your deletion, at least in the near future. Otherwise it is a permanent loss.
Rename Folder: Mouse
You don't have to use menus to rename folders and files, if you can click carefully.
-
 To rename the folder word docs, click on its label.
- Pause briefly and click again.
Clicking too quickly will result in a double-click, which will open the folder. Problem:
You double-clicked and opened the folder by accident.
Problem:
You double-clicked and opened the folder by accident.
Solution: If a new window opened, close the new window and try again. If the display changed in the same window, click the Back button and try again.Problem: Lost
highlight for the label
Solution: Click off the label in a blank area of the window and then click the label again. -
 Type pictures and
don't click anywhere else yet.
Type pictures and
don't click anywhere else yet.
You changed your mind and don't want to rename after all! - While the name is still highlighted, press the ESC key at the upper left of your
keyboard.
The folder name will return to the previous name.
Let's try a different name.
- Click on the label word docs. Pause and click again.
- Type reports , and then click in a blank spot in the window.
The name is changed.
Hmmm. You still don't like this name. This time we will let Undo come to the rescue.
Undo Rename
 Right click in a blank area in the window and from the context menu click to undo the change.
This works well when the highlight has been lost. The label will return to word docs.
Undo last action: What
action that the menu says you can Undo will change depending on what you just did! It's always the very last thing you did.
There is no history list that you can see, though Windows does remember more than one action in
the more recent versions. So catch those mistakes quickly!
- Refresh: Press the F5 key to refresh the listing of folders.
They should be in correct alphabetical order now. - Close all open My Computer/Computer/File Explorer windows with the method of your
choice:
- Close button
- Double-click the control icon on the title bar or the title bar itself.
Check it out!
![]() Your Class disk should now contain:
Your Class disk should now contain:
 class
class
- my docs
- excel docs
- paint docs
- word docs
-
|
|
| © 1997-2017 Jan Smith All Rights Reserved |
Site Map What's New |
Privacy Policy Terms of Service Copyright Acknowledgements |
~~ 1 Cor. 10:31 ...whatever you do, do it all for the glory of God. ~~
Last updated: March 22, 2017