
Jan's Working with Windows:
Folders: Create & Arrange
 What is a folder? It's just a way to group files together, like putting various paper documents into a file folder and then into a file drawer.
What are the basic tasks about folders that you need to learn?
Obviously you must first create a folder or two. You will change the way your folders display in the window.
Most of these tasks work much the same in different versions of Windows and for files as well as folders.
| |
Step-by-Step: Create & Arrange |
|
| What you will learn: | to create a folder using the File menu or ribbon button to create a folder using the context menu to arrange folders |
Start with: ![]() , Computer or File Explorer window open
, Computer or File Explorer window open
![]() Missing expected command: Many parts of Windows are context-sensitive. That is, they change depending on what is selected or what you are doing. The Common Tasks pane and the menus in WinXP are examples. Win7, 8, and 8.1 have ribbon tabs that only show when you have selected an object for which the commands make sense. For example, the Picture Tools tab appears when a folder containing images is selected. So when a command you expect to see is missing, first check to see what is selected.
Missing expected command: Many parts of Windows are context-sensitive. That is, they change depending on what is selected or what you are doing. The Common Tasks pane and the menus in WinXP are examples. Win7, 8, and 8.1 have ribbon tabs that only show when you have selected an object for which the commands make sense. For example, the Picture Tools tab appears when a folder containing images is selected. So when a command you expect to see is missing, first check to see what is selected.
Open a Drive
- Open a Computer or File Explorer window to show
the drives on the computer.
(Hint: Double-click the icon on the Desktop for My Computer or Computer or This PC.) - If necessary, attach your drive to the computer.
The window should refresh automatically to show the newly attached drive.
If the AutoPlay dialog opens, close the dialog.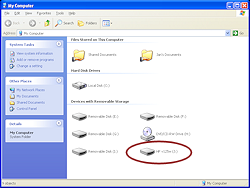
-
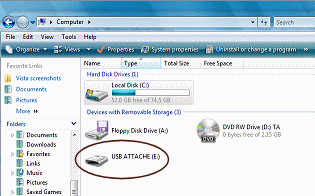
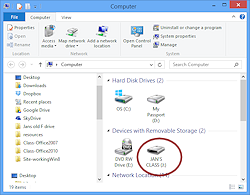
 Double-click on the icon for the removable drive.
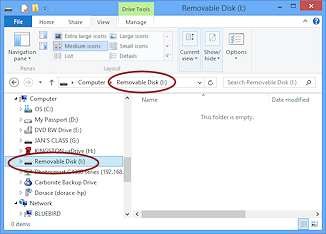
The display changes or a new window opens, depending on the computer's settings.
You may or may not see icons in the window. A new USB flash drive is usually blank but some drives come with software already on the drive.
It does not matter for these lessons if there are already folders and files on the disk. Just be careful not to delete or move any pre-installed files or folders.
 Right click in a blank area and select and then (WinXP) or (Vista, Win7, Win8) so that your window is ready for the next
steps.
Right click in a blank area and select and then (WinXP) or (Vista, Win7, Win8) so that your window is ready for the next
steps.
Create and Name a Folder: File Menu or Ribbon
The illustrations below show a the folders in Icons style (WinXP) or Medium Icons style (Vista, Win7, Win8, Win8.1).
![]() Menus: An arrow following a menu item like
Menus: An arrow following a menu item like ![]() means that another menu will cascade
from it.
means that another menu will cascade
from it.
Three dots following a menu item like ![]() means that a dialog box will open,
containing choices for you to make.
means that a dialog box will open,
containing choices for you to make.
- Create a new folder:
Menu:


 WinXP, Vista, Win7:
 Choose > >
(Click on the menu, then the item and then the item )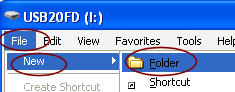
 Problem: The Menu bar is not showing.
The menu bar is hidden by default in Vista and Win7.
Solution: Press the ALT key on the keyboard. The Menu bar appears.
Once you have selected something from the menu, the menu will vanish again. You can make it stay in view all the time by clicking the Organize button and then >. -
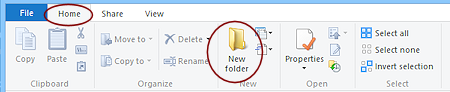 Ribbon:

 Win8, Win8.1: If necessary, click on the Home ribbon tab and then click the New folder button.
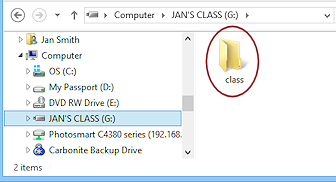
A new folder appears with the name New Folder, which is highlighted
 , ready for you to type. You really do want to replace this unhelpful name!
 -
While the folder label is still highlighted, type class as the new name for this folder and press the ENTER key.
The folder is renamed.
 Problem:
You lost the highlighting before typing.
Problem:
You lost the highlighting before typing.
You must have clicked somewhere else.
Solution 1: Right click on the icon and choose to get the highlighting back. Then you can type
to replace the name.Solution 2:
Click on the folder name, pause, click again.
The highlighting returns.
Don't click too quickly the second time or the computer will treat it as a double-click which will open the folder.
Create and Name a Folder: Context Menu
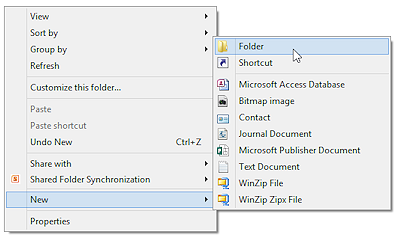 Right click in a blank spot in the window to see the context
menu.
Right click in a blank spot in the window to see the context
menu.
This will automatically deselect the label you were just typing.
- Select the menu item .
The menu slides out. - Click on .
A new folder appears in the window with its name ready for your typing.
-
While the folder label is still highlighted, type the name my docs as the name for this new folder and then
click in a blank spot in the window.

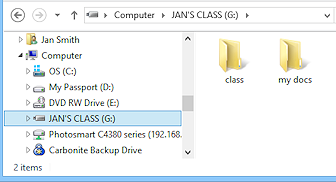
Now you have 2 folders: class and my docs
Open Folder in New Window
When you open a folder from the Contents pane, do you want the folder's contents to show in the same window or do you want it to open in a new window? It probably depends on what you are doing! There is a context menu to help you out, but the choices are not as obvious in WinXP and Vista as they are in Win7, Win8, and Win8.1.
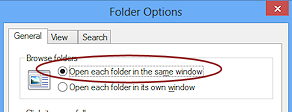 You can change the default behavior in the Folder Options dialog, on the General tab or you can use the right click menu and pick an action.
-
Double-click the folder my docs to see if it opens in a separate window. The folder is empty so far.
Did your folder open in the same window or in a new window?
Which one happens is controlled from the Folder Options dialog.
The default behavior is different for different versions of Windows.Problem:
You did not get a separate window automatically.
The Folder Options is set to open in the same window.Solution 1: Click the Back button on the Address bar to return to the view with your two new folders.
Right click on the my docs folder and select the second choice in the list or ,if it is there.
The first two choices in WinXP are Open and Explore while in Vista the choices are reversed, Explore and Open. These don't really tell you whether you will get a new window or not. Win7 and Win8 are clearer since they include the choice 'Open in a new window'!Solution 2: Open the Folder Options dialog and change the default setting on the General tab to the one your prefer.
-
Using the methods you just learned, in the my docs folder create three new folders, named word docs, excel docs, and paint docs.
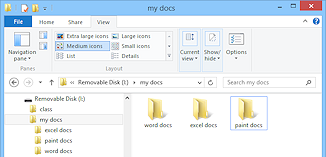
Create and name them in the order listed!
As you create new folders or files, they are added to the end of the list at first. You must refresh the window to get the contents sorted again with the current sorting choices.
The icons for the new folders may be scattered around the window if you used the right click menu. It depends on where you clicked and whether Auto Arrange is turned off.
Don't worry. Making things neat is the next topic.
Arrange Icons
First a couple of definitions:
AutoArrange arranges icons into neat rows and columns, starting from the top left.
Align to Grid or Line up Icons arranges icons to the closest lines in an invisible grid.
Neither of these change the order of the icons. They just straighten up the lines of icons.
 Drag a folder icon out of line and drop it elsewhere inside the same window.
Did it fail to move at all or pop right back in place? Your computer has AutoArrange icons turned on.- Turn off AutoArrange the icons:
WinXP, Vista:
If your icon popped back into place, select from the menu or the right click menu, > to turn this feature off for now. AutoArrange puts the icons in rows and columns. Win7, Win8, Win8.1: Automatically arranges icons and does not have a command or dialog choice to
turn off this behavior.
Advantage: Keeps you from accidentally covering one icon with another.  Experiment: Moving folder icons
-
Try to drag the folder icons around so that they are not in order
and are not lined up in a row.
Win7, Win8, Win8.1: Your folders will not change position, even when the folders are not in the current sorting order, which is alphabetical order. Did you expect that! -
WinXP, Vista:
- Right click in a blank area of the window and from the context menu choose > or >
Your icons are lined up to the invisible grid lines but are not automatically put into the same rows and columns.If your icons still aren't neatly in rows or if they extend past the window edge, drag one or more of them closer to where you think they should go and Align to Grid again.
- To do it the easy way, select from the menu or the context menu, > > or
Your folder icons should now be in neat rows.
- Drag the icons a short distance.
They pop right back in place. - Drag the folder excel docs to the far right of the window.
With AutoArrange on, the folder is lined up neatly at the end of the row
and the other two folders are moved to the left. This shows that AutoArrange does not
alphabetize. It just lines up the rows and columns neatly.
-
-
Right click in a blank spot in the window and choose or or from the
context menu.
A submenu expands.
- Click on or ,
even if it is already selected.
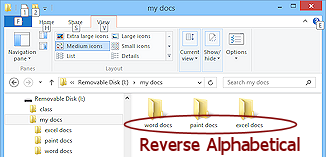
Did any folders switch positions? Are they in alphabetical order now, excel docs, paint docs, word docs?
If your folders were already in alphabetical order, they are now in reverse alphabetical order with the folder excel docs on the right. -
Experiment: Sorting and Grouping
With only three folders, sorting and grouping is not as exciting as if there were 50 items, but you can see how these features work.- Right click in a blank spot in the window and select in turn each of the different choices for sorting and grouping.
(These choices are also on the toolbar or ribbon. Look for Sort by and Group by.)You only have three folders, so some choices may not look very different.
-
When you are done... let you last choice be by Name in ascending order with no grouping.
 Arrange by: The right click menu for a folder in a library (Win7, Win8, Win8.1) has yet another item, . This opens a short list of common properties for items in that type of library. Choosing one of these will group your files based on that property, such as by author or date created for documents, day or month for photos, type or length for videos.
|
|
| © 1997-2017 Jan Smith All Rights Reserved |
Site Map What's New |
Privacy Policy Terms of Service Copyright Acknowledgements |
~~ 1 Cor. 10:31 ...whatever you do, do it all for the glory of God. ~~
Last updated: March 22, 2017