
Jan's Working with Windows 10:
Pointing Devices
Before you can explore Windows much, you must know how to control the pointer on the screen.
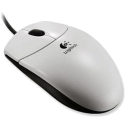
Mouse
|
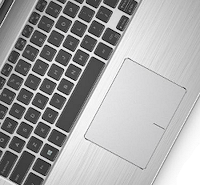
Touchpad
|
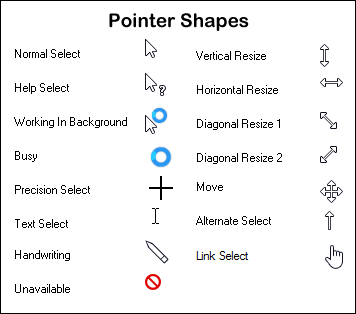
The normal shape for the pointer is an arrow: ![]()
The tip of the arrow shows where your action will be applied. Other shapes for the pointer and their meanings are at the end of this page.
With a mouse, the pointer moves as you move the mouse around.
A keyboard is not usually thought of as a pointing device, but you can do most mouse tasks with those keys that are not letters or numbers.
On a touchpad (laptops) or touchscreen (tablets and smartphones), the pointer moves as you move your finger on the pad or screen.
There are other kinds of pointing devices, like a game controller or a stylus, which is a special pen used with some touchscreens.
A physical pointing device has at least two buttons for left and right clicks. Many have a middle button between the left and right buttons or a scroll wheel that can also be clicked. Some devices have several other buttons that can be programmed for special functions, especially for games.
Touchpads and touchscreens use a taps and swipes on the pad or screen. Some laptops have physical buttons near the touch pad to use for left and right clicks.
A gesture for a touchpad or touchscreen is some combination of three features:
- Number of taps
- Direction of swipe
- Number of fingers to use.
Using a Pointing Device
| Mouse | Touch Gestures | Keyboard | |
|---|---|---|---|
| Move the pointer | Move the mouse around. |
Drag finger on pad or screen. | Cannot move the pointer. Keys can change the selection or move a cursor (where actions will be applied). |
| Click | Press the left mouse button and release it. | Tap once with finger or press at the lower left of the touchpad. |
ENTER key or Spacebar |
| Double-click | Press a mouse button twice quickly. | Tap twice quickly with finger. | ENTER twice quickly. |
| Right click | Press the right mouse button and release it. | Touch pad: Tap with two fingers or press firmly at the lower right of the touchpad.
Touch screen: Press with finger or stylus, hold briefly, then lift up. |
(on some keyboards) |
| Drag Usually what the pointer was over on the screen will move or be highlighted when you drag. |
Hold a mouse button down while moving the mouse.
|
Tap twice quickly but don't lift your finger up on the second tap. Drag finger on screen or pad.
|
SHIFT + arrow key will enlarge a selection to include other objects. Key combo CTRL + X to cut. Arrow keys to get to the new location. CTRL + V to paste. |
| Right Drag to get a menu of choices when you drop |
Hold the right mouse button down and move the mouse around. When you release the mouse, you will get a menu of options. |
Touchpad: Press the bottom right of the touchpad, hold briefly, then drag across the touchpad. Touchscreen: Touch and briefly hold until you see an extra border or a circle around your pressure point, then drag. |
|
| Scroll | Roll the wheel that some mice have to move the document up and down in the current window. | Drag two fingers horizontally or vertically to move the document up and down in the current window. Some touchpads will scroll when you drag down the right edge of the touchpad. |
Arrow keys will scroll the view once the focus reaches the edge of the window. PageUp and PageDown keys shift the view one screen up or down. |
Practice Pointing Device Skills
Watch carefully how you click or tap. Things may move! Refresh your window to get back to the original layout in the practice area below. You cannot use the keyboard alone for this exercise.
Credit: Microsoft
Card backs from an old Solitaire
-
Move your pointer
 over each image in the frame.
After a brief pause, a screen tip appears.
over each image in the frame.
After a brief pause, a screen tip appears. -
Click on the cars. Something changes. Click on other images.
 Do any others change?
 -
Double-click the fish. Another change. Double-click other images.
Which ones change? -
Right click on a picture. Right click in the frame but not on a picture. You get two different context menus. To close the context menu, click somewhere else or press the ESC key.
-
Drag the scrollbar at the right of the images down.
More of the page comes into view. -
Drag the images around.
This is easy enough to do with a mouse or a stylus. It may be hard with a touchpad or touchscreen.Can you get them into a single
stack... with even edges?
What other arrangements can you create? - Scroll page inside frame:
If you mouse has a scroll wheel, put the pointer over the framed area. Rotate your scroll wheel.
If you are using a touchpad or touchscreen, with the pointer over the framed area. Drag with two fingers, up and down a short distance.You can move the images up and down in the frame just like the scrollbar did. When you reach the top or bottom of the framed document, rotating the wheel or dragging with two fingers moves the pointer outside the frame and makes the whole page move.
To reset the images, refresh the page by clicking the Refresh button of your browser or by pressing the F5 key on the keyboard.
These images are the options for card backs from Solitaire in WinXP.
More Gestures
Your touch device may have more or different gestures depending on the manufacturer. Some gestures use 3 or even 4 fingers. You may be able to customize the gestures that your touchpad/touchscreen uses.
If you have a 'precision' touchpad or touchscreen,Microsoft has some new gestures for Windows 8, 8.1, and 10 ![]() . These use more than two fingers. In Windows 10, to find out if your device is 'precision', go to Settings > Devices > Mouse & touchpad. The sentence "Your PC has a precision touchpad." will be in the right pane under the subtitle Touchpad.
. These use more than two fingers. In Windows 10, to find out if your device is 'precision', go to Settings > Devices > Mouse & touchpad. The sentence "Your PC has a precision touchpad." will be in the right pane under the subtitle Touchpad.
- Zoom in or out: Place two fingers on the pad or screen and pinch in or stretch out.
- Task View: Swipe three fingers up to open task view and see all your open apps.
- Desktop: Swipe three fingers down to show the desktop.
- Switch apps: Swipe three fingers either left or right to switch between your open apps. Slide your fingers slowly across the pad or screen to flip through them all.
- Action Center or Cortana: Tap the pad or screen with three fingers.
![]() It's physical! To control your pointer comfortably you must practice, practice, practice. This is a physical skill which uses muscles in your hand and forearm and even the chest that you may not have used before in quite this way. You should expect some soreness when you first start using a new device or method or when you have an unusually long or intense session.
You can develop serious problems like carpel tunnel syndrome if you do not have
the proper physical setup for your work. Aching necks are common!
It's physical! To control your pointer comfortably you must practice, practice, practice. This is a physical skill which uses muscles in your hand and forearm and even the chest that you may not have used before in quite this way. You should expect some soreness when you first start using a new device or method or when you have an unusually long or intense session.
You can develop serious problems like carpel tunnel syndrome if you do not have
the proper physical setup for your work. Aching necks are common!
 Pointer
Shapes
Pointer
Shapes
The shape of the pointer changes depending on where it is and what is happening. It does NOT depend on whether you are using a mouse, a trackball, a touchpad, or a touchscreen.
The list at the right shows the pointer shapes for Windows 10. Particular programs and versions of Windows might use somewhat different shapes, but they are probably similar to these for these actions. The Busy and Working In Background shapes tend to be the ones that are different. Programs often have additional pointer shapes that are useful in that program.
The term cursor is used for the shape that shows where your typing will appear. That is usually a vertical bar | or an I-beam ![]() shape. You can position the cursor by clicking or tapping in a spot in a document. So the pointer
and cursor work together, but are not quite the same thing.
shape. You can position the cursor by clicking or tapping in a spot in a document. So the pointer
and cursor work together, but are not quite the same thing.
The hand shape ![]() usually means that the pointer is over a link, like on a web page.
usually means that the pointer is over a link, like on a web page.
Since pointer shapes can be customized in the Mouse dialog (see the lesson Control Mouse later), your own pointer shapes may look quite different or even be animated. For example, the following animated shapes are used in pointer schemes that come with WinXP for the shape Working In Background:
![]()
![]()
![]()
![]()
|
|
| © 1997-2017 Jan Smith All Rights Reserved |
Site Map What's New |
Privacy Policy Terms of Service Copyright Acknowledgements |
~~ 1 Cor. 10:31 ...whatever you do, do it all for the glory of God. ~~
Last updated: March 24, 2017