
Jan's Working with Windows 10:
Dialogs: Screen Saver
A screen saver program continuously changes what shows on the screen to prevent 'screen burn-in' on CRT monitors. When a display on a CRT monitor stays the same for too long, a permanent discoloration remains behind. This was a common problem for office or point-of-sale computers where the same interface was showing through most of the work day. LCD monitors do not have that problem. Screen savers now are just for enjoyment.

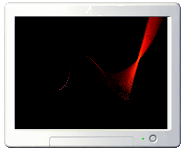
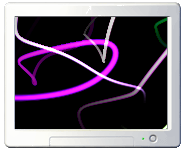
Stills from Screen Savers: Bubbles, Mystify, Ribbons
In this lesson you will work with a classic style dialog for screen savers that has several different kinds of inputs.
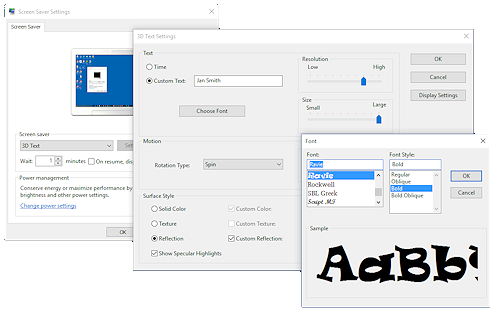
Sequence of Dialogs: Screen Saver > 3D Text Settings > Font
|
|
Step-by-Step: Screen Saver |
|
| What you will learn: | to use a classic style dialog (Screen Saver) to use various inputs: text box, drop list, spin box, slide, button, list box, option buttons, check box |
Start with: ![]() Desktop and Taskbar showing
Desktop and Taskbar showing
Using Screen Saver
The dialog for managing screen savers is not part of the new style Settings dialog yet. There is a classic dialog available, but it is not obvious where to find it.
[ April 2017 - Search does not find this dialog in Windows 10 CU! Maybe Screen saver will move to Settings soon.]
-
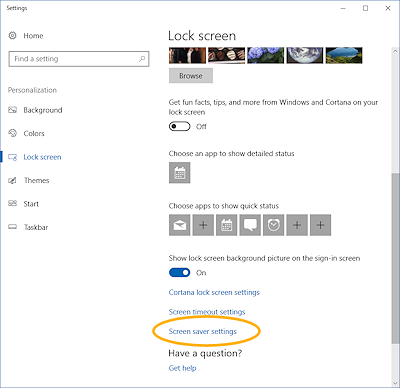 Open Settings to the Lock screen page.
 - Scroll to the bottom of the page.
 Click on 'Screen saver settings'.
A dialog opens.
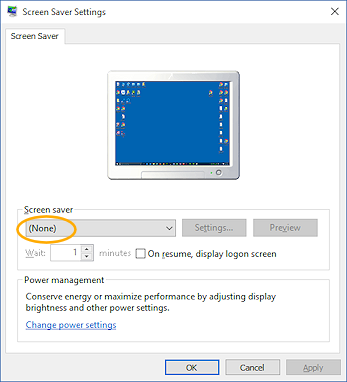
- Inspect the dialog.
 What kinds of inputs do you see here?
There is a drop list, some command buttons, a spin box, and a check box. That's four input types already!Buttons that are grayed out cannot be used with the current selection for screen saver.
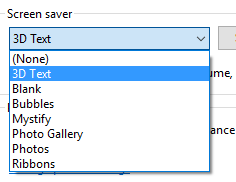 Drop List: Click the Screen saver drop list to see all of the choices that come with Windows 10.
 -
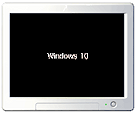
Click on 3D Text.
The thumbnail of your computer screen at the top of the dialog runs a sample to show what your screen saver will look like.The default 3D Text screen saver rotates the phrase 'Windows 10' around on a black screen. You can customize this.
 Spin Box: Click
the up arrow at the right of the Wait box.
Spin Box: Click
the up arrow at the right of the Wait box.
The Wait time is how long the computer will sit while nothing is happening before running the screen saver. The default is 1 minute. Each click changes the delay one minute.- Click the down arrow to reduce the delay back to the default, 1 minute.
- Check Box: Click
the check box 'On resume, display logon screen'.
This choice means that once the screen saver starts, you will have to logon again to get back to your work.
Is that a good thing? Or is it too annoying?
Extra security comes with a price! - Click the check box again to turn this choice off.
-
Command Button:
Click on
the Settings... button to the right of the drop list. (3D Text is still the selected screen saver.)
The 3D Text Settings dialog opens. This one looks more like the Settings dialog in the last lesson in color and spacing, but it is really a classic dialog because it has OK and Cancel buttons. Settings pages automatically apply your choices without the need for these buttons.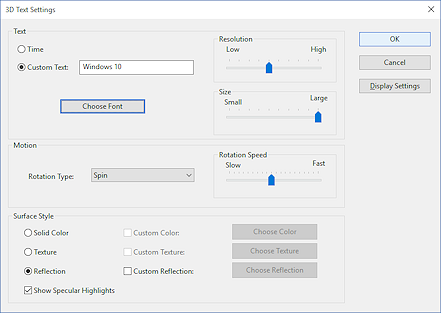
So many ways to customize this screen saver.
This dialog will have different choices for different screen savers. Some do not have any settings to choose even if they did in previous versions of Windows.
It's time to experiment!
 Experiment: 3D Screen Saver
- Inspect the dialog.
What kinds of inputs do you see here?
There is a text box, several command buttons, three sliders, two sets of options buttons, and some check boxes. - Options button: If necessary, click on the option button 'Time' at the top of the box.
The circle gets a dark center to show that this is the chosen option.
You can choose only one of the two options: Time or Custom Text.
- Click on Custom Text.
The circle for Time goes white and the circle for Custom Text gets a dark center .
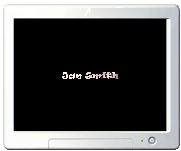
 - In the Custom Text box, replace 'Windows 10' with your name.
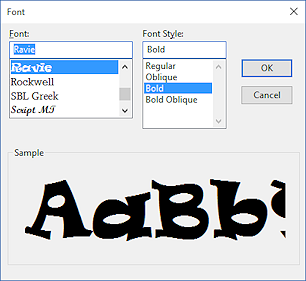 Command button: Click the button Choose Font.
The Font dialog opens.- List Box: Scroll the list of fonts available.
Each font name is written with that font, except for symbol fonts. - Click on an interesting font.
 Click on the OK button to close this dialog and return to the 3D Text Settings dialog.
 - Click on OK again to return to the Screen Saver Settings dialog.
What does your text look like on the thumbnail?
It can be hard to see at this size. - Click on the Preview button.
The screen saver runs full screen.
Move the mouse or press a key to end the preview.
When the preview quits, you are back at the Screen Saver Settings dialog. - Click on Settings... to open the 3D Settings dialog again.
- Change other settings for this screen saver.
Be sure to try each type of input.
Motion has a drop list.
Surface Style has a set of option buttons, each of which has a check box.
Resolution, Size, and Rotational Speed are sliders.
- For each choice, close the dialog to see the effect of your changes on the thumbnail. Let Preview show you what it looks like on the full screen.
There are MANY combinations!
- Inspect the dialog.
- Experiment with other screen savers.
- Pick a different screen saver.
- Check the thumbnail and Preview to see what each one will look like.
- Open Settings... for each one and make changes, if allowed.
For Photos and Photo Gallery you can navigate to a specific folder that you want to use.
When you are ready to continue... if you wish, choose and modify a screen saver that you want to keep.
- Close the dialog in one of the following ways:
- Click on Apply to save your changes and keep the dialog open.
The Apply button is grayed out (not available) until you actually make a change. - Click on OK to save your changes and close the dialog.
- Click on Cancel to discard the changes and close the dialog.
-
There are many more ways you can personalize/customize Windows. Now you have some experience is using the types of inputs that these dialogs require.
|
|
| © 1997-2017 Jan Smith All Rights Reserved |
Site Map What's New |
Privacy Policy Terms of Service Copyright Acknowledgements |
~~ 1 Cor. 10:31 ...whatever you do, do it all for the glory of God. ~~
Last updated: April 25, 2017