
Jan's Working with Windows 10:
Files & Folders: Exercise Win 2-2
Sometimes you save a document and fail to notice what folder it was saved in. Or perhaps you create a clever scheme one day for storing your files, but a week later you forget what you put where. You need help in finding your files. Windows has a wonderful tool search tool to assist you.
With Windows Search and Search in File Explorer you can search for a file or folder by name, by a partial name, by text contained in the file, or by date or range of dates. It's actually rather flexible.
![]() Special
characters for Search: Windows search lets you use wildcard characters as placeholders in the search term. The asterisk * stands for any number of characters. A question mark ? stands
in for a single character. So if you search for b*.txt the results would include all of the files with an extension of txt whose names start with a b. If you search for ??.png,
the results must have exactly two characters before the dot, like ad.png and my.png. Longer or shorter names would not show, like forest.png or f.png because they don't have the correct number of letters.
Special
characters for Search: Windows search lets you use wildcard characters as placeholders in the search term. The asterisk * stands for any number of characters. A question mark ? stands
in for a single character. So if you search for b*.txt the results would include all of the files with an extension of txt whose names start with a b. If you search for ??.png,
the results must have exactly two characters before the dot, like ad.png and my.png. Longer or shorter names would not show, like forest.png or f.png because they don't have the correct number of letters.
Exercise Win2-2: Find and Manage Files
| What you will do: | Create folders and files Move and rename Do a screen capture Crop in Paint and print Backup your files |
Start with: ![]()
![]() and have finished Exercise Win2-1.
and have finished Exercise Win2-1.
Look for Files
Windows lets you search for files based on the file's name or its contents or type or date created or date modified. But to see those choices you have to dig a bit. You will be using the search feature in a File Explorer window.
Windows Search on the Taskbar can be faster if you have recently worked with what you are looking for. Just a few results show at first but you can expand the results.
You can do most file management tasks directly from the results window. This is so neat!
- Search for files with the extension BMP:
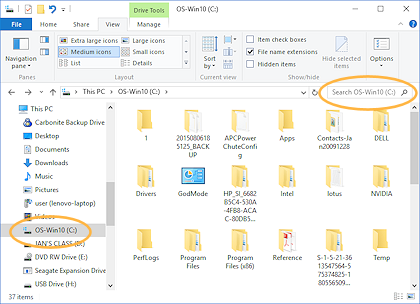
- Open a File Explorer window.
- Select the icon for drive C: in the folder tree.
-
In the search text box at the top right of the window, type *.bmp.
Windows starts looking for files with an extension of bmp. The address bar shows a green progress bar overlay. The search is not finished until the whole address bar is green, including the X box at its right end.My own Windows 10 computer had 103 GB of files on drive C. The search took about 2 minutes and found 4798 BMP files. Most of these are files that various programs use as part of their interface, like the image for a button.
Did you notice the Search ribbon tab that appeared? This is a context-sensitive ribbon tab that only shows when you are searching.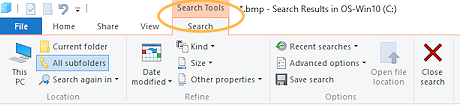
- Switch to the Search Tools: Search tab and inspect the ribbon buttons to see in what ways you can restrict the search results.
-
Navigate the folder tree until you can click on the Windows folder.
The Contents pane changes to show what is contained in the Windows folder.
The search box changes to show "Search Windows".
The Search Tools ribbon tab vanishes when you click on a folder in the folder tree.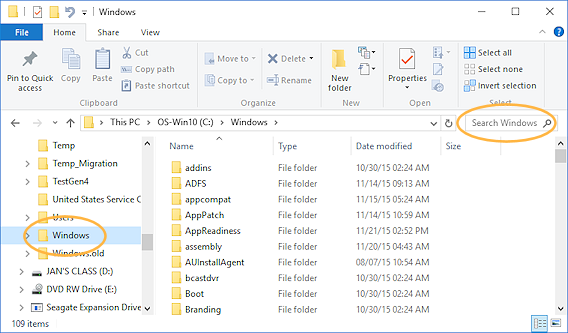
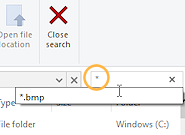 Click in the search box at the upper right.
A list of recent search terms drops.
If the list does not drop, type the asterisk, *.
The Search Tools tab comes back and a search starts immediately!
- Click on *.bmp.
Now Search looks in just the Windows folder instead of the whole computer for BMP type files.
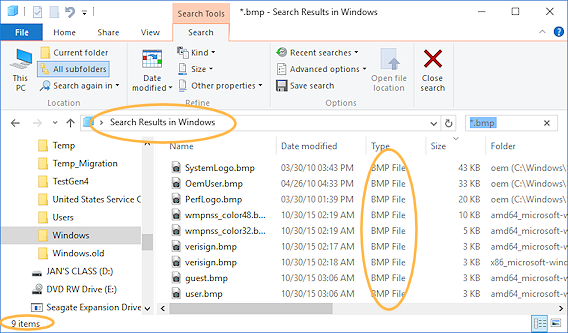
This search should run MUCH faster. My computer found only nine BMP files.
Note: If you search on just .bmp (without the asterisk), you will also get results for folders and files with bmp in the file name.
-
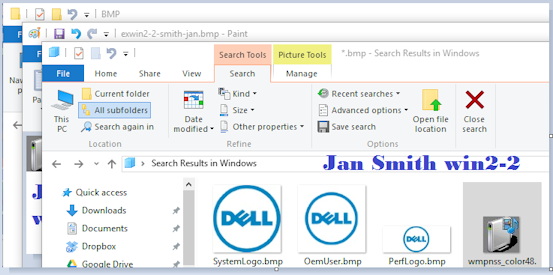
When the search is finished, scroll the list of found files.
The column for folder names may be out of sight to the right. If so, slide the horizontal scroll bar across the bottom of the window or enlarge the window to see the Folder column. The results are usually grouped by folder. Can you tell by the folder names how these bitmap images are going to be used?
-
Change the display to show Large Icons.
Some files may not show a thumbnail but normal BMP files will. Your results will likely be different from the illustration.
Clearly my computer was made by Dell. The icon for the files without thumbnail is for my default image editor, PaintShopPro. It is disappointing that some of the files will not show a thumbnail.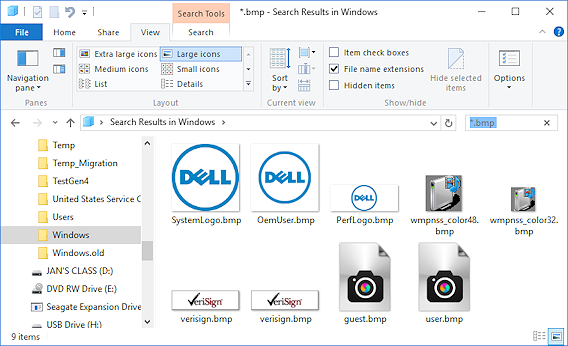
Copy Files: Send To
-
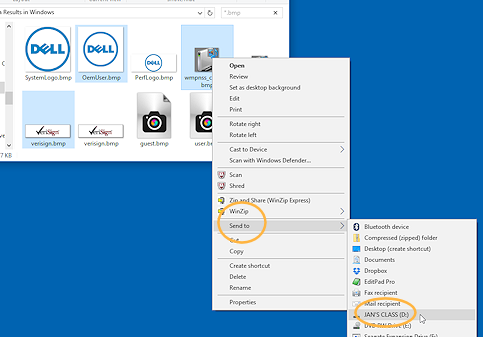 Select three images in the Search Results window.
Your results will likely show different BMP files. The files are mostly images that are used as part of the interface, like for buttons, backgrounds, file icons, or devices.
 Right
click on the selection.
Right
click on the selection. - From the context menu, hover over and from the menu that cascades from it,
select your removable drive.
The selected files are immediately copied to the root of the chosen drive (not in any of the folders). With this method, you cannot browse to a folder on the drive. The window does not change to show you the location of your copies! You must be prepared to remember the location!!
- Do NOT close the Search results window.
You need it to be open for later steps.
Create Folder; Save As
- Open a new File Explorer window.
- Create a new folder, named bitmaps on your removable disk.
- Move the three files from the root directory of the Class disk to the new folder.
- Display the contents of bitmaps in the window.
- On the folder tree, rename the folder as BMP.
In earlier versions of Windows, you did not get all caps when you typed BMP in all caps! - Open a file in Paint:
Right click on one of the images that you copied to your Class disk and select .
The picture opens in Paint. Problem: Image
opens in an image viewer like Windows Picture and Fax Viewer or in Windows
Photo Gallery.
Problem: Image
opens in an image viewer like Windows Picture and Fax Viewer or in Windows
Photo Gallery.
Cause: You double-clicked which selects the default menu item, Preview, or you clicked on Preview in the context menu.
Solution: Close the viewer window and try again.Problem: Image
opens in another graphics program
Cause: Most graphics programs change the file associations when they are installed to open all images in that program.
Solution: You can try to work with it there if you are familiar with it, or else close that program and use the Open with... command on the context menu. - If necessary, drag the bottom right corner of the image in Paint down and right to enlarge the canvas enough to hold some text.
-
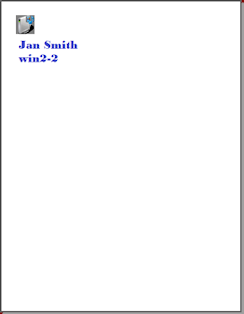
Use the Text tool
 to write your name and Win2-2 on the picture using
a color that contrasts well with the image. Use a font with large wide letters at a font size that
shows well and fits on the canvas.
to write your name and Win2-2 on the picture using
a color that contrasts well with the image. Use a font with large wide letters at a font size that
shows well and fits on the canvas.
Fonts are installed by many programs as well as Windows itself. If you upgrade to a new version, the installed fonts are still there. This makes it hard to predict what fonts your computer will have for you to use.
-
Open the dialog.
Change the location to the BMP folder on your removable drive. DO NOT save in the original file location!!!!
Use the name win2-2-LastName-FirstName.bmp, substituting your own first and last names, of course. Be sure that the file type is BMP. Just adding that extension will not change the file type.
-
 Check the Page Setup and Print Preview.
Make adjustments, if necessary, to print the image at the upper left of the page at 100% to 300% of normal size, depending on the size of your image. -
 If all is
arranged happily, print.
If all is
arranged happily, print. - Do NOT close Paint.
Refresh; Delete; Cascade; Backup
- Switch back to File Explorer with Windows key
 + TAB.
Notice that your file is at the bottom of the list. It is not in alphabetical order! - Refresh the list with one of the following methods:
- Method 1: Press the F5 key.
- Method 2: Click the Refresh button
 at the end of the Address box.
- Delete the original of the file you edited from the folder BMP on
your removable disk.
(Don't delete the original on the hard disk!!!)
-
Cascade the windows: Right click on the Taskbar and choose .
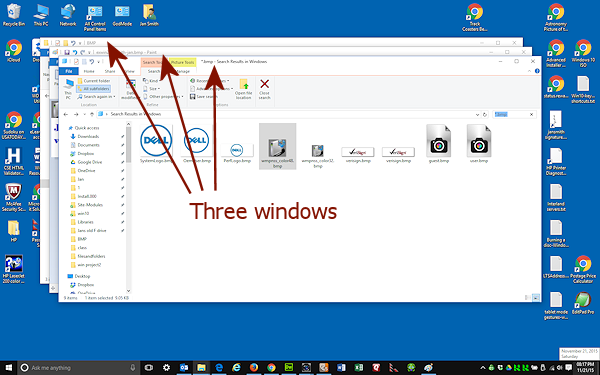
You should have at least 3 windows open - Paint, a File Explorer window showing your removable drive, and another one showing the search results (and likely a browser with these directions!).
Windows that are minimized will not show in the cascade.
Screen Capture
You can use a screen capture to show someone later what you saw on your screen. This is handy for many technical support issues and also for proving you made those high scores in your favorite games!
You can reduce the size of the file by cropping the image.
- Capture an image of the whole desktop with Print Screen.
- Open a new Paint window by starting Paint again.
- Paste your screen capture.
-
Crop: Use the Select tool to select the part you want to save, then click
 the Crop button. Be sure to include the top left area, which shows the
titles in the title bar.
the Crop button. Be sure to include the top left area, which shows the
titles in the title bar.
- Type your name and Win2-2
somewhere on the image. Be sure it is readable. Don't cover anything that
will make it clear which window is which.
-
 Save the file as win2-2-lastname-firstname.bmp in the folder win project2.
Watch out! This is a different folder!!
- Check Page Setup and Print Preview.
Be sure the image will fit on one page.
Make changes if needed. You may need to choose Fit to: 1 by 1 pages.Problem: Image is
too wide for the paper
Solution: Try changing the margins. If it is still too wide, either print 1 page, or go back to Paint and select enough of the image, to show the right pane contents and the title bars of the cascaded windows, crop the image or copy and paste into a new document. Check settings for this version. - Print. Check your printout.
Backup
-
 Copy your files to a folder on your hard disk
and/or to a different
removable drive.
Copy your files to a folder on your hard disk
and/or to a different
removable drive.
- Close all of the windows.
|
|
| © 1997-2017 Jan Smith All Rights Reserved |
Site Map What's New |
Privacy Policy Terms of Service Copyright Acknowledgements |
~~ 1 Cor. 10:31 ...whatever you do, do it all for the glory of God. ~~
Last updated: April 28, 2017