
Jan's Working with Windows 10:
File Explorer: Navigate
To work with files and folders you need to navigate the folder tree, expanding and collapsing parts to show just what you want. In this lesson you will practice with the folder tree.
Left: Navigation pane
Right:
Contents pane
Special Sections You May See
![]() Quick access: New name for Favorites for File Explorer. This avoids confusion with Favorites in your browser. This section will show Downloads, Documents, Music, Videos, and frequently used folders but only for the current user. Plus, you can pin the folders you want to have handy here.
Quick access: New name for Favorites for File Explorer. This avoids confusion with Favorites in your browser. This section will show Downloads, Documents, Music, Videos, and frequently used folders but only for the current user. Plus, you can pin the folders you want to have handy here.
![]() OneDrive: OneDrive is Microsoft's online file storage system. A free account comes with 5 GB of storage. This folder will be empty unless you choose to sync copies of files to the hard disk. To see all of your OneDrive files, use a browser to logon to your Microsoft account at onedrive.live.com
OneDrive: OneDrive is Microsoft's online file storage system. A free account comes with 5 GB of storage. This folder will be empty unless you choose to sync copies of files to the hard disk. To see all of your OneDrive files, use a browser to logon to your Microsoft account at onedrive.live.com ![]() . Other cloud storage services like Dropbox and Google Drive may create a similar link with their own logos. You should check whether or not a file showing will actually be on the local computer or not.
. Other cloud storage services like Dropbox and Google Drive may create a similar link with their own logos. You should check whether or not a file showing will actually be on the local computer or not.
![]() Current User: Each user has a logon name and password and a user folder. That folder has its own sub folders. Other users cannot view these files unless you grant permission.
Current User: Each user has a logon name and password and a user folder. That folder has its own sub folders. Other users cannot view these files unless you grant permission.
![]() This PC: Includes all of the drives attached to the computer and their folders.
This PC: Includes all of the drives attached to the computer and their folders.
![]() Libraries: (May not show by default) You can add a folder of your own to a library if you do not want to save all of your files to the default User folders. So your Pictures library could include your Pictures folder plus other folders that are stored somewhere else, even on removable media. To show Libraries, on the View ribbon, click the Navigation pane button at the far left of the ribbon to open its menu. Then click on 'Show libraries'.
Libraries: (May not show by default) You can add a folder of your own to a library if you do not want to save all of your files to the default User folders. So your Pictures library could include your Pictures folder plus other folders that are stored somewhere else, even on removable media. To show Libraries, on the View ribbon, click the Navigation pane button at the far left of the ribbon to open its menu. Then click on 'Show libraries'.
![]() Network: Shows other computers and network devices on the current network.
Network: Shows other computers and network devices on the current network.
![]() Homegroup: Show other computers that are part of your home network and have been added to the Homegroup. This allows you to share files and devices connected to your computer with other computers. You can also stream media between computers.
Homegroup: Show other computers that are part of your home network and have been added to the Homegroup. This allows you to share files and devices connected to your computer with other computers. You can also stream media between computers.
![]() Control Panel: A large set of icons to open dialogs for managing various features and settings.
Control Panel: A large set of icons to open dialogs for managing various features and settings.
![]() Recycle Bin: Where deleted files and folders go. Once the Recycle Bin gets full, newly deleted objects replace the oldest ones. If an object is larger than the available space, it is not put into the Recycle Bin at all.
Recycle Bin: Where deleted files and folders go. Once the Recycle Bin gets full, newly deleted objects replace the oldest ones. If an object is larger than the available space, it is not put into the Recycle Bin at all.
| |
Step-by-Step: Navigate File Explorer |
|
| What you will learn: | to open a File Explorer window to expand and collapse the folder tree to navigate using the Navigation pane to navigate with the Address bar: type an address drop lists arrows History |
Open a File Explorer Window
Start with-
Use one of the methods below to open a File Explorer window that shows your drives.
 Method 1: Desktop icon -
 Double-click the Desktop icon This PC, if you have such an icon. This icon is not on the Desktop by default.
 Method 2: Taskbar icon -
  Click the folders icon on the Taskbar.
This icon is on the Taskbar by default.
 Method 3: Start menu - Click the
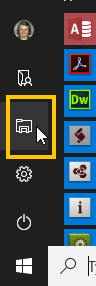
  Start button and then on
  File Explorer in the menu.
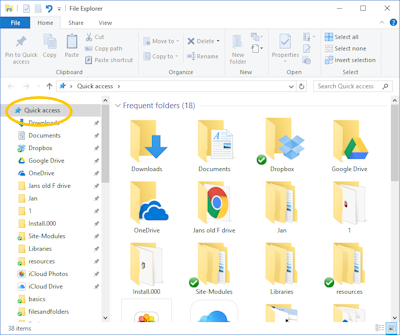
 A window opens with Quick Access selected on the left. This view lists the pinned folders and drives first and then recently accessed folders.
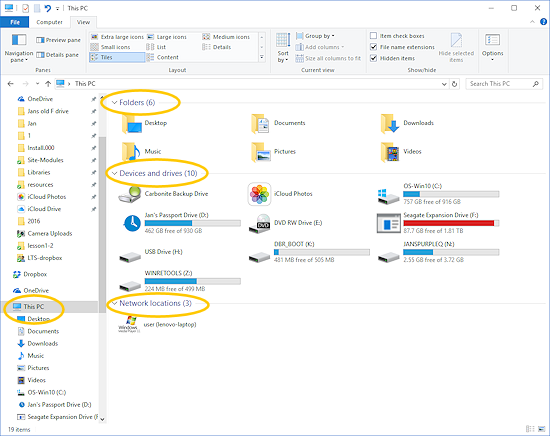
- Click on This PC in the Navigation pane at the left.
(You may have to scroll to see it.)The window remembers the size and settings that were in place the last time a File Explorer window was closed. The default view for This PC is Tiles view, with items grouped by type - Folders, Devices and drives, and Network locations. You will work with views in the next lesson.
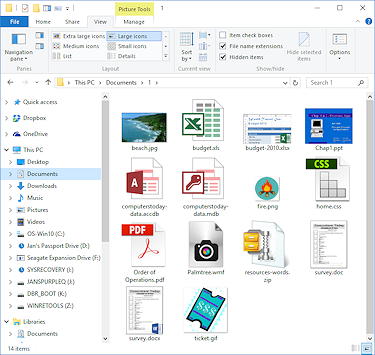
The illustration shows some drives that use icons from the manufacturer of the drive, Seagate Expansion Drive (F:), or from software that formatted the drive, SYSRECOVERY (J:).
The bar below a drive shows how full it is. The bar turns red when the drive is close to full. That means it is time to start planning - additional drive, larger drive, remove files?
- If necessary,
 drag the edges of the window to resize it to a comfortable size.
 -
Inspect the drives that appear and the panes that your window shows.
Your drives will almost certainly be quite different from any of the illustrations.You may or may not see an icon for a drive that is attached but is empty, like a CD or DVD drive. The default is to hide such drives, but you can change that setting.
You may see a 'drive' that is actually another kind of device, such as a printer which has slots for removable media.
 Do you see these in the File Explorer window?
 - Title bar
- Address bar
- Ribbon
- Status bar
- Navigation pane on the left - Shows the folder tree
- Contents pane on the right - Shows the contents of whatever is selected in the Navigation pane
Use the Folder Tree - Expand and Collapse
The folder tree in the Navigation pane shows all of the computer's drives and folders in a nested arrangement. It also shows some shortcuts to special areas like the Recycle Bin, OneDrive, and your Documents and Pictures folders. Cloud storage services like Dropbox and Google Drive may put their own entries in the folder tree.
- Scroll the left Navigation pane to see what items are available.
 What special areas do you see? Some items like Libraries may be hidden by default. Windows remembers what sections were expanded the last time this kind of window was opened.
- Move your pointer slowly over the Navigation pane and back out again.
Did arrows appear and disappear when you move your pointer off the Navigation pane? If you do not have a folder or drive selected in the Navigation pane (highlighted in light blue), the expand/collapse arrow does not show until you hover over the folder tree. 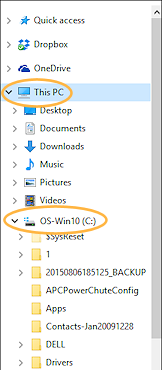 If necessary, double-click on the name This PC in the folder tree to expand that part of the folder tree. The Contents pane does not change since it was showing the contents of This PC already.
 -
Click on the arrow
 beside drive C: to expand that branch of the folder tree without changing what shows in the Contents pane.
A gray arrow pointing right,
, means that the
drive or folder has subfolders in it that are currently hidden. It is collapsed.A black arrow pointing down,
 , means that this drive or folder has
been expanded in the folder tree to display
all its subfolders.
, means that this drive or folder has
been expanded in the folder tree to display
all its subfolders. -
 Experiment: Expand and collapse folder tree
- Click on beside various folders and drives to expand the folder tree.
Do not click on any names just yet. - Click on for each folder or drive that you expanded to collapse all of them again.
As you collapse and expand parts of the folder tree, what is displayed in the Contents pane at the right does not change, if you clicked on the arrow to the left of the item's name.
-
Experiment: Navigate with Navigation Pane
The Navigation pane exists to help you see what is in folders and drives.
-
Click on the name of a drive or folder in the Navigation pane.
That item is now selected. It's name is highlighted.The Contents pane at the right changes to show what is in the drive or folder that you selected in the Navigation pane at the left. The path to what you selected is in the Address bar.
- Click on the name for several different items in the folder tree. Be sure to include drives and special folders like Documents.
The Contents pane changes. Did you find drives or folders in your folder tree that are empty or will not expand?
Empty folders cannot expand in the folder tree. There are several ways that can happen.
- Folders: Folders that do not contain other folders cannot expand in the folder tree.
- New user: Several blank folders are created when you create a profile as a new user, including Downloads, Documents, Pictures, Music, and Videos.
- Built-in slots for removable media: The slots may show as one or several drives for removable media, even when they are empty.
-
CD or DVD drive: The tray will slide open for you to put in a disc when you try to expand it or select it. Only when a disc is in the drive will there be any files or folders to show.
- Network drive: Will not expand if you are not logged into that network or if the network device is not connected to the network or if the device does not allow discovery. You may get an error that says the drive is not accessible or that you do not have permission.
Navigate with the Address Bar
- Click in the Address bar of your File Explorer window.
The set of folder links changes to a path with back slashes between the folder names.  Type the path below into the Address bar of File Explorer, or copy and paste it:
C:\Windows\Web\Wallpaper\Windows 10
The path is automatically converted to a set of links separated by arrows.
 Tip: Your set of links will be cut off at the left if the window is too narrow to hold it.
-
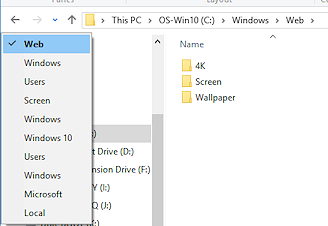
Experiment: Navigate with Address Bar Drop Lists
When you typed or pasted a path into the Address bar for File Explorer, the path was changed into a set of names separated by arrows. Each name is a drop list of links. You can use these to navigate when you cannot see the location you want in the Navigation pane. It can be much faster.
-
 Click on the arrow to the right of Wallpaper.
A drop list of folders and/or drives appears. These are clickable.You may have other folders. You probably won't have a Dell folder unless you have a Dell computer.
 Open the drop list for each of the other links.
- Practice showing the drop lists and clicking on items.
How does the Contents pane change?
How does the Navigation pane change? Was the change in a part of the pane you cannot see at the moment?
-
-
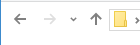
Experiment: Navigate with Address Bar Arrows
To the left of the Address box on the Address bar are some arrows - left, right, down, and up. These are navigation arrows. Left and right take you back or forward in the history of where you have navigated in this window. The up arrow takes you up one level in the folder tree. The down arrow opens a History list of places you have been in File Explorer.
 Click the Back arrow (left arrow) in the Address bar.
The window changes to show where you were previously.- Click the Forward arrow (right arrow) in the Address bar.
The windows changes back . - Click the Up arrow in the Address bar.
The window changes to show one level up in the folder tree. -
Practice navigating Back, Forward, and Up.
Once you go Up, the Back arrow will return you to where you were. -
 Click the small Down arrow between the Forward and Up arrows.
This arrow opens a drop list of places in your History for this window. - Practice using the History list to navigate.
|
|
| © 1997-2017 Jan Smith All Rights Reserved |
Site Map What's New |
Privacy Policy Terms of Service Copyright Acknowledgements |
~~ 1 Cor. 10:31 ...whatever you do, do it all for the glory of God. ~~
Last updated: April 27, 2017