
Jan's Working with Words
Templates: Save As Template
You've done a lot of work to get the look of this letter
just right. To use the same scheme for other letters is an attractive
thought!
The brute force way is to open the saved letter and rewrite the parts that don't apply to the new letter. That method has a high risk of saving your changes over the original letter. You can do better by creating your own template. Word protects templates so that you have to make an effort to mess one up.
There are only two important things to do to create a template:
- Create the document parts and paragraph and character styles that you want to reuse.
- Save the document as a template in a folder where Word can find
it.
(This can be harder than it should be!)
Saving a Template
 To
save your template, click the Office button or the File tab and then
Save As. In the Save
As dialog, pick the Word Template type with the dotx
extension. The extension dotm
is for templates that have macros in them. A macro is a short piece of code
to do something automatically.
To
save your template, click the Office button or the File tab and then
Save As. In the Save
As dialog, pick the Word Template type with the dotx
extension. The extension dotm
is for templates that have macros in them. A macro is a short piece of code
to do something automatically.
You must save your template to the right location for Word to find it. The default location varies with the version of Word and whether or not your computer is set up to allow multiple users.
Location 1: Custom Templates folder
When you choose Save As and pick the dotx file type, the dialog display should switch to the folder for custom templates, but it may not. Very inconvenient when it does not.
Office puts the files that you save as templates in a special folder, not with the templates are installed with Office. Exactly where depends on the version of Windows and on the version of Office that you are using.
Custom Templates are stored in a folder with a path similar to:
C:\Users\<username>\AppData\Roaming\Microsoft\Templates (Word 2007, 2010)
C:\Users\<username>\Documents\Custom Office Templates (Word 2013, 2016)
When Word shows you templates to choose for a new document, your new custom template will be listed in the category My templates (Word 2007, 2010) or Personal (Word 2013, 2016).
Location 2: Your own location for custom templates
You can set your own location in Word Options > Advanced > General section > File Locations... button. Click on User templates and then on the Modify button. Navigate to the folder you want to use or type in the path to the location. Now, when you choose New, templates from this location will appear under My templates or Personal.
Idea: Save your file as a template to a subfolder of the folder where Office stores its templates. When you choose New, your template (or the subfolder it is in) will show along with the templates that Office installed. Cool!
Templates installed with Microsoft Office are in a folder similar to:
C:\Program Files\Microsoft Office\Templates
C:\Program Files (x86)\Microsoft Office\Templates\1033
C:\Program Files\Microsoft Office 15\root\Templates\1033
The 1033 in the path is for the English version. Other languages have a different number.
If you are on a network, your network administrator may be using this setting for sharing templates for the workgroup. You will have to find out if you have permission to save your own templates separately. To keep others from being able to change your templates requires that the administrator set up a folder for you with permissions set that allow only you to make changes.
To Edit a Template
You can edit a template, even the ones that Word installs, or you can use one as the basis for a new template.
 To make changes to a template, you must open it
as a template rather than use it to create a new document. Older versions of Word let you pick how to use the template when you pick it in the New dialog. But more recent versions do not offer this helpful shortcut.
To make changes to a template, you must open it
as a template rather than use it to create a new document. Older versions of Word let you pick how to use the template when you pick it in the New dialog. But more recent versions do not offer this helpful shortcut.
Instead, to edit an existing template, use the Open command and navigate to where the template is stored and select it. Word will open it for editing. When you save your changes, you will be saving as a template.
![]() Create a pattern: When editing a template, don't get carried away and write your document instead of just the
pattern for a document!
Create a pattern: When editing a template, don't get carried away and write your document instead of just the
pattern for a document!
![]() Watch
the file type in dialogs! Once you have saved a new template, the next time you save a document, the file type will be set to
Word Template (*.doxt) and only dotx files will show in the
dialog! You must select Word Document (*.docx) in the File Type text box
yourself.
Watch
the file type in dialogs! Once you have saved a new template, the next time you save a document, the file type will be set to
Word Template (*.doxt) and only dotx files will show in the
dialog! You must select Word Document (*.docx) in the File Type text box
yourself.
|
|
Step-by-Step: Saves as a Template |
|
| What you will learn: |
to create a template from an existing
document to save a template to your own folder |
Start
with: ![]() ,
letter6-Lastname-Firstname.docx
,
letter6-Lastname-Firstname.docx
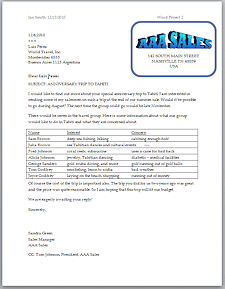
You will create a template using the document letter6-Lastname-Firstname.docx. To do this, you will remove text from the letter and substitute some temporary text. You may also change the Date to a field so it will update automatically whenever you use the template.
Delete Header
The header was put in so you could turn in your print-out to your instructor. You probably don't want that in your template!
-
 Save
As letter7-Lastname-Firstname.docx
in the folder
word project2
Save
As letter7-Lastname-Firstname.docx
in the folder
word project2
- Double click the Header to open it.
- Delete all the text in the header and close the header.
Insert Date Field
You can insert a field that will automatically put the current date on your letter. If your computer does not keep time well, this might write the wrong date. On the other hand, if your computer is that far off, you've got a more important problem than this template!
-
 Click
on the Date line of the letter.
Click
on the Date line of the letter. -
Press the END key to move the cursor to the right end of the date.
-
Press the DELETE key repeatedly until the entire date is deleted and then once more to delete the frame.
 Problem: Image
disappeared
Problem: Image
disappeared
Your selection included the anchor for the image.
Solution: Undo your actions. Delete the date again, being careful not to delete too many times.
-
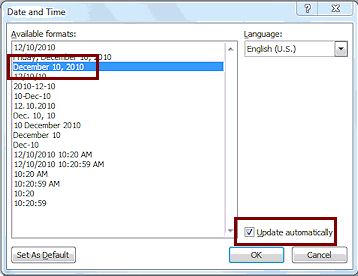 On
the Insert tab in the Text tab group,
click on the Date & Time button
On
the Insert tab in the Text tab group,
click on the Date & Time button .
. - Select the date format that is like December 10, 2010.
- If necessary, check the box for
Update automatically.
- Click on OK.
- If necessary, press ENTER to put the dots on a separate line.
-
Save.
[letter7-Lastname-Firstname.docx]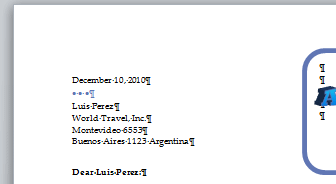
Replace with Temporary Text
Next you need to replace the letter's actual text with some temporary text that will remind you what information is needed in each spot.
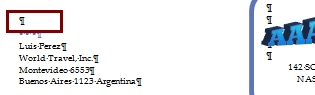
- Below the date, select Luis Perez and
type [Recipient] .
- Select all of the lines for the address underneath and type
[Recipient's address] .
- Select the Salutation, Dear Luis Perez: and type
[Greeting]:
- Select the words to the right of SUBJECT: and delete
them.
- Select the body of the letter and type [Type body of letter here]
- Select the text of the CC line without selecting
the final paragraph mark.
Press the DELETE key
(If you delete the whole line, you may change the paragraph white space for AAA Sales.)
- Save.
[letter7-Lastname-Firstname.docx]
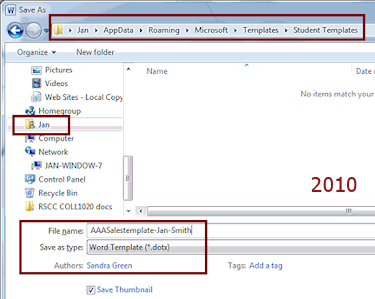
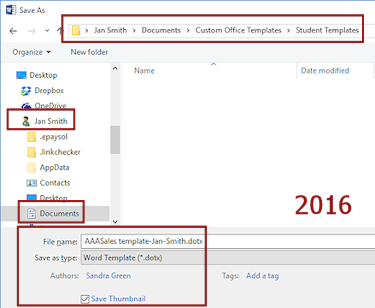
Save as Template
To see this document as a template in the New dialog, you must save it with the template file format and to a location that Word will look at.
- Click on the Office button or the File tab and then on Save As. (Very important!!!)

 Word 2013, 2016: Pick a location. (It does not matter where!)
-
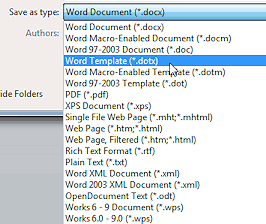
Choose file type Word Template (*.dotx) .
The dialog should switch to the correct folder for templates.
[My experience has been that Word 2013 does switch but previous versions often did not.]If you see a link to Templates in the Favorites section of your folder tree, click on it to get to the correct folder easily!
Otherwise...
Navigate to where Word looks for your custom templates, which is should be one of the following:
 Win XP: C:\Users\<username>\Application
Data\Roaming\Microsoft\Templates
Win XP: C:\Users\<username>\Application
Data\Roaming\Microsoft\Templates


 Vista/Win7/Win8/Win10: C:\Users\<username>\AppData\Roaming\Microsoft\Templates
Problem:
Cannot find Templates folder
Vista/Win7/Win8/Win10: C:\Users\<username>\AppData\Roaming\Microsoft\Templates
Problem:
Cannot find Templates folder
You must have Windows Explorer/File Explorer set to show hidden files and folders.
Solution:
Earlier versions of Windows: In Windows Explorer, click on the Organize button > Folder and search options > View tab > check the box beside Show hidden files, folders, and drives. Click on OK.
Win8, Win10: In File Explorer on the View tab check the box Hidden items. - Create a new folder with the name Student Templates.
- If necessary, double-click on the folder
Student Templates to open it in the dialog.
- Name your template AAASalestemplate-Lastname-Firstname , and
click the Save button.
- Close the document.
Create new document from your template
- Click on the Office button or the File tab and select New.
-
Click on
My templates or Personal and then on Student
Templates.
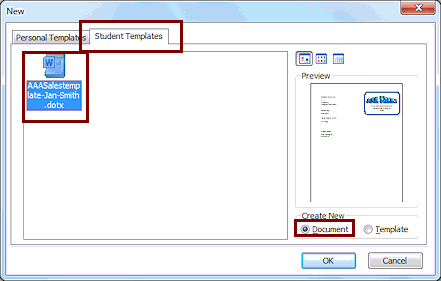
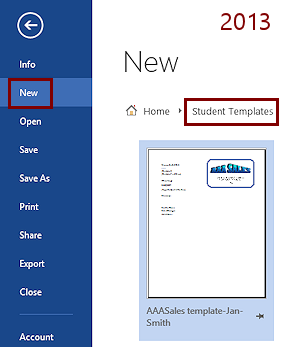
Notice the preview. Sometimes these small views are a bit off.
[If the template didn't show, consult with your instructor to find out why. Did you save the template to the correct folder??]
-
Click on your template.

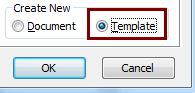
 Word 2007, 2010: Be sure the radio button for Document
is selected in the lower right.
Word 2007, 2010: Be sure the radio button for Document
is selected in the lower right.
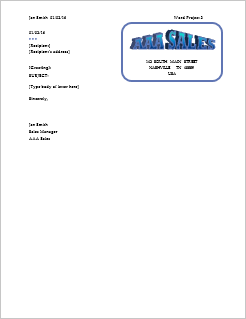
Click on OK.A new document opens using your template! You are a success!
The date is today's date and the signature line now has your name since you are the default author when logged in with your own name.
- Create a header with your name, two
spaces, the date, tab twice, and Word
Project 2 .
 Save the document as
letter-AAAtemplate-Lastname-Firstname.docx in the word project2 folder on the Class disk.
Save the document as
letter-AAAtemplate-Lastname-Firstname.docx in the word project2 folder on the Class disk.  Print.
- Close
the document.
- Close Word.
You have completed your second Word project!
|
|
| © 1997-2017 Jan Smith All Rights Reserved |
Site Map What's New |
Privacy Policy Terms of Service Copyright Acknowledgements |
~~ 1 Cor. 10:31 ...whatever you do, do it all for the glory of God. ~~
Last updated: March 22, 2017