
Jan's Working with Words
Templates: WordArt
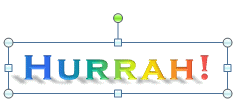
Sometimes plain words just won't do. You need characters with some pizzazz. WordArt can help you create attractive logos and fancy text to really catch the reader's eye.

![]() WordArt
and Spell Check:
WordArt
and Spell Check:
Your WordArt text is not regular text. Spell check won't see it any more than it would a picture of a tree. So be careful with your spelling when you create WordArt!
 WordArt Features
When you
use WordArt, you are creating text inside a text box, which is a drawing
object. This container
object has handles that you drag to resize
the container.


 Word 2010, 2013, 2016:
Changes for WordArt:
-
WordArt no longer resizes when you resize the text box that contains it.
There are no handles on the WordArt itself. See the work-around below. -
Normal text tools will now work on WordArt.
Improvement over earlier versions! -
WordArt Tools apply to the text.
Drawing Tools apply to the container for the text... mostly. - The pre-designed styles are different from previous versions and you can edit them in more detail. Word 2013 and 2016 have the same pre-designed styles but have fewer than Word 2010. <sigh>
Work-around: To resize WordArt by dragging
- Select your WordArt.
- Click on Drawing Tools Format at the top to get the menu.
- Select Text Effects > Transform > Select the first item under "Warp".
The WordArt then resizes itself to the size of your box and you can change the size and shape by simply changing the size and shape of the box.
Use a WordArt Style to start with: Because there are so many settings that you can change, the WordArt Styles can be a big help getting you started, even if you wind up changing several settings.
Where is the WordArt button? WordArt appears on two ribbon tabs: Insert and Drawing Tools. The Drawing Tools tab only appears when a drawing object is selected.
![]() Resize and keep the same proportions: Hold the SHIFT key down while dragging a corner handle.
Resize and keep the same proportions: Hold the SHIFT key down while dragging a corner handle.
![]() What
is selected is important! Is it the text box or the WordArt?
What
is selected is important! Is it the text box or the WordArt?
In Word 2007 a different ribbon tab appears, depending on what is selected, Text Box Tools or WordArt Tools.
In Word 2010, 2013, and 2016 the tools for both WordArt and text boxes are on the Drawing Tools tab.
If the wrong thing is selected, some tools will fail to do anything or will do something you did not expect, with no explanation.
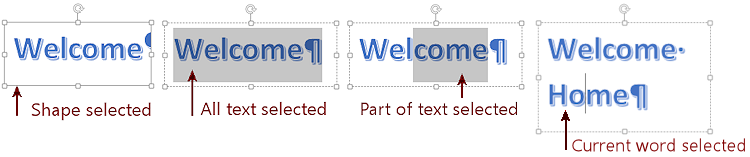
How to tell what is selected for WordArt:
- Solid outline around the text box shape = Shape is selected
- Dotted outline around the shape = Some WordArt text selected
- All WordArt text is highlighted = All WordArt is selected (Duh!)
- Part of WordArt text is highlighted = Only that part is selected
- Cursor is in the WordArt but nothing is highlighted = The word with the cursor is selected
This one can be a surprise!
|
|
Step-by-Step: WordArt |
|
| What you will learn: | to insert WordArt to format WordArt with text tools |
Start with:
Insert WordArt
You are going to create a letterhead for your letter, including a WordArt logo. The choices are quite different from versions of Word before Word 2007, though you can eventually create any of the old styles, if you wish to work hard.
The pre-designed WordArt choices are VERY different depending on the version of Word.
-
 Save
As letter3-Lastname-Firstname.docx
in the folder word project2 on your storage
device.
Save
As letter3-Lastname-Firstname.docx
in the folder word project2 on your storage
device. -
Click at the left of the graphic dots near the top of the letter.
-
On the Insert tab, click on the WordArt button
 .
.
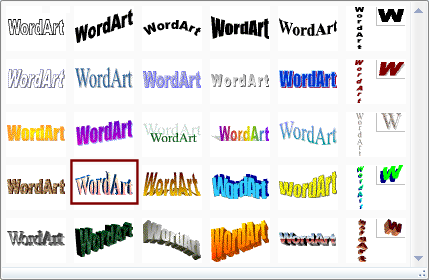
The gallery opens.
Word 2007's WordArt is similar to previous versions. But Word 2010, 2013, and 2016 are quite different. - Create a WordArt company name:
 Word 2007: Insert, Type, and Format
-
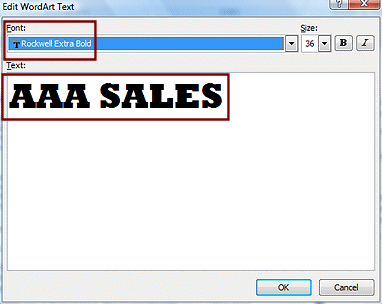
Click on the style in row 4, column 2.
The Edit WordArt Text dialog appears, ready for you to type. -
Type AAA SALES
By default, the WordArt is inserted as inline with text.
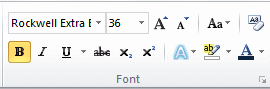
-
 Change
the font to Rockwell Extra Bold. Leave the font size at 36 pt.
Change
the font to Rockwell Extra Bold. Leave the font size at 36 pt.Notice the few formatting options in this dialog - font, font size, bold, italics. The other text formatting choices on the Home ribbon tab CAN NOT be applied to WordArt in Word 2007.
-
Click on OK to close the dialog.
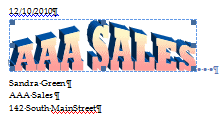
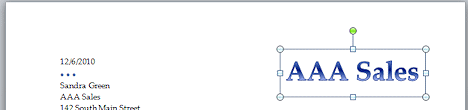
If necessary, click on AAA Sales to select it.
A dashed line appears around the WordArt.
On the WordArt Tools tab in the Arrange tab group, click on the button Text Wrapping and select In Front of Text.
Now the WordArt will float over the existing text in the letter.
 Word 2010: Insert and Type
-
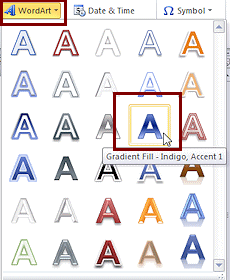
Click on the style in row 3, 4th column:
Gradient Fill - Indigo, Accent 1.
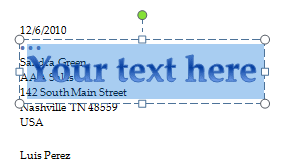
A text box appears, ready for you to type.
-
 Type
AAA Sales.
Type
AAA Sales.
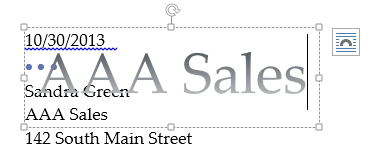
Your typing overwrites the dummy text.
The new text floats over the existing letter.You will format this text in detail below.
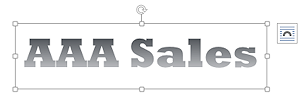
 Word 2013, 2016: Insert and Type
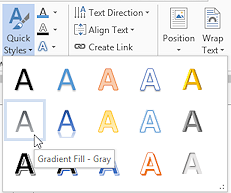 Click on the style in the first column on the 2rd row,
Gradient Fill - Gray.
-
 Type AAA Sales.
Your typing overwrites the dummy text.
The new text floats over the existing letter.You will format this text in detail below.
-
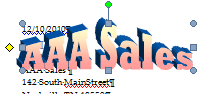
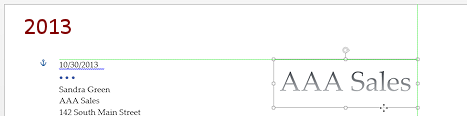
- Move
the mouse over the edge of the text box until the pointer changes to the
Move
shape .
.
-
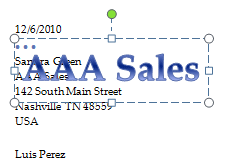
Drag the container to the upper right of the letter with the top edge about level with the top of the date on the left.
Word 2013 and 2016 make this easy by showing green margin lines when the text box hits the margins.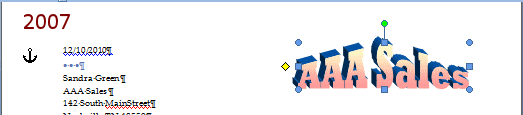
 Problem: WordArt won't drag
The image is not floating but is inline with the text.
Solution: With the WordArt selected, on the Drawing Tools: Format tab, click the Wrap Text button and click on In Front of Text.
- Save.
[letter3-Lastname-Firstname.docx]
In Word 2010, 2013, and 2016 the WordArt needs more formatting than in Word 2007 to achieve the same effect. <sigh>
Word 2007: Format WordArt: Gradient Fill
The pre-set styles for WordArt in Word 2007 can be modified, but not in as much detail as in Word 2010, 2013, and 2016. You will change the colors for the fill. Those working with Word 2010, 2013 or 2016 will have a LOT more work to do to get the 3-D look for the letters and then change the gradient fill. I don't know why they made this more difficult!
-
With the WordArt still selected, if necessary, switch to the context ribbon tab WordArt Tools: Format.

-
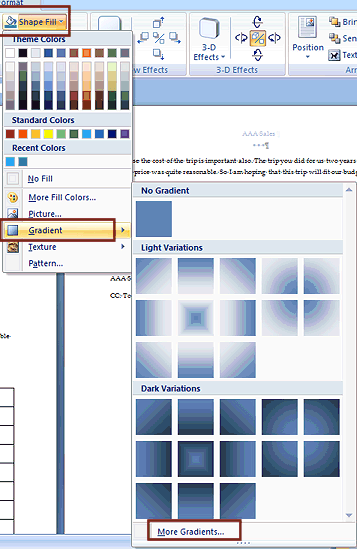 Click
on the button Shape Fill.
Click
on the button Shape Fill.
A gallery of colors and choices appears.
-
 Experiment: Shape Fill
- Hover over several of the Theme Colors in
the gallery.
Live Preview shows changes. Do any look good? Bad? - Click on Gradient.
A gallery of gradients directions appears, but not in the current colors. - Hover over each of the variations. Live Preview will show
changes.
-
 Click
on More Gradients... at the bottom of the
gallery.
Click
on More Gradients... at the bottom of the
gallery.
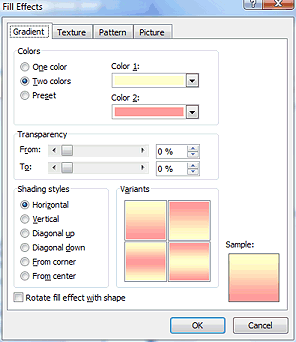
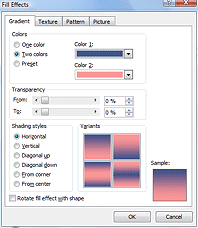
The Fill Effects dialog appears, open to the Gradient tab with Two colors selected. -
Experiment: Gradient Colors
Try different colors for Color 1 and Color 2 and click on the various shading styles. Experiment!
The sample thumbnail changes as you make choices but there is no Live Preview in the document itself.When you are ready to continue...
- Hover over several of the Theme Colors in
the gallery.
-
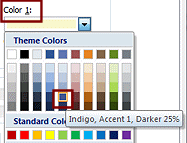 In
the Fill Effects dialog on the Gradient tab, click
the arrow beside Color 1 to open the color
gallery.
In
the Fill Effects dialog on the Gradient tab, click
the arrow beside Color 1 to open the color
gallery.
- Click on Indigo, Accent
1, Darker 25%.
(5th row, 5th column)
The Gradient tab changes to show the shading variations with this color instead of the tan color.
-
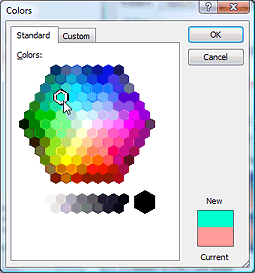 Click
the arrow beside Color 2 to open its color
gallery.
Click
the arrow beside Color 2 to open its color
gallery.
- Click on More Colors...
The Color dialog opens.
- If necessary, click on the
Standard tab.
- In the hexagon of colors, click on the
turquoise that is in the 4th row from the top,
3rd color from the left.
-
 Click
on OK.
Click
on OK.
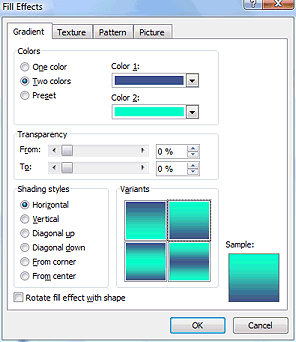
The Gradient tab now shows variations using indigo and turquoise.
- Click on the variation with turquoise at the
top and indigo at the bottom, horizontal.
- Click on OK.
Finally, your AAA SALES shows the new colors.

The WordArt is now complete in Word 2007.
Word 2010 and 2013 let you adjust how the color changes gradually from one to the other. You can even use more than two colors.
Word 2010, 2013, 2016: Format WordArt: Text Tools
In Word 2010, 2013, and 2016 you can apply the normal text tools that are on the ribbon to your WordArt. In previous versions of Word only a few of the most common text tools could be used, and then only from the WordArt dialog. This is easier!
-
Experiment: Text Tools
 With the WordArt selected, on
the Home tab in the Font
tab group, make changes using the various tools: font, font size, bold, italics, underline, colors,
etc. Undo each change.
With the WordArt selected, on
the Home tab in the Font
tab group, make changes using the various tools: font, font size, bold, italics, underline, colors,
etc. Undo each change. Which changes do you think work well with WordArt? Which do not work well?
Would a different pre-designed style accept some of these changes better... or worse?
When you are ready to continue...
-
On the Home tab, change the font to Rockwell Extra Bold.
Notice that the Home tab shows that the font size is 36.
The text box enlarged automatically to hold your text with this larger font. Nice!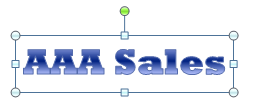
(If you don't have this font, choose Rockwell or something similar. You need a font with wide strokes for the 3D formatting to work well. Making the text Bold might help, too.)
-
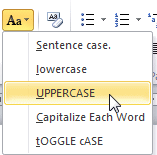 Click
the arrow beside the Change Case button
Click
the arrow beside the Change Case button
 .
.
A list of changes appears. Each item demonstrates what it will do with its own name, like the Font list does.This is a quick way to fix certain problems... if you remember where the button is!
-
Click on UPPERCASE.
All of the letters are in uppercase now.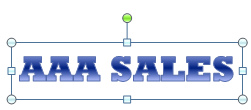

-
Save.
[letter3-Lastname-Firstname.docx]
Word 2010, 2013, 2016: Format WordArt: Drawing Tools
The WordArt tools are on the Drawing Tools: Format tab. The WordArt Styles apply to the text. The Shape Styles apply to the shape that contains the text. At least that's true most of the time. Some tools have lists that include items that apply to both.

-
Experiment: Drawing Tools
On the Drawing Tools: Format tab in the tab groups Shape Styles and WordArt Styles, hover over the various choices with the text box selected and with just the text selected. Which tools affect the text and which affect the container for the text? Did what was selected make a difference? Which choices does Live Preview show in the document?It's a mix and not always obvious. Some galleries list items of both types!
Undo all of your changes.When you are ready to continue...
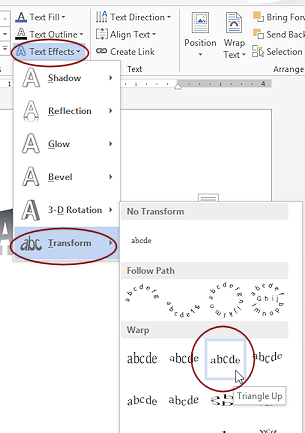 On
the Drawing Tools: Format tab,
click the Text Effects button and hover over
Transform to open the gallery.
On
the Drawing Tools: Format tab,
click the Text Effects button and hover over
Transform to open the gallery.
-
Experiment: Transform Effect
Hover over the various choices without clicking.
Live Preview shows the effects in the document.Transform effects change the arrangement and sizes of the letters. When the text is short like yours, it can be hard to see what the effect really is trying to do.
When you are ready to continue...
-
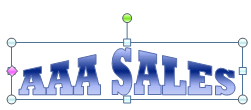
Click on the transformation Triangle Up, under Warp in the first row.
The shape of the letters changes, rising to a point in the middle while staying flat across the bottom.

-
Experiment: Adjustment Handle
The pink or yellos handle on the left border of the text box adjusts the steepness of the pitch of the triangle.- Drag the adjustment handle up and down to see the effect on the shape that the letters fit into. For this effect the handle is hard to manage! It jumps around when you drag and release and does not want to go back to where it started. Apparently not all positions are allowed. Unexpected!
- Undo your changes!
-
Save.
[letter3-Lastname-Firstname.docx]
The next lesson will show you how to adjust the gradient fill in Word 2010, 2013, and 2016 and how to get the 3D look that WordArt in Word 2007 created so easily.
|
|
| © 1997-2017 Jan Smith All Rights Reserved |
Site Map What's New |
Privacy Policy Terms of Service Copyright Acknowledgements |
~~ 1 Cor. 10:31 ...whatever you do, do it all for the glory of God. ~~
Last updated: March 22, 2017