
Jan's Working with Words
Interface: Navigating
Documents are usually too long to fit completely in the window and still be easy to read. Sometimes they are too wide. There are several techniques you can use to move around in your document. It's good to know both mouse and keyboard methods.
Too long and too wide to fit in the window.
Navigation Methods
Scrolling
 Scrollbars were invented to move the document within the window. You click
the vertical single scroll arrows
Scrollbars were invented to move the document within the window. You click
the vertical single scroll arrows 
 to
move one line up or down at a time. The horizontal scroll arrows
to
move one line up or down at a time. The horizontal scroll arrows 
 move
the document left or right an inch (on the page) at a time.
move
the document left or right an inch (on the page) at a time.
Drag the scroll box to move longer distances at a time. The scroll box is proportional in Word and in most programs. That means that its size shows you how much of the document is showing on the screen at a time.
As you drag the scroll box, a screen tip shows where you are in the document. It gives the page number and the current heading, if you used heading paragraph styles. (A good reason to learn to use paragraph styles!)
You can also click in the scrollbar area itself to move the document down one window's worth.
 Many mice and other pointing devices have a scroll
wheel in addition to the mouse buttons. The scroll wheel does what the
scrollbar does, but without having to position the pointer somewhere
special. As long as the document window is the active window and the pointer is over the window, scrolling
the mouse wheel will scroll the document up and down.
Many mice and other pointing devices have a scroll
wheel in addition to the mouse buttons. The scroll wheel does what the
scrollbar does, but without having to position the pointer somewhere
special. As long as the document window is the active window and the pointer is over the window, scrolling
the mouse wheel will scroll the document up and down.

 Word 2007, 2010: Navigation Buttons
![]()
![]() The Browse Objects button
The Browse Objects button ![]() is at the bottom of the vertical scrollbar, between the double arrows. The default setting is to Browse by Page. Clicking a button with two arrows moves the document view to the next page. The double arrows are black when this is the current setting.
The double arrows
will turn blue or gray if you choose anything besides page.
is at the bottom of the vertical scrollbar, between the double arrows. The default setting is to Browse by Page. Clicking a button with two arrows moves the document view to the next page. The double arrows are black when this is the current setting.
The double arrows
will turn blue or gray if you choose anything besides page.
 You
can choose a different object to browse. Clicking
You
can choose a different object to browse. Clicking ![]() the Browse Objects
button pops up a gallery of choices of what you can browse.
the Browse Objects
button pops up a gallery of choices of what you can browse.
The first illustration shows the gallery when there is space
on the Desktop to
the right of the window. Reading clockwise starting at the top left, your
choices are:
page, section, comment, footnote, endnote, field, Go To, Find, edits, table, heading,
graphic, table. As your mouse hovers over each choice, the text
below the gallery changes to tell you what that icon is for. That's helpful!
 If
there is no room to the right, the gallery appears to the left of the
button, but the order of the items is reversed. Unexpected!
If
there is no room to the right, the gallery appears to the left of the
button, but the order of the items is reversed. Unexpected!
Find, Replace, and Go To
Included on the Home ribbon tab and in
the Browse Objects display (Word 2007, 2010) are buttons that open the Find and Replace
dialog box, which has tabs for Find, Replace, and Go To.
![]() The Find and Replace dialog lets you search for a particular word or phrase. You can use choices in
the More>> button to search based on formatting. There
are also buttons on the Home ribbon
for Find and for Replace.
The Find and Replace dialog lets you search for a particular word or phrase. You can use choices in
the More>> button to search based on formatting. There
are also buttons on the Home ribbon
for Find and for Replace.
![]()
![]() Word 2013, 2016:
Word 2013, 2016:
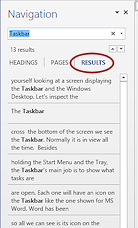
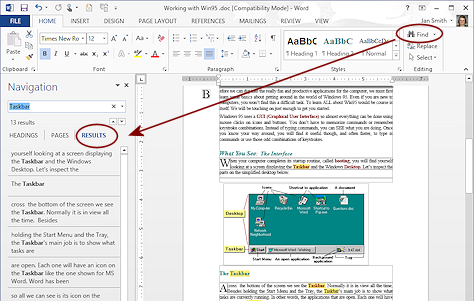 Results in Navigation pane -
When you click on the Find button on the ribbon, Word opens the Navigation pane to Results. Word repeats your last search, even if you did not search this document. If that is not what you want, type something different in the Search box and press ENTER. Word searches the current document and shows the results in the Navigation pane.
Results highlighted in the document - Use Find and Replace dialog,
Click the arrow 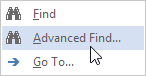 beside the Find command on the ribbon and choose . The dialog Find and Replace opens.
If you choose Find Next in the dialog, Word scrolls to the next location in the document past the current cursor location and highlights the search term for you.
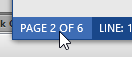 Alternate method to open Navigation pane: Click the page number in the Status bar to open the Navigation pane. If necessary, click on Results below the search box. Now you can enter your search term(s).

![]() The Go To dialog asks you to
select a particular object. The most common choice would be a particular page but there are several other choices.
The Go To dialog asks you to
select a particular object. The most common choice would be a particular page but there are several other choices.
You click the Next button to go to the next
one of that type of object in the document. Or you can enter a choice in the text box at the right. The Next button changes to Go To.
The Previous button moves you back to the nearest such object earlier in the
document.
![]()
![]() Word 2007, 2010: You
can also open the Go To dialog by clicking the bottom left corner of the
Word window, where the page number shows. That opens the Find and Replace dialog, which has a tab for Go To.
Word 2007, 2010: You
can also open the Go To dialog by clicking the bottom left corner of the
Word window, where the page number shows. That opens the Find and Replace dialog, which has a tab for Go To.
![]()
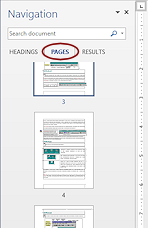
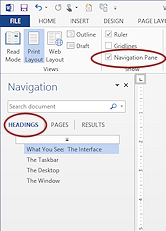
![]() Word 2013, 2016: In the Navigation pane click on PAGES to show thumbnails of the pages in the document. Click on the page you want.
Word 2013, 2016: In the Navigation pane click on PAGES to show thumbnails of the pages in the document. Click on the page you want.
Document Map

 Navigation Pane
A document map (2007) or Navigation pane (2010, 2013, 2016) shows a list of the heading paragraphs, which are those that are formatted with Heading styles. It's a clickable outline of sorts. Click on a heading to move to that point in the document. Very useful for long documents... IF you used those Heading styles!
 |
 |
|
check the box by Document map. |
![]()
![]() Word 2013, 2016: In addition to the Heading page, there are two other pages:
Word 2013, 2016: In addition to the Heading page, there are two other pages:
PAGES (thumbnails of the document's pages) and RESULTS (of a search). The pane can float or be docked. It remembers its last location.
 |
|
 |
| HEADINGS Paragraphs using heading styles. |
PAGES Thumbnails of document pages |
RESULTS (Same as Find in previous versions) |
Shortcuts with Keys
Keystrokes and key combinations can also move you quickly around your document. In the list below, the + between two keys means to hold down the first key while pressing the second key, then release both.
| Key(s): | To Move: |
|---|---|
| HOME | beginning of line |
| END | end of line |
| CTRL + HOME | beginning of document |
| CTRL + END | moves to end of document |
| left or right arrow | one character left/right |
| up or down arrow | one line up/down |
| CTRL + left or right arrow | beginning of next word in direction of arrow |
| CTRL + up or down arrow | beginning of next paragraph in direction of arrow |
| PAGE UP | up one screen (scrolling) |
| PAGE DOWN | down one screen (scrolling) |
| CTRL + PAGE UP | top of next page |
| CTRL + PAGE DOWN | bottom of next page |
|
|
| © 1997-2017 Jan Smith All Rights Reserved |
Site Map What's New |
Privacy Policy Terms of Service Copyright Acknowledgements |
~~ 1 Cor. 10:31 ...whatever you do, do it all for the glory of God. ~~
Last updated: March 27, 2017