
Jan's Working with Words
Formatting: Spaces
The spaces around your text and images are very important to your document. Crowded lines are hard to read. Open space can draw the eye to the important parts of your text. Colors and borders can make important parts stand out from the crowd.
In this lesson you will learn to format the spaces around lines and paragraphs.
A line of text fits in one width of the text area on the page. A line can be blank or have any number of words, as long as they fit in the width.
A paragraph wraps to the
page and ends with a paragraph mark ![]() .
A paragraph can be just one word or
several sentences. A paragraph can take one or many lines. This is not your English teacher's definition!
.
A paragraph can be just one word or
several sentences. A paragraph can take one or many lines. This is not your English teacher's definition!
In your flyer, the title and subtitle are paragraphs. Each is just a few words, not even a sentence, and fits on a single line. The sentence that starts "In honor of our 10th ..." is a paragraph made up of complete sentences and takes 3 lines.
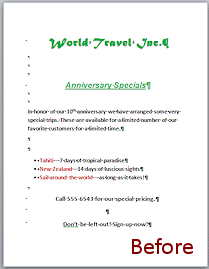
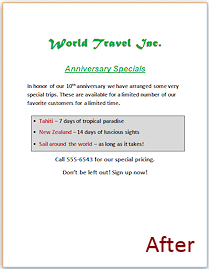
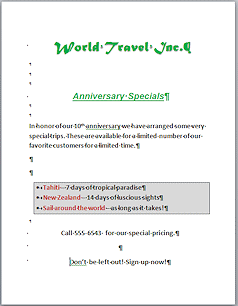
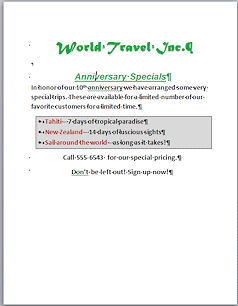
Flyer before and after this lesson
Spaces Around Lines of Text
Around your text is a small amount of white space that varies depending on which font and which font size you are using. More white space can be created by changing the line spacing and/or the space before and after a paragraph.
Normal Line Spacing includes:
- Space for tall letters like t and l and capital letters like B and W
- Space for letters that hang below the line like y and p
- Space between lines to keep the text from overlapping or feeling crowded
 Change
Spacing
Change
Spacing
You can
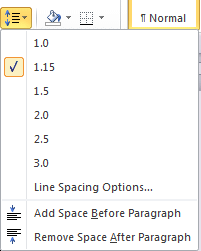
change the line spacing with the Line Spacing button ![]() in the Paragraph group in the Home tab. Drop the list to see common
choices. The list also has commands at the bottom to add or remove 10 or 12 pts. of space before or after the paragraph,
but just once.
in the Paragraph group in the Home tab. Drop the list to see common
choices. The list also has commands at the bottom to add or remove 10 or 12 pts. of space before or after the paragraph,
but just once.
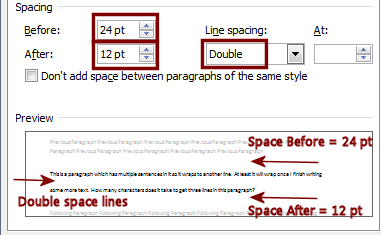
The Paragraph Dialog lets you set all of these and more. You can add even more space or set other values for line spacing.
You can open the Paragraph dialog using the Dialog Box Launcher button in the Paragraph group in the Home tab.
The Preview in the dialog shows your current paragraph in between two sample paragraphs
so you can see the effect of your changes.
Which Spacing Does What?
Line Spacing: Affects three kinds of space -
- for text
- between lines of a paragraph
- after the paragraph (but not before)
 Before
and After: You
can add more space before a paragraph or after it. This is often done for
titles and heading styles.
Before
and After: You
can add more space before a paragraph or after it. This is often done for
titles and heading styles.
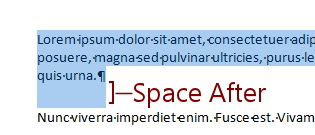
Between Paragraphs: There are three different values that could affect the space between two paragraphs -
- 1st paragraph: Space After
- 1st paragraph: Line Spacing
- 2nd paragraph: Space Before
The spacing you see is the largest of these three. Unexpected and confusing! These spaces overlap instead of adding up.
![]() Editing
Spacing between Paragraphs: Use the Paragraph dialog or Spacing
controls on the Page Layout tab to see the values for Space After or Space Before for
both paragraphs before you start making changes. Remember that
the larger amount is in charge of the spacing. If you guess but guess
wrong, you can sometimes change and change and change without seeing any
changes in the document! Very confusing and frustrating!
Editing
Spacing between Paragraphs: Use the Paragraph dialog or Spacing
controls on the Page Layout tab to see the values for Space After or Space Before for
both paragraphs before you start making changes. Remember that
the larger amount is in charge of the spacing. If you guess but guess
wrong, you can sometimes change and change and change without seeing any
changes in the document! Very confusing and frustrating!
Examples:
| |
Step-by-Step: Format Spaces |
|
| What you will learn: | to add shading to add borders to change line spacing to adjust Space Before/Space After |
Start with:![]() , flyer-World Travel Inc-Lastname-Firstname.docx as finished in the last lesson
, flyer-World Travel Inc-Lastname-Firstname.docx as finished in the last lesson
Shading: Gallery
 Shading, also called Fill, is a colored or
patterned background. Pictures and text are on top of the color or pattern.
Shading, also called Fill, is a colored or
patterned background. Pictures and text are on top of the color or pattern.
![]() Design
tip: Colors
Design
tip: Colors
When you choose a dark color for shading, select a pale color
for the text. Text is easier to read when there is good contrast
between text color and background color.
![]() Design
tip: Printing
Design
tip: Printing
Think about how the combination of shading color and text
color will
print in black/white or gray scale. Some colors will turn into the
same shade of gray. You can wind up with invisible text!
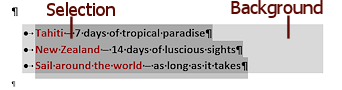
Let's create a colored background for the bulleted list.
- If necessary, select the lines listing the trips by dragging down the margin.
-
 On the Home tab in the Paragraph group, click on the down arrow at the right of the Shading button
  .
.
A gallery of colors opens.
-
 Experiment: Shading Colors
Hover over various colors to let Live Preview show the effect. Some backgrounds don't work so well with the red text!
-
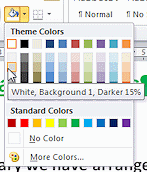
Click in the first column of colors on White, Background 1, Darker 15%.
 The
gray shading is applied to the background of the selected paragraphs, all the way across the
page between the margins. The other shading that you see is for being selected.
The
gray shading is applied to the background of the selected paragraphs, all the way across the
page between the margins. The other shading that you see is for being selected.Weird name for a color! Word uses descriptions of choices in its galleries. It makes it easier to figure out which color you want. When colors are named, it can be hard to figure out whether 'Haze' is lighter or darker than 'Smoke'.
 Save.
Save.
[flyer-World Travel Inc-Lastname-Firstname.docx]
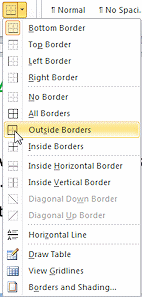
Borders: Menu
A border is a line around something. The versions of Word since Word 97 can put a line around just about anything!
The Borders button changes its icon to show the most recent choice. If you select some other text and click the button, the border style on the button will be applied.
-
 While
the lines about trips are still selected, on the Home tab in the Paragraph group, click on the down arrow at the right of the
Borders button
While
the lines about trips are still selected, on the Home tab in the Paragraph group, click on the down arrow at the right of the
Borders button  .
.
A vertical gallery of choices for borders drops down.
- Experiment: Borders List Combinations
Hover over various choices in the list. There is no Live Preview in versions before Word 2016! Unexpected! Apparently this list is a menu instead of a gallery in those versions.
You can combine these choices in some interesting ways.- Click on the first border in the list, Bottom Border.
The list closes and applies the border.
The Border button shows the icon for Bottom Border now. - Click on the second border, Top Border.
The top border is applied, and the bottom border is still there.
The Border button now shows the icon for Top Border. - Click on the
Border button again.
The top border is removed. Did you expect that?? I didn't!
Borders are additive and subtractive. If there is already a border there, clicking that choice again takes it away. - Try various combinations. Can you now predict
what will happen?
When you are ready to continue...
- Click on the first border in the list, Bottom Border.
-
 Choose No Borders to clear any borders left over, and then Outside Borders.
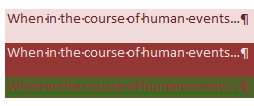
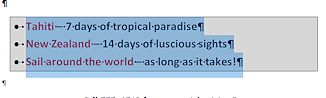
A thin line appears all the way around the shaded area.The illustration shows the text as selected after the background color and border have been applied.
 In Word 2013 and 2016 the highlighting for selected text is gray.
 -
Save.
[flyer-World Travel Inc-Lastname-Firstname.docx]
Borders: Dialog
You have control of all the features of your borders in the Borders dialog.
-
 With the three lines listing trips still selected, in the Borders menu, click at
the bottom on Borders and Shading...
With the three lines listing trips still selected, in the Borders menu, click at
the bottom on Borders and Shading...
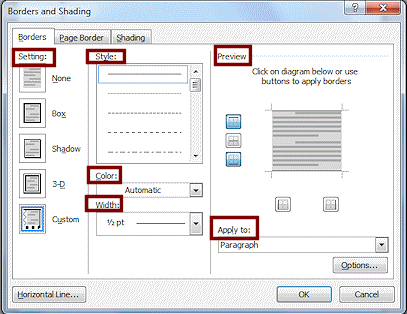
The Borders and Shading dialog appears.There are several sections to the Borders tab.
- Setting - The type of border: none, a simple box, a shadowed box, a 3-D box, or create your own Custom border.
- Style for the line - solid, dotted, dashed, double
- Color for the line
- Width of the line
- Preview of the effect of your choices. You can click directly on the preview to set which sides have a line.
- Apply To text box lets your choose to
apply to the whole paragraph or to selected text.
-
 Experiment: Borders Dialog
Try out various combinations of settings.- Click on the borders in the preview. Turn borders on and off.
- Change the type of line and its
width and color.
Watch how the buttons in the preview get highlighted when that border is on. Have a good time!
When you are finished...
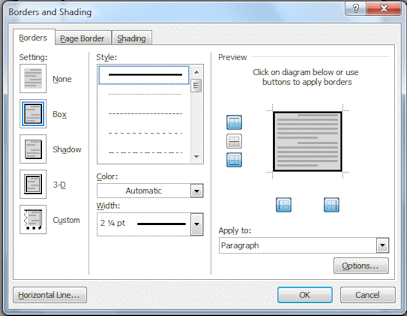
- Click on the setting Box.
- Select the solid line Style.
- Select Color as Automatic
- Select line Width of 2¼ pt.
- Select Apply to: Paragraph.
 Border
Options button: Under Options you can change how far from the border the text is. The default is 1 pt. top and bottom and 4 pt. left and right.
Border
Options button: Under Options you can change how far from the border the text is. The default is 1 pt. top and bottom and 4 pt. left and right.
-
 Save.
Save.
[flyer-World Travel Inc-Lastname-Firstname.docx]
Line Spacing: Button on Ribbon
You can manage the white space in your document more exactly than by just adding blank lines. That's the old way required for documents typed on a typewriter!
You actually need only one of the blank lines in the flyer. Let's get rid of the rest and adjust the spacing with Line Spacing and Space Before and Space After.
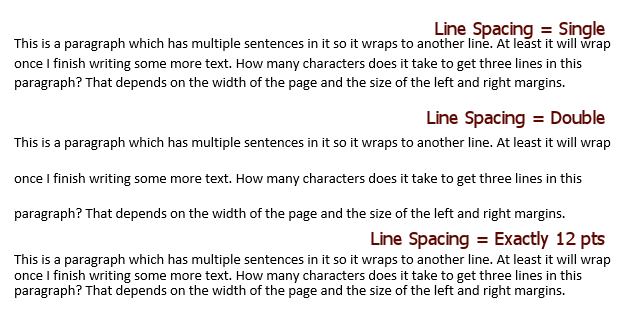
Normal line spacing is 1.0. Double spacing is 2.0. Triple spacing is 3.0.
-
 Delete all of the blank lines except one of the ones below the
title.
Delete all of the blank lines except one of the ones below the
title.
(Hint: Select the line with its paragraph mark and press the DELETE key.)
- Click anywhere in the subtitle, Anniversary Specials.
- Click the arrow beside the Line Spacing button to open the
list.
- Experiment: Line Spacing for a heading
Hover over each of the choices for line spacing.
Live Preview shows the effect in the document.
Changing the spacing for the subtitle line changes the space after the subtitle but not the space before the subtitle. -
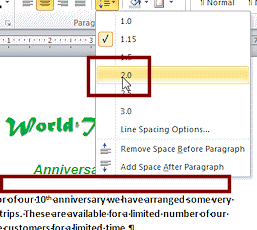 Click on 2.0 to create double-spacing.
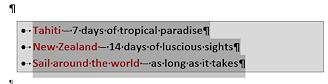
 Select all three lines in the bullet
list.
Select all three lines in the bullet
list. - Change the line spacing to 1.5 using the Line Spacing drop list.
- Save.
[flyer-World Travel Inc-Lastname-Firstname.docx]
Spacing: Paragraph Dialog
- Click anywhere in the paragraph, that
starts "In honor of..."
- Experiment: Line Spacing for paragraphs
Open the list from the Line Spacing button again and hover over each choice but do not click
on any of them yet.
again and hover over each choice but do not click
on any of them yet.
Live Preview shows the effect of each one.
Some of these choices add a LOT of space!The last item in the list is now Remove Space After Paragraph instead of Add Space. Why?? Apparently the formatting already included some space after. Let's find out how much!
- Click off the list to close it.
-
On the Home tab in the Paragraph group, click on the Dialog Box Launcher button
 .
.
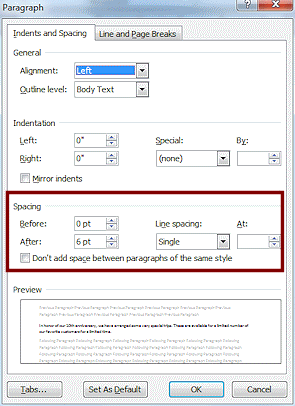
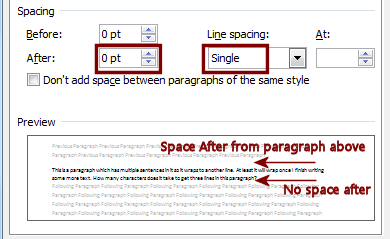
The Paragraph dialog opens.This paragraph already has extra white space after it and its line spacing is NOT 1.0.

 Word 2007, 2010: 10 pt. space after and 1.15 line spacing
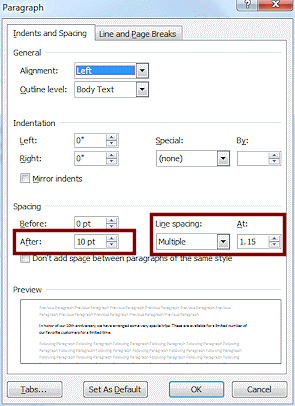

 Word 2013, 2016: 8 pt. space after and 1.08 line spacing.
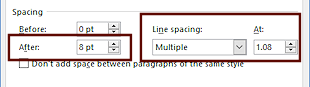
The values come from the paragraph style in the template, which is why different versions of Word have different values.
Look at the Preview at the bottom of the dialog. Your text is showing there in between two example paragraphs with standard formatting. Can you see the differences in the preview?
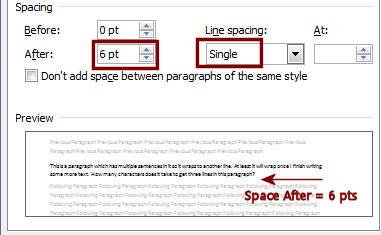
- Click the up arrow at the
right of the After: box to increase the value. Watch as the
preview changes.
 Repeat until the size is 24 pt.
 - If necessary, set the Line Spacing to Multiple and then type in the At: box the value 1.15.
- Click on OK.
The dialog closes and the space is added in the document. 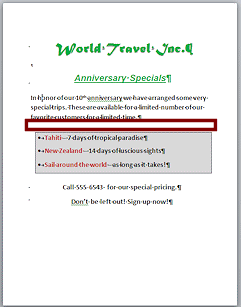 Save.
Save.
[flyer-World Travel Inc-Lastname-Firstname.docx]
|
|
| © 1997-2017 Jan Smith All Rights Reserved |
Site Map What's New |
Privacy Policy Terms of Service Copyright Acknowledgements |
~~ 1 Cor. 10:31 ...whatever you do, do it all for the glory of God. ~~
Last updated: March 27, 2017