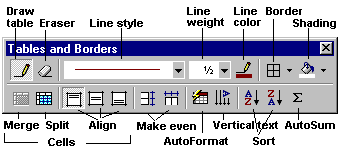
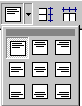
The Tables and Borders toolbar contains buttons for
commands to help you create and format a table. The toolbar can be docked
at any edge of the window, but the default is free-floating. The
Tables and Borders button
 toggles this
toolbar open and hides it.
toggles this
toolbar open and hides it.
Below you will find explanations of all the features of
the Tables and Borders toolbar.
 |
Draw Table |
Turns your pointer to
 a pencil shape with which you
can draw the outside of a table by dragging from top left corner to
bottom right corner. You drag across the table to add lines that
create rows and columns or to split a cell into several rows or
columns. This allows you to create very complex tables
easily. a pencil shape with which you
can draw the outside of a table by dragging from top left corner to
bottom right corner. You drag across the table to add lines that
create rows and columns or to split a cell into several rows or
columns. This allows you to create very complex tables
easily.
 You
must click the button again to toggle it off, returning
your pointer to it's previous shape. You
must click the button again to toggle it off, returning
your pointer to it's previous shape.
When drawing lines, be sure you see your line appear
before you release the mouse or you might wind up with a line
that is too short. Your lines will be straight and either vertical
or horizontal. No angles are allowed with this tool! |
 |
Eraser |
Changes the pointer to
 an eraser shape with which you
can erase a line in a table by clicking it or by dragging down the line to erase across
several cells. This button also is a toggle button. Click it to
return the pointer to the normal shape. an eraser shape with which you
can erase a line in a table by clicking it or by dragging down the line to erase across
several cells. This button also is a toggle button. Click it to
return the pointer to the normal shape. |
 Line Style Line Style |
Style of line drawn with the
pencil. The arrow displays a list of line styles, like double or
dashed or solid. Choose style before
drawing. |
 |
Line Width |
Width of line drawn with the
pencil. The arrow opens a list of widths for your border lines.
Choose width before
drawing |
 |
Line Color |
Color of line drawn with the
pencil. Choose the line color first
and then draw. |
 |
Borders |
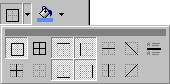 Applies the border
type shown. The arrow opens a palette of borders. The diagonals are
only available for a table cell. Applies the border
type shown. The arrow opens a palette of borders. The diagonals are
only available for a table cell.
You can also use the Borders button on the Formatting
bar.
|
 |
Shading |
Colors the background
with the solid color shown under the bucket. The arrow opens a palette of
other colors.
To use a pattern or color percentage
you must use the Borders and Shading… dialog from the
Format menu.
For a table, you cannot use the button on
the Drawing toolbar that looks just like this. That button applies only to drawing objects. Confusing! |
 |
Merge Cells |
Combines the selected cells in a table into one cell.
The contents of each former cell is placed in a separate paragraph
within the new cell. |
 |
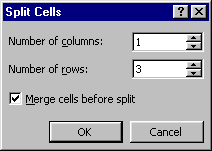
Split Cells |
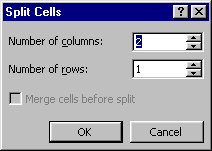 Divides a cell into several new cells. Divides a cell into several new cells.
Clicking this button opens the Split Cells dialog
where you must set the number of rows and columns.
The paragraphs in
the cell being split are split between the new cells if you are
creating columns.
|
|

 |
Alignment (Vertical) |
 Align a cell's contents at
the top, middle, or bottom of the cell. You can combine a vertical
alignment with a horizontal alignment- Left, Center, Right, or
Justify using the Formatting bar buttons. Align a cell's contents at
the top, middle, or bottom of the cell. You can combine a vertical
alignment with a horizontal alignment- Left, Center, Right, or
Justify using the Formatting bar buttons.
  Aligns a cell's contents horizontally and
vertically inside the cell. Aligns a cell's contents horizontally and
vertically inside the cell.
|
 |
Distribute Evenly |
Make the selected rows or columns of equal size
within the current space. |


 |
Change
Text Direction |
Changes the direction of text in a cell.
Image on the button changes to show the direction that will be
applied if you click it. |
 |
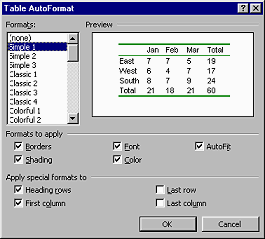
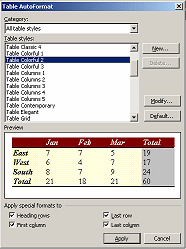
Table AutoFormat |
Opens a dialog with pre-designed table formats for you to
choose.
You
can pick what parts of the formatting you want by using the
checkboxes. There does not seem to be a way to save your own
formatting combinations to use here.
|
 |
Sort Ascending and Descending |
Sort alphabetically based on any
column. Ascending means normal alphabetic order- a, b, c….
Descending is reverse alphabetic order- z, y, x…. |
 |
AutoSum |
Totals the values in a column or row. To do
other calculations, you must use the command on the menu. |

 You can draw a table of the size you
want, even with an uneven number of rows or columns. This method is much
easier for complicated tables than using the Table button and then merging and
resizing.
You can draw a table of the size you
want, even with an uneven number of rows or columns. This method is much
easier for complicated tables than using the Table button and then merging and
resizing.