Forms & Reports:
Create Form
Manually

Did you want: Working with Databases: Access 2007, 2010, 2013, 2016
Forms & Reports: |
 Did you want: Working with Databases: Access 2007, 2010, 2013, 2016 | |||||
|
| ||||||
|
It is often useful to create a form manually. You can add and position the controls yourself, instead of using an automatic method. You decide in what order the fields will appear. You can adjust the controls' sizes to match the data that you expect. In this lesson, you will create a form from scratch yourself. It is easy to add controls by dragging from the Field List and dropping onto the form. Then you can position and resize as you wish.
Default form |
Project 4: Forms & Reports
| |||||||||||||||||||||
Selecting Multiple ControlsOnce you have your controls onto the form, you will want to format, move, and align them. It speeds things up when you can do this for multiple controls at once. Even while multiple objects are selected, you can move an individual object with the Move handle at the object's upper left corner without losing the selection. So flexible! You must select both the control and its label if you want your formatting changes to apply to both. Both will move even if only one is selected.
Aligning Controls
You can also align objects to the grid points. This happens automatically if you have Snap to Grid turned on. (See the Format menu choices.) Other Office programs allow you to align to the objects Center or Middle, but Access does not! The Align commands are available from the Format menu and from the right-click menu. Access looks at the selected objects and finds the one that is farthest away in the direction that you chose. All objects are lined up to that one. If you do not select carefully, objects can wind up on top of each other or even completely hidden.
| ||||||||||||||||||||||
|
|
Step-by-Step: Create Form Manually |
|
|
What you will learn: |
to add fields manually to format control to select multiple controls to format multiple controls to move multiple controls to align controls |
Start with:
![]() ,
resource files,
worldtravel.mdb from the previous lesson
,
resource files,
worldtravel.mdb from the previous lesson
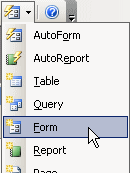 Click on the New Objects button and
select Form.
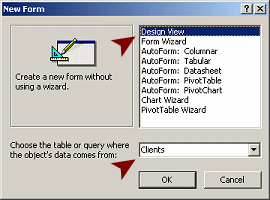 Select
Design View and Clients as the source table.
Click on OK.
A blank form opens.
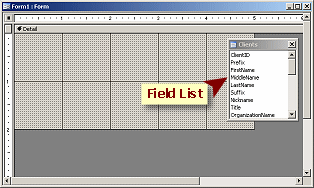 In the
Form Design View, if necessary, click on the Field List
button
![]() to display
the list of fields.
to display
the list of fields.
To manually add a field to a form is a drag-and-drop action. The Field List shows all of the fields that are in the source for this form. The New Form dialog allowed you to chose only one table or query as the source. You can, however, change that in the form's Properties dialog.
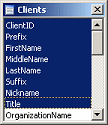 Select
fields:
Click on the first field in the Field List,
ClientID. Hold the SHIFT key down and click
on the field Title. All fields between
these two are also selected.
These are the fields having to do with the client's name.
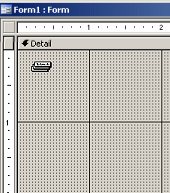 Drag
the fields to the blank form. The pointer changes to the Drag Fields
shape
![]() .
Drop at the left, below the word Detail.
.
Drop at the left, below the word Detail.
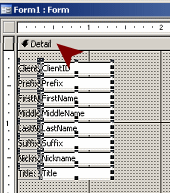
Whoops. The labels and controls are overlapping!
![]() Drop
point: Access puts the top left corner of the control at the point where you dropped,
and puts
the label to the left. The mouse pointer shape makes it a bit
difficult to drop exactly in the spot you wanted.
Drop
point: Access puts the top left corner of the control at the point where you dropped,
and puts
the label to the left. The mouse pointer shape makes it a bit
difficult to drop exactly in the spot you wanted.
When there is not enough room for the whole
label on the form at this location, the label starts at the form's edge
and extends underneath the control. You need to move the
controls and leave the labels alone but dragging a Move control will
only move that particular control. You cannot move just the controls. Instead, let's
back up and try to drop again in a better
location.
 Undo.
Undo.
Select the fields again in the Field List.
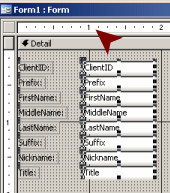
Drag and drop the fields below the
1" mark on the horizontal ruler.
Ah! Better.
Access is trying to be smart and helpful. It has lined up all of the
labels and controls. It has left some space between the end of the
widest label (MiddleName) and its control. There is just a little bit of vertical
space between the controls.
However, Access used the default width for all of the controls, one
inch. Some of
the other fields will need more space and some of these do not really need this
much width. Too much space is probably better than not enough!
![]() Switch
to Form View and navigate through all of the records. Are any of the
controls too narrow for the data? Yes, the Title control is.
Switch
to Form View and navigate through all of the records. Are any of the
controls too narrow for the data? Yes, the Title control is.
![]() How to see data that is out of view:
Even when the
control is too small to show all of the data, the data is NOT lost.
It's still there. Memo fields will get scroll bars but other field types
do not. You can see the hidden data in Form View by putting your cursor in
the field and using the arrow keys. You can also drag inside the field
and the data will scroll into view as you drag.
How to see data that is out of view:
Even when the
control is too small to show all of the data, the data is NOT lost.
It's still there. Memo fields will get scroll bars but other field types
do not. You can see the hidden data in Form View by putting your cursor in
the field and using the arrow keys. You can also drag inside the field
and the data will scroll into view as you drag.
![]() Evaluate:
Which is more important: a neat agreement of control
sizes and alignments or being able to see all of the data in a
control? Sometimes you will choose neatness but most of
the time you will want to choose being able to see the data!
Evaluate:
Which is more important: a neat agreement of control
sizes and alignments or being able to see all of the data in a
control? Sometimes you will choose neatness but most of
the time you will want to choose being able to see the data!
![]() Evaluate:
Do you like to see controls that are just the right size for their
maximum data? Would you rather have most of the controls the same size
even if many of them are much wider than necessary?
Evaluate:
Do you like to see controls that are just the right size for their
maximum data? Would you rather have most of the controls the same size
even if many of them are much wider than necessary?
For
example, you could make the Prefix field just wide enough for 5
characters because that is the maximum size allowed for that field in
the underlying table Clients.
ClientID could be that narrow, too, since
you probably won't have more than 99,999 clients (5 characters). But
the fields for parts of a name must be much wider than 5 characters.
You can resize your selected controls together. The labels will not resize unless they, too, are selected.
![]() Switch back to Form Design View.
Switch back to Form Design View.
The controls are still selected.
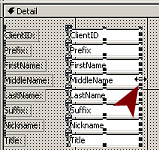 Move
your mouse pointer over a handle on the right edge of any control
until it changes to the Resize Horizontal shape
![]() .
.
Drag to the right to the vertical
grid line and drop.
All of the selected controls resize together but their labels stay
the same.
![]() Switch
to Form View and check the Title field again for all the records.
Switch
to Form View and check the Title field again for all the records.
If it is still not wide enough, repeat steps 1, 2, and 3 above until
the control is just wide enough.
![]() Save
the form as Clients.
Save
the form as Clients.
It can be a good idea to same your work along the way with different
names. Access only remembers the last 20 actions for the Undo list.
It can be hard to get back to a previous arrangement if you change
your mind. You just have to remember which version is the one you
want to use!
![]() Switch
to Form Design View.
Switch
to Form Design View.
Select the next 7 fields in the Field
List, from OrganizationName through
Country. These are the parts of a complete
address.
 Drag
the selected fields and drop below the 3.125" point on the
ruler and level with the top of the first column of controls.
A second column of controls and labels appears, neatly lined up to the
grid.
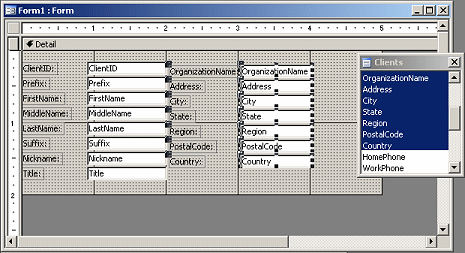
Note: In the illustration, the second column is one grid row too low to
line up with the top of the first column. You will fix this later.
 Move them down to align with the bottom of the first column.
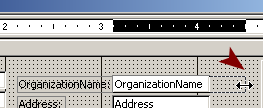 Resize the control OrganizationName
wider by dragging its handle to the right to the 4.5" mark on the ruler.
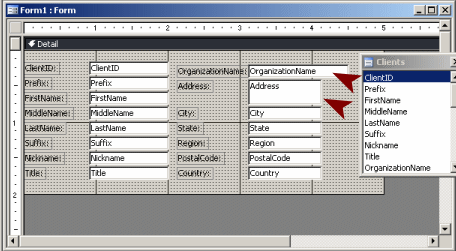


![]() Save
the form. (Clients)
Save
the form. (Clients)
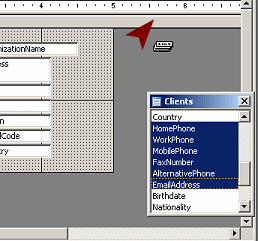 Select
the phone number fields and the email field from the Field
List.
Drag and drop the fields onto the form at
ruler mark 5.5".
Yes, this is outside the form. It's OK!
Access enlarges the form to hold the fields that you dropped. So helpful!
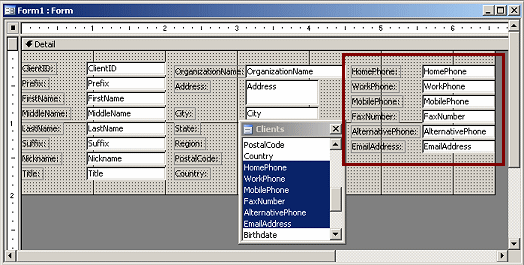
The phone number fields are going to be fine for most numbers, so for now you will leave these controls as they are.
Several email addresses, however, are far too wide for this control. You must enlarge the control. You will have to rearrange the control and its label so that the form itself will not get any wider.
 Drop
the control below its label but not lined up with it.
 Hold
the SHIFT key down and click on the label
EmailAddress.
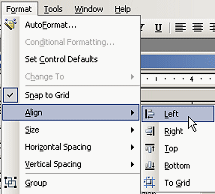 From
the menu select ||
 Switch
back to Form View and navigate through the records to see if the email addresses now fit in the
control.
![]() Save
the form. (Clients)
Save
the form. (Clients)
You have several fields left in the Field List that are not on the form yet. You need to add these one at a time and position them carefully to keep the form from getting too wide.
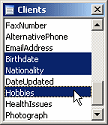 Hold
the CTRL key down and click on the fields
Birthdate, Nationality,
and Hobbies in the Field List to select these
non-adjacent fields.
  Drag
the fields and drop them at the bottom of the first column.
 If necessary, move or align the controls so that they line up with the
rest of the column.
 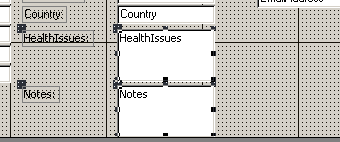 Drag the fields HealthIssues and
Notes and drop them at the bottom of
the second column. These are both Memo type fields.
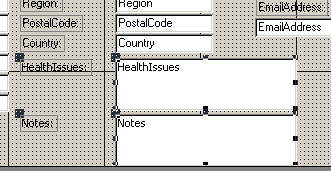 Resize
the controls wider since some records will likely have a lot of text in
them eventually.
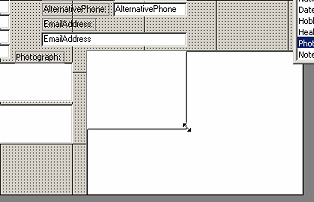 Drag the field Photograph and
drop it at the bottom of the third column. This is an OLE
Object type of field. The default size is much too large. The form
automatically enlarged.
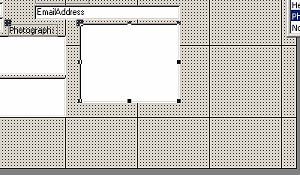 Resize
the control by dragging the bottom right handle upwards and to the left,
until the control is about 1" square.
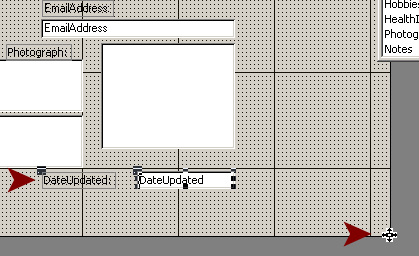
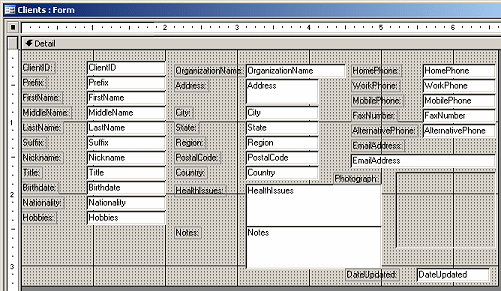
![]() Save
the form. (Clients)
Save
the form. (Clients)
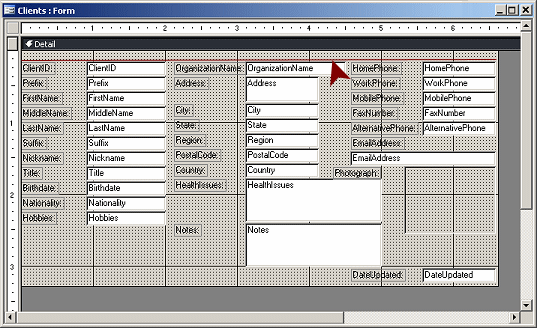
Now that all of the fields are on the form, it may be that your columns, like the illustrations, are not lined up on the same grid row. I added the red line to the illustration to show where the columns should line up.
Inspect the form, looking especially at how
the columns line up with each other.
If necessary, move controls and align again so that:
The first controls in each column are lined up on the same row of grid dots.
Labels and controls in each column are aligned at the left with each other.
The vertical spacing between controls is the same throughout the form.
The form is just large enough to hold the controls.
|
|
~~ 1 Cor. 10:31 ...whatever you do, do it all for the glory of God. ~~ |