|
If you want to put an image in a field in a
record, the field must have the data type OLE Object.
On a form or report you display the image from a record in a
bound object frame. This is the only way to have
an image tied to a particular record.
The bound object frame on the form or report can contain an image,
spreadsheet, word processing document, or any other kind of object that is
associated with a program that allows OLE (Object Linking and Embedding).
In fact, each record can have a different kind of object!
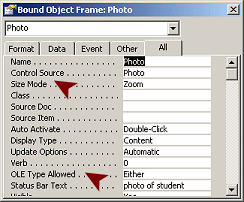
Properties Dialog: Bound Object Frame
 The
Properties dialog for a bound object frame has different properties
from those that you saw for background images and Image controls. After
all, it might not be holding an image at all! The
Properties dialog for a bound object frame has different properties
from those that you saw for background images and Image controls. After
all, it might not be holding an image at all!
It does have Size Mode (Clip, Stretch, or Zoom)
and OLE Type Allowed (Embedded, Linked, or
Either).
The value for the Auto Activate property
determines the method for opening the the object in its original program
for editing. Sometimes you will get a whole new window and sometimes a
small window right in the control. The default is to double-click the
control. In the case of an image object, that program that opens will be
the graphics program associated with the image's file type.
|
|

Where you are:
JegsWorks >
Lessons >
Databases
Before you start...
Project 1: Intro
Project 2: Access Basics
Project 3: Tables & Queries
Project 4: Forms & Reports

Import/Export/Link
Designing Forms
 Form
Wizard Form
Wizard
Controls
Create
Form Manually
Format
Form
Tab
Control
Form View
Images in Forms & Reports
Form Images
Record
Images
Printable Form
Designing Reports
Special Forms & Reports
Summary
Quiz
Exercises
Search
Glossary
Appendix
|
|
How to Insert an Object into a Record
You can insert an object into a record in
either Table Datasheet View, Form Datasheet View, or in Form View.
You cannot type anything in the control!
First, select
the bound object frame or the datasheet cell, then...
-
Method 1: Use the menu
A dialog opens for you
to create or select an object, which can be an image or spreadsheet or any
other OLE object.
-
Method 2: Drag and drop the file from a My Computer window into the
field (Datasheet View) or control (Form View).
-
Method 3: With the file open in the original program, copy it. Paste into the field (Datasheet View) or control (Form View).
Sometimes you will only get a picture of what you copied and pasted.
Sometimes you will get the whole document, even if you copied just part of
it.
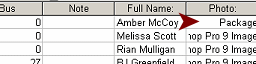
What you will see after inserting an object:
 Datasheet
view: A datasheet does not ever show the actual image or
document.
In Datasheet View you will see only what
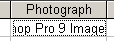
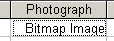
type of object it is, like "Bitmap Image" or
"Picture" or "Microsoft Office Excel Worksheet" or the name of the program on your
computer that is associated with that file type, like "PaintShopPro
9
Image". "Package" means that Access cannot display the object. Datasheet
view: A datasheet does not ever show the actual image or
document.
In Datasheet View you will see only what
type of object it is, like "Bitmap Image" or
"Picture" or "Microsoft Office Excel Worksheet" or the name of the program on your
computer that is associated with that file type, like "PaintShopPro
9
Image". "Package" means that Access cannot display the object.
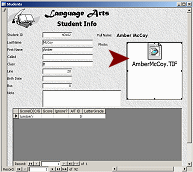
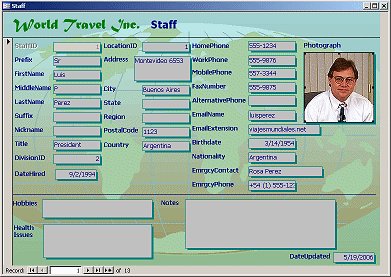
Form View: The control on a form or report will show the image or
document. When it can't, it shows the file name and either an icon or a
bitmap approximation of the file.
 |
 |
 |
| Word document |
PowerPoint presentation |
Excel spreadsheet |
 |
 |
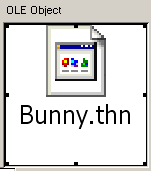 |
Picture of single slide
from Copy/Paste |
Image |
Unknown file type |
 Problem: Table field shows Package Problem: Table field shows Package
Problem: Form shows file name
  What's
wrong: You do not have the software installed that you need
to use the file's format. What's
wrong: You do not have the software installed that you need
to use the file's format.
You need to install a program that allows OLE connections for that file
type.
What to do about images that don't show:
Solution 1: Install Microsoft Photo Editor from
Office 2000 or Office XP or install another graphics program that has the OLE
servers. BUT, if you move the database to a different
computer, THAT computer also must have such a program installed for the
images to display!
Solution 2: Better - Convert your images to Windows Bitmap
format (*.bmp), which Access is supposed to understand.
 |
Step-by-Step: Record Images |
|
|
What you will learn: |
to add images to records with:
Insert Objects dialog
drag and drop
copy and paste
to compact database
to compare database file sizes |
Start with:
 ,
resource files,
worldtravel.mdb from the previous lesson ,
resource files,
worldtravel.mdb from the previous lesson
You will add images to your Staff table records. It will be
interesting to see what effect on the database's file size the images
will have.
 Warning: File
Size Increase Warning: File
Size Increase
As you add images to records in this lesson, the database file size
will increase a LOT. Be sure that the disk you are saving your database
to has LOTS of empty space. I needed over 30
MB. I did a lot of experimenting with objects and images. You may need to
use a copy of the file on a hard disk for this part.
Backup Database
Before adding any images or new objects, you need a copy
of the database at its smallest size. Backing up the database is the
easiest way to get that. Besides, you should be making backups regularly
anyway.
-
Close any open forms or tables and save
if necessary.
-
From the menu select |The Save Backup As dialog opens.
-
If necessary, navigate to your
databases project4 folder on your Class disk.
-
 Save with the name worldtravel_beforerecordimages.mdb.
The database closes. A copy is made with the name that you chose. The
original database opens.
You will see security warnings again if you saw them the first time you
opened the database.
-
Open a My Computer window and navigate
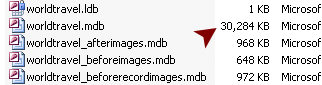
to your Class disk to the databases project4
folder. You should see worldtravel.mdb, worldtravel_beforeimages.mdb,
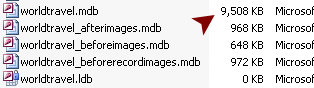
and worldtravel_beforerecordimages.mdb.
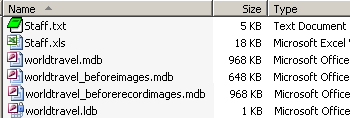
Write down the sizes of these files. (They are almost certainly different from
the illustration!) As you work, the database size increases. Compacting it
reduces the size somewhat. When you do a backup, the file is
automatically compacted as part of the process.
You can leave the My Computer window open.
Insert
Image in Record: OLE Dialog
You can add an image to a table directly in Table Datasheet View or in
Form Datasheet View. The image won't display in the datasheet. So you will usually add
an image to a record via a form. You can insert the picture as an
object or drag the file from a My Computer window and drop it on the
control. You will try all of these in this section!
Disclaimer: All of the images of people are from clip art
collections.
-
 Open
the form Staff-formatted. Open
the form Staff-formatted.
- Switch to Datasheet View.
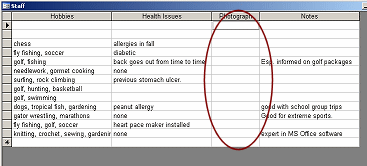
- Scroll to the Photograph field.
This column is blank.
-
 Click
in the first row in the Photograph column. Click
in the first row in the Photograph column.
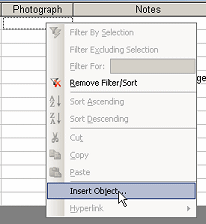
- Right click and select
A dialog opens.
-
 Select
the second option, Create from File. Select
the second option, Create from File.
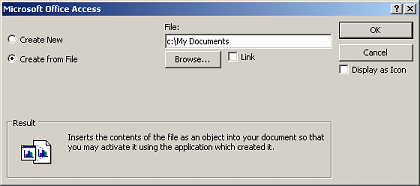
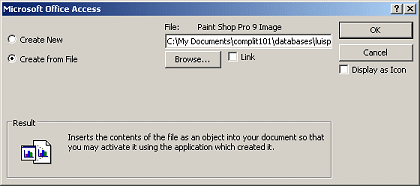
The initial path is to where you last choose an object.
- Click on the Browse button.
A Browse dialog opens for you to navigate to the object that you want.
-
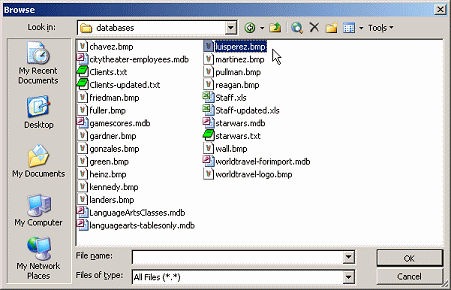 Navigate
to where you saved the resource files. Navigate
to where you saved the resource files.
- Select the image luisperez.bmp
The icon beside the image will match the program that is associated with
BMP files. In the illustration, the icon is for MS Paint.
-
Click on OK.
You are back in the previous dialog, but there is a new path in the text
box.
You can choose here whether you want to link to the image or if you want
to display a clickable icon instead of the image itself in a form or
report. (Not a good choice for a printed report!)
-
 Click
on OK. Click
on OK.
The graphics program that is associated with BMP images may open. The field
is an OLE Object type. Access does not know how to handle objects but
relies on the original program to tell it how to display it.
- If necessary, switch to the form datasheet window.
The datasheet shows text in the field.
  What text you see will depend on what graphics program is associated
with the BMP file format. What text you see will depend on what graphics program is associated
with the BMP file format.
 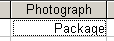 Problem:
You see "Package" in the datasheet Problem:
You see "Package" in the datasheet
Access does not have the correct OLE server
installed. In this case, in Form View you will see the name of the file
and possibly a small, poor quality bitmap of the image.
Solution: Install a graphics program that can handle the file
format and will work with OLE objects.
-
 Switch
to Form View to see the image. Switch
to Form View to see the image.
Better! In this view you have a chance of noticing if you inserted the
wrong image since you can easily see whose record this is. In the Form
Datasheet View the person's name was out of sight to the left and you
could not see the image itself or even the file name.
Insert Image in Record: Drag and Drop
In both Form View and Datasheet View, you can drag and drop files into
OLE controls. This can be easier than going through the OLE Object dialog
over and over.
- In the Form View of the Staff-formatted
form, change to record #2, Hector Chavez.
- Click on the Photograph control to select it.
-
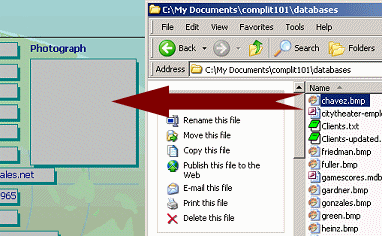 Open
a My Computer window to the folder where you saved the databases resource files. Open
a My Computer window to the folder where you saved the databases resource files.
- Position the windows so that you can see the form also.
- Drag the file chavez.bmp from the
My Computer window and drop it on the Photograph control.
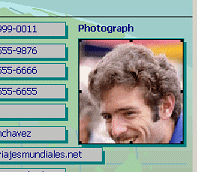
The photo appears in the control.
There may be a noticeable delay while Access does its magic.
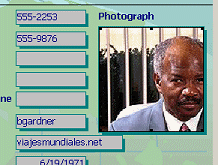
 The
image is cut off. The default value for Size Mode is Clip, which shows
only the part of the image that will fit into the control, starting from
the upper left corner. The
image is cut off. The default value for Size Mode is Clip, which shows
only the part of the image that will fit into the control, starting from
the upper left corner.
We will fix this shortly.
- Leave both windows open.
Insert Image in Record: Copy and Paste
If you are editing an image to crop or resize, it is easy to copy the
image directly from the graphics software and paste to the form
control. You cannot link the image when you paste it into a control. It
might not have been saved any where at all!
-
 In
the My Computer window, double-click the file named
gardner.bmp. In
the My Computer window, double-click the file named
gardner.bmp.
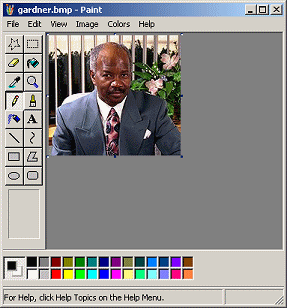 The image opens in the program that is associated with the BMP
file type. The image opens in the program that is associated with the BMP
file type.
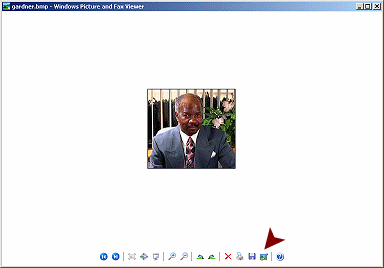 Image
did not open in an editing program Image
did not open in an editing program
If you do not have a graphics program installed, then
double-clicking the file will probably open the image in Windows Picture
and Fax Viewer, which does not have editing tools. Click the next to
last button on the right to open the picture for editing.
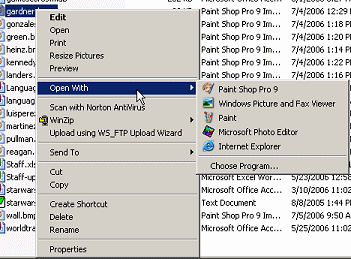 Alternately,
you can close the viewer window, right click on the file name and choose
Open With... Then choose a program from the list. Alternately,
you can close the viewer window, right click on the file name and choose
Open With... Then choose a program from the list.
- For MS Paint, from the menu select | and then on
|
OR
 Use the key combo CTRL + A and then CTRL + C.
These menu commands and key combos should work in most programs. If not,
investigate the menus to find commands to select the whole image and copy it.
-
 Switch
to the form. Switch
to the form.
- If necessary, click on the Photograph
control to select it.
- Paste.
Whoops. The image is cut off.
- If necessary, open the Properties dialog for
the control.
The Size Mode property shows Clip, which is exactly what Access did to
your image.
-
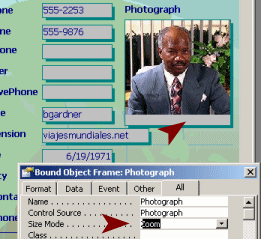 Change
the Size Mode to Zoom. Change
the Size Mode to Zoom.
Now the image shows completely. There is a strip of background showing
at the bottom of the control and the quality is not quite as good.
Access is not a graphics program!
- Navigate back to records 1 and 2. How did
changing to Zoom affect them?


The first record is not so pretty now. Access does not always do a good
job of resizing. The second photo looks good. Images will
look the best when the size closely matches the size of the control.
- Add images from your
resource files to each of the remaining records, using the
method(s) of your choice. The images are named with the last name of the
staff member.
- View all of the records with Clip, Stretch, and Zoom
settings.
 Evaluate:
Which setting works best for the most images? Which
images will need to be revised in order to look good with your choice
of Size Mode? Evaluate:
Which setting works best for the most images? Which
images will need to be revised in order to look good with your choice
of Size Mode?
- Save the form Staff-formatted
with your choice of Size Mode.
 Resize
with a graphics program: You
will get better results using a graphics program to resize the image to
the correct size for your control so you can use the Clip setting. For
this form you need to crop the image to a square size and then resize,
if necessary, to 1.5" square. Then you can sharpen the image. Resize
with a graphics program: You
will get better results using a graphics program to resize the image to
the correct size for your control so you can use the Clip setting. For
this form you need to crop the image to a square size and then resize,
if necessary, to 1.5" square. Then you can sharpen the image.
Crop
and Reduce Size With MS Paint:
It requires a good eye and some experimenting to use MS Paint to revise
your images. MS Paint does not have a
Crop tool or a Resize tool like other graphics programs.
Work around for cropping: Open the image in MS Paint. Select a section of the image using
the rectangular Select tool. (Try for a square shape selection.) Copy. File | New to open a new blank canvas.
Paste. If there is extra white around the image, click in the white
area and drag
on the tiny handles until the white vanishes at the edges of the image.
Work around for resizing: From the menu select Image |
Stretch/Skew and use a percentage less than 100% for both
Stretch dimensions. (Your best guess) Click on OK. This will reduce the
size of the image without making it jagged. Select View | Attributes to
see what size your image is now. If you don't like the size, close the
Attributes dialog, Undo and try again. Save your image as a bitmap for
use in Access.
Compare File Size Again
Now that you have added images to the records, will there be any
difference in the file size?
- Verify that all database objects are saved.
- Switch to the My Computer window (If necessary open
one and navigate
to your Class disk to the databases project4
folder. )
- Compare the current size of worldtravel.mdb
to the size of
worldtravel_beforerecordimages.mdb, which was the
size of worldtravel.mdb at the beginning of
this lesson. There should be a significant difference!
Note:
Your file sizes are almost certainly different from mine! I did a lot
more work and tinkering that you probably did.
- Switch to the Access window for worldtravel.mdb.
- From the menu select ||The database closes, compacts, and reopens.
- Switch to the My Computer window.
- Write down the file size.
Did the World Travel database change sizes much after compacting?
Probably! How
does its size now compare to the size before adding the record images?
(Mine shrank to less than a third of the previous size. Your file sizes are likely to be different from mine!)
|