|
To Create a Custom Dialog
To be able to use a dialog to accept values for your parameters, you
need several things:
-
Form for parameter(s): A custom dialog with
unbound controls to accept the values. Set the form's properties
appropriately for a dialog. (See below)
-
Form or Report: Something that will
use the parameters
-
Form/Report Source: Modify a form or report's
source to accept the parameter values from the custom dialog instead of
normal query parameters.
-
Macro or Code: In OnOpen property of form/report,
to open the custom dialog when the form/report opens.
-
Macro or Code: In OnClick property of a button on
the custom
dialog, to open form/report and then hide the custom dialog.
The dialog must be open for the form or report to see the values that you
entered.
-
Macro or Code: In OnClose property of form/report, to close the hidden custom dialog when
you close the form/report.
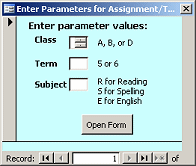
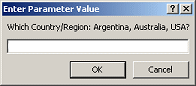
In the parameter query, instead of a parameter with directions, like
[Enter a Class (A, B, or D):], you must
refer to the control on the custom dialog form, like
[Forms]![ChooseAssignments]![WhichClass]
where ChooseAssignments is the name of
your custom dialog form and WhichClass is the name of the
text box where you enter a value. The exclamation points in the
expression are
important! (When reading such expression aloud, read the ! as "bang".)
Properties of a Custom Dialog
A dialog does not look like a normal window and usually behaves
differently, too.
Normal form window vs. Dialog
style
Appearance: The following properties on the Format tab of the
Properties dialog for a form create
the look of a dialog:
- BorderStyle property =
Dialog
- RecordSelectors property =
No
- NavigationButtons property =
No
- DividingLines property =
No
Behavior: Dialogs are usually popup, modal windows. These
properties are on the Other tab in the Properties dialog for the form.
- Pop Up property =
Yes
- Modal property =
Yes
A popup window stays on top of
all other windows until you close it. You can switch to another window,
assuming that your popup window is not covering the whole screen. Some
Help windows behave this way.
A modal window keeps you from switching to a different window until you close the modal window,
either by clicking its Close button or by completing the choices in the
window and clicking its Submit or OK button. Dialogs are often modal
windows.
A modeless window (Modal = No) is an ordinary window. You can
switch to other windows as you wish.
Macro
  A
macro is a way to do a bit of programming
without having to know any programming! A
macro is a way to do a bit of programming
without having to know any programming!
Access provides a Macro dialog with drop lists of possible actions. The
list at the right of these actions is quite long! We will not be getting
too deep into macros in these lessons.
Unlike in other Microsoft Office programs, you cannot record your
keyboard and mouse actions as a macro.
What do you do with a macro?
In the Properties dialog of a form or report or section or control, you can assign a macro to any of the
events, such as OnOpen or OnClose
or OnClick or OnFormat or OnPrint.
For example, you could assign a macro to the OnClick event of
a command button on a form. The macro could open another form or a report or it could
run an action query of some sort.
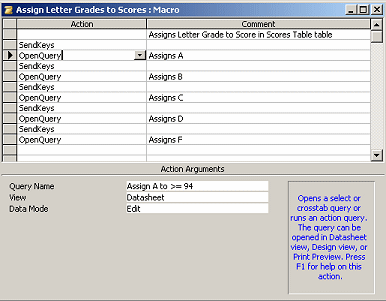
The macro in the illustration is from the
Language Arts
Classes database. It runs a sequence of update queries to update a table with letter
grades based on scores. This macro was not attached to any other object.
I just ran it directly when I needed to convert scores to letter grades
at the end of each grading period.
Most actions have
arguments in the bottom part of the macro window. In the
illustration the action OpenQuery has 3 arguments: the name of the query to run, what
view to run it in, what mode (add, edit, or read-only).
 AutoExec macro: Any macro saved
with the name AutoExec will automatically
run whenever the database is opened. You could use such a macro to
immediately open a switchboard dialog or to open the Database Window to
the list of forms or the list of reports. AutoExec macro: Any macro saved
with the name AutoExec will automatically
run whenever the database is opened. You could use such a macro to
immediately open a switchboard dialog or to open the Database Window to
the list of forms or the list of reports.
 |
Step-by-Step: Custom Dialog |
|
|
What you will learn: |
to create a report that uses the form data
as parameter(s)
to create a custom form
to format a custom form as a dialog
to create an event procedure using Command Button Wizard
to edit an event procedure
to add a macro to the OnOpen event of a form/report
to add a macro to the OnClick event of a button
to add a macro to the OnClose event of a form/report |
Start with:
 ,
resource files,
worldtravel.mdb from the previous lesson ,
resource files,
worldtravel.mdb from the previous lesson
In a previous lesson
you created and saved a parameter query,
QStaff-WhatCountry. This query required you to type in the name of
a country or region and the query would then produce a datasheet of staff
members from that country/region. If you mis-typed the country name, the
query would find no records. To be able to select a country from a list
of the existing countries would certainly help! You will create a form
that uses a list box to show the possible countries. If the list were
longer than 6 or so, you might want to use a combo box instead.
You will create a simple report that will show the Staff info and takes
its parameters from your custom form. You will need some macros and event
procedures (programming code) to handle the form and the resulting
report.
Create the Report
- Use AutoReport to create a new report based on the query
QStaff-WhatCountry.
The only fields in the query are the StaffID, first name, middle
name, last name, and country/region.
 Save the new report
as Staff- select Country/Region. Save the new report
as Staff- select Country/Region.
-
 Switch
to Report Design View. Switch
to Report Design View.
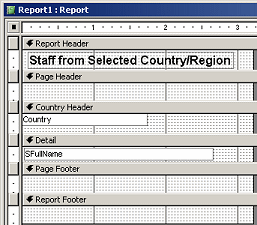
- Delete all the fields except SFullName
and Country.
- Delete the label for each of these controls.
- Group on the Country field and show a group
header.
- Cut and paste the Country control to the group header.
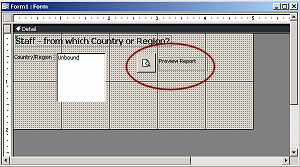
- Resize and position the controls as shown in the
illustration, at the far left of their sections.
- Show the Report Header/Footer.
- Add a label to the report's Header for a title.
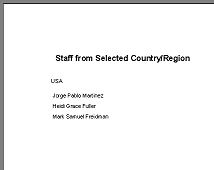
- Enter as the title: Staff - from selected
Country/Region
- Resize the report to just over 3" wide.
- Save.
-
  Switch
to Print Preview. Switch
to Print Preview.
A parameter dialog appears.
- Enter USA and click on OK.
The report lists the staff members whose Country/Region field matches
USA.
- Switch to Report Design View.
You will change the design shortly.
Create Custom Form
With only 3 choices the parameter dialog for the report above works
fine. But what if there are 10 choices? And how good is your typing?? If
you mis-type the country, the report will find no records at all.
The custom form that you will use to collect parameter information is
not bound to any table or query. You must add any controls using the
Toolbox tools.
- Open a new blank form.
(Database Window - Forms | New | Form Design View)
-
 With
the Label tool, add a label at the top of the Detail section. With
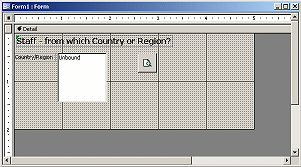
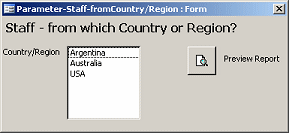
the Label tool, add a label at the top of the Detail section.
- Enter the text Staff - from which Country or
Region?
- Format the label as:
Tahoma
12 pt.
Bold
Add List Box
A list box shows a list of items in a
fixed-size box. If the control is too short to show the whole list, a
scroll bar appears. It is more useful for short lists than a combo box
which you have to keep open with your mouse. You can only choose 1 item
from a list box. If there are many items to choose from, a combo box
might be a better choice since it would take less space on the form.
If the list will be used by
several different forms, it would be a good idea to use a table as the
source of the list box. Then you would have to write it once and can
update it in only one place.
-
 Click
on the List Box tool Click
on the List Box tool
 on the
Toolbox bar. on the
Toolbox bar.
- Click in the Detail section, at the left underneath the title.
A control appears and the List Box wizard starts to help you with this control.
   Problem:
Wizard does not start Problem:
Wizard does not start
The toggle button for Tool Wizards is off (no line around the
button).
Solution: Click on the button to turn it on. Delete the blank
list box and try again.
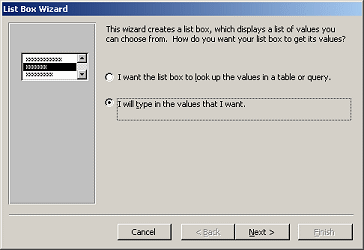
- In the first page, select "I will type in
the values that I want."
- Click on Next.
-
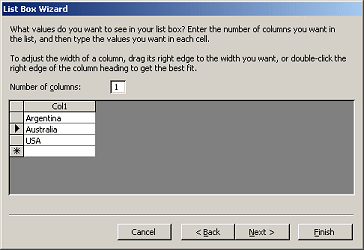 In
the second page, leave the number of columns as
1 and type in the choices: In
the second page, leave the number of columns as
1 and type in the choices:
Argentina
Australia
USA
- Spell check by pressing the F7 key.
Make any corrections that are needed.
- Click on Next.
-
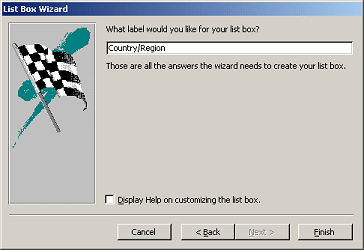 In the
third page, for the label of the control type
Country/Region. In the
third page, for the label of the control type
Country/Region.
- Click on Finish.
The list box control is added to your form.
If the label Country/Region is cut off, move the unbound control to the
right by
dragging its Move handle.

- Change the Name of the list box control to
Country List, in the Properties dialog of the
form.
This will be important shortly.
Create a Command Button
Once your user has picked a country, you need a way to open the report.
A command button is the right control. A wizard helps by creating some
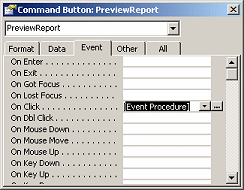
code for you! The code is called an Event Procedure and will
automatically be attached to the OnClick event in the button's Properties
dialog.
Unless you can write some additional code yourself, this event
procedure will have to be discarded later. It handles the opening of the
form just fine, but that is not enough in this case.
- Click on the Command Button tool
 on the Toolbox bar.
-
 Click
on the form under the word Region in the title. Click
on the form under the word Region in the title.
The Command Button wizard opens.
- In the Categories column, select Report Operations.
- In the Actions column, select Preview Report.
- Click on Next.
-
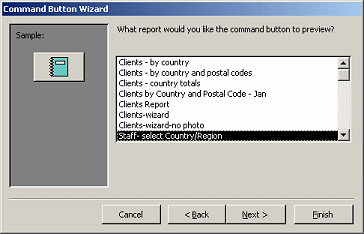 In
page 2 of the wizard, select the report
Staff- select Country/Region. In
page 2 of the wizard, select the report
Staff- select Country/Region.
- Click on Next.
-
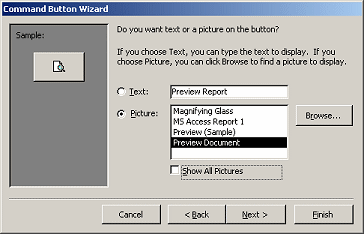 In
page 3 of the wizard, select the picture Preview
Document for your button. In
page 3 of the wizard, select the picture Preview
Document for your button.
- Click on Next.
-
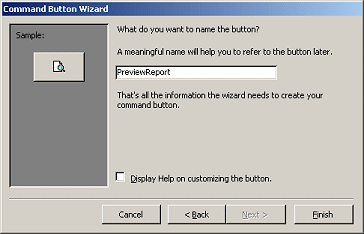 In
page 4 of the wizard, enter as the name of the new button,
PreviewReport. In
page 4 of the wizard, enter as the name of the new button,
PreviewReport.
- Click on Finish.
-
 With
the button still selected, look at the Properties dialog. With
the button still selected, look at the Properties dialog.
(Open it if necessary by clicking the Properties button
 on the toolbar)
- Click on the Event tab and scroll to OnClick.
The value is [Event Procedure].
- Click in the text box for OnClick.
The ellipsis button appears.
- Click on the ellipsis button.
Whoa! A large window appears with a lot of messy-looking stuff in it!
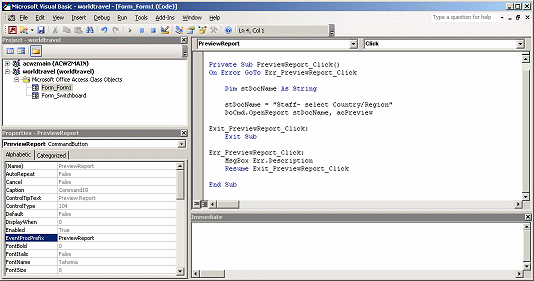
This is the Visual Basic programming code that will make the report
open when you click the button on your custom form. Aren't you glad you
did not have to write this yourself?!
- Close the code window by clicking the Close button
 in
the Title bar. in
the Title bar.
You are back in Form Design View.
-
 Use
the Label tool Use
the Label tool
 from the Toolbox bar to add a label beside the button that reads
Preview Report.
from the Toolbox bar to add a label beside the button that reads
Preview Report.
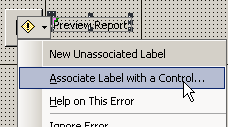
The Info button appears beside the new label, since it is not associated
with a control.
- Click on the Info button and choose to associate
the label with the command button control.
 A
dialog, Associate Label, appears. There is only one choice! A
dialog, Associate Label, appears. There is only one choice!
- Click on OK to close the Associate Label dialog.
The button now has a lovely label.
-
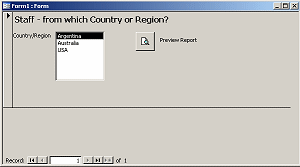 Switch
to Form View. Switch
to Form View.
How does your form look? If necessary, make adjustments to the position
or size of the controls. and the window size to eliminate unnecessary
blank spaces.
Recall that when you open the form directly, the window will be just
large enough for the form.
The navigation bar is totally unnecessary for this form, as is the
record selector at the left. You can use the Properties dialog to change
such things.
- Resize the window to just fit the form.
- Switch to Form Design View.
-
 If
necessary, select the form and open the
Properties dialog. If
necessary, select the form and open the
Properties dialog.
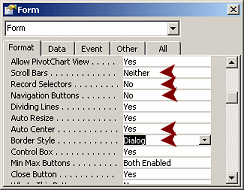
- On the Format tab, make the following changes:
Scroll Bars = Neither
Record Selectors = No
Navigation Buttons = No
AutoCenter = Yes
Border Style = Dialog
The AutoCenter property will center the dialog in the application's
window when you open it, but not when switching from Form Design View.
-
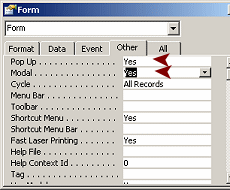 On
the Other tab, make the following changes: On
the Other tab, make the following changes:
Pop Up = Yes
Modal = Yes
Problem:
Switching to Form Design View for a dialog These changes prevent you
from using a toolbar button to switch to Form Design view.
Solution: The right click menu does include that command.
-
 Switch
to Form View. Switch
to Form View.
Quite a different look!
Problem: Resizing
a Dialog form in Form View
In Form View with the Border style set to Dialog, you cannot
drag the edges to resize the form.
Solution: If you need to adjust the size, switch back to Form
Design View and reset Border Style to Sizeable, make changes in Form
View, and set the Border Style back to Dialog.
-
 Select
a country and click the Preview Report button. Select
a country and click the Preview Report button.
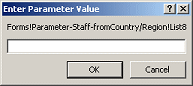
Hmmm. The parameter dialog appears. Why? You already picked a country!
The query that is the source for the report cannot see the value that
you picked. You will fix that in the next set of steps!
- Click on Cancel to close the parameter dialog and stop
display of the report.
- Save
the form as Parameter-Staff-fromCountry/Region
There are no spaces in this name.
- Leave the form open with some country selected.
Revise Query to Use Form Values
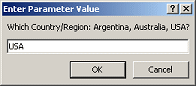
The query is currently using a parameter, [Which Country/Region:
Argentina, Australia, USA?]
You must make the query look to your new form for this value.
- Open the query QStaff-WhatCountry
in Query Design View.
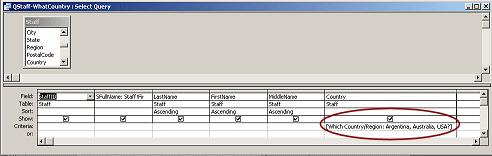
- Widen the Country column to show the whole parameter
expression.
- Edit the Criteria row in the Country column to read:
[Forms]![Parameter-Staff-fromCountry/Region]![Country
List]
No spaces!
This expression tells Access to look at the list of Forms for one named
Parameter-Staff-fromCountry/Region and then to look for a control named
Country List. The value of that control is what Access uses for the Country
column in the query. (It would have been better to not have a space in
the name!)
- Save
the query as QStaff-WhatCountry-fromform
-
 Run
the query. Run
the query.
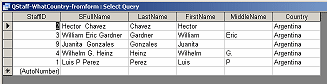
A datasheet lists staff members using the value from the Country
List control in the open form
Parameter-Staff-fromCountry/Region is
used by the query.
If you closed the form or do not have a country/region selected, the datasheet will be blank.
- Close the query.
So far, so good. You have a query that will take a value from your
custom form.
Report/ Query/Form Combo
You created a new query that uses the custom form. But the report is not using the new
query yet.
You could change the report's source but instead let's create a new report that will open from the custom form and leave
the old report to use the old parameter query. You must change the code
on the form for the command button so that it will open the new report.
Changes cause changes which cause changes!!
- In the Database Window, select the report
Staff- select
Country/Region.
- Copy.
- Paste.
- Name the new report Staff- select
Country/Region-customform.
- Open the report in Design View.
- Change the Record Source to use the new query,
QStaff-WhatCountry-fromform.
- Save
and close the report.
- Switch to your custom form
Parameter-Staff-fromCountry/Region .
- Switch to Form Design View.
- Click on the command button.
-
 In
the Properties dialog, open the Event Procedures for the OnClick
button by clicking the ellipsis button. In
the Properties dialog, open the Event Procedures for the OnClick
button by clicking the ellipsis button.
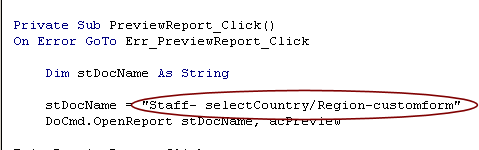
- Edit the name of the report to read
Staff-
selectCountry/Region-customform.
Type exactly as written here. (You are going to
produce an error on purpose.)
The wrong changes to this code can keep your button from working at all.
- Save
your change by clicking the Save button on the toolbar.
- Close the window.
Let's try the form now.
- Switch to Form View.
- Select a country and click the Preview
Report button.
An error message appears! The name of the report is apparently mis-spelled.

- Click on OK to close the message.
- Return to the Events Procedure window and edit the report's name.
There should be a space between "select" and "Country".
Be careful! The double quote marks are important as is the spacing and
spelling of the name.
- Save
and close the code window.
You are back to the custom form.
- Select a country and click the Preview
Report button again.
Success! At least, you should have success if you typed the report name
correctly!
Testing
When objects depend on other objects, it is a good idea to close all of
them and try from the beginning to see if everything works as you thought
it did. To use your new custom form, where must you start??
Start with custom form:
- Close all windows inside Access except the Database Window.
- In the Forms category in the Database Window, double-click
the form Parameter-Staff-fromCountry/Region.
The form opens.
- Select a country and click the Preview Report button.
Success.
- Close the form and then the report.
Start with report:
-
 In
the Reports category in the Database Window, double-click on your
newest report, Staff- select Country/Region-customform. In
the Reports category in the Database Window, double-click on your
newest report, Staff- select Country/Region-customform.
A normal parameter dialog appears. Why?
This one is looking for the value from your custom form. But the form is
closed. There is no value to find!
To open this report directly, you need to change it to automatically open the form
first. We can do that with a macro!
Macros to Open Form, Hide Form & Open Report, & Close Form
- Report: To be able to open the report directly and choose a
country, you must make the action of opening the report automatically
open the form for the parameter.
- Parameter Form: Clicking the button on the form to Preview
Report must then hide the form, without closing it, as well as opening
the report. The report can see the value you selected only while the
form is open!
- Report: When the report closes, it must also close the hidden
form. That is 3 different macros.
Complicating matters is the event procedure that was
created for the command button. The OnClick property cannot run both an
event procedure and a macro. So you must remove the event procedure and
create a macro that does the same thing, open the report, and also hide the
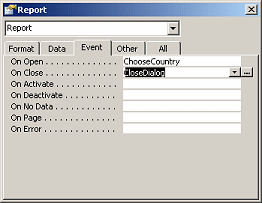
form. Report: Macro to open form for parameter(s)
- Open the report Staff- select Country/Region-customform
in Report Design View.
- In the Properties dialog for the report itself, find the event
OnOpen.
- Click in its text box and then on the ellipsis
button.
-
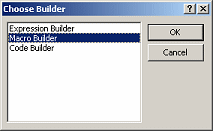 Choose
to open the Macro Builder and click on OK. Choose
to open the Macro Builder and click on OK.
A dialog appears for you to name the macro right now.
-
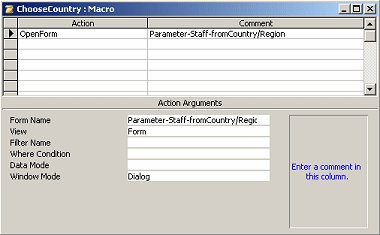 Name
the macro ChooseCountry. Name
the macro ChooseCountry.
- In the Action column, select OpenForm.
Scrolling long drop
list:
When you drop the list of actions and type a letter, the long list
scrolls to the entries that start with that letter.
- In the arguments at the bottom, select the following from each of
the drop lists:
Form Name: Parameter-Staff-fromCountry/Region
View: Form
Window Mode: Dialog
Why set Dialog mode?
The Dialog mode sets the Pop Up and Modal properties to
Yes. You already did that in the form's
properties. Using Dialog mode here, does something more! It guarantees
that the report will wait for you to enter values before formatting
the report. Very important!
- Close the macro window.
The OnOpen property shows ChooseCountry, the macro that you just created.
Report: Macro to close dialog when report closes
- In the Properties dialog for the report itself, find the
event OnClose.
- Click in its text box and then on the ellipsis
button.
- Choose to open the Macro Builder again.
A dialog appears for you to name the macro right now.
-
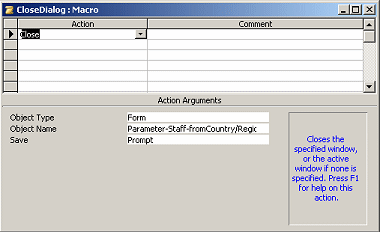 Name
the macro CloseDialog. Name
the macro CloseDialog.
- In the Action column, select Close.
- In the Arguments for this action, select the following:
Object Type = Form
Object Name = Parameter-Staff-fromCountry/Region
Save = Prompt
-
 Close
the macro window. Close
the macro window.
The OnClose property shows CloseDialog.
- Close the report.
Form: Macro to open report and hide form
This macro will have two actions.
- Open in Form Design View the parameter form
Parameter-Staff-fromCountry/Region
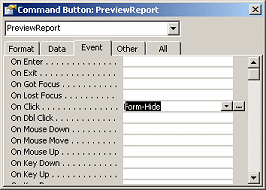
- Click on the command button to select it.
- If necessary, open the Properties dialog.
- Find the OnClick event on the Events tab.
- Delete the value [Event Procedure].
- Click out to accept the change.
- Click back in the text box for OnClick and
click the ellipsis button.
-
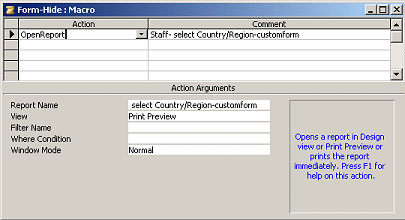 Choose
to open the Macro Builder. Choose
to open the Macro Builder.
A dialog appears for you to name the macro.
- Name the macro Form-Hide.
- For the first action, select OpenReport.
- For its arguments select:
Report Name: Staff- select
Country/Region-customform
View: Print Preview
Window Mode: Normal
Be sure to change the View value. The default view, Print, will
cause the report to immediately print, without displaying it!
Narrow display space for arguments:
If an argument is too long to show completely in the argument box,
copy and past it to the Comment area. This is very helpful when you
look at this later if you have a number of similar names to choose
from. It is entirely too easy to get confused!
- Copy and paste the report's name to the Comment
column.
-
 On
the second action line, select SetValue. On
the second action line, select SetValue.
You will use this action to change a property of the parameter
form.
- In the arguments, enter the following:
Item: [Forms]![Parameter-Staff-fromCountry/Region].[Visible]
Expressions: No
Syntax to refer to a
property:
[type of object]![name of
object].[property]
Notice the dot after the name of the form and then the name
of the property.
- Copy and paste the Item's name to the Comment
column.
-
 Close
the macro. Close
the macro.
The OnClick property now shows Form-Hide.
- Close the form.
Test Macros
Users do not always do things in the order that you planned. Test
your new objects by opening the form directly as well as by opening
the report directly.
- With the parameter form and the report both closed,
double-click the report in the Database Window.
The parameter form appears.
- Select a country.
- Click the Preview Report button.
The report should display in Print Preview.
Problem:
Error message - "You don't have the license required to use this
ActiveX control"
You may get this message at this point in your work if
Access is running in sandbox mode, which is a higher security mode
that prevents certain kinds of macros from running. It's the Visible
property that is being blocked. (I have not been able to find out
why this happens for some installations of Access but not for
others.)
Solution 1 (Recommended): Edit the macro Form-Hide to remove the Set
Value part, which is what hides the form. Change the Modal
property of the custom dialog form
Parameter-Staff-fromCountry/Region
to No, so you can minimize the form and work in another window. Now when you click the
button Preview Report, the report will open and the form will
still be visible. Awkward, but workable. The form will still
close when you close the report.
Solution 2: Disable sandbox
mode from
|| by setting the security level to Low. This is not
normally
recommended, of course! You will have to restart Access before the new
setting can take effect.
Solution 3: Surprisingly, a Visual Basic function that accomplishes the same
thing as the macro will not be blocked! You can use such a function
in an even procedure. Writing such functions is
beyond the scope of this course.
- Close the report.
The report and its parameter form should close.
How do you know if an
invisible form has closed?
Try to open the report again. If the form already has values in
it, then it did not close before!
- Double-click the custom form in the Database window.
Does it have values still? If so, your macro did not close the
form when you closed the report. Make corrections and test again.
- Select a country, click the Preview Report button.
The report should open as before.
- Close the report.
|