|
One of the common tasks done
with database information is to create labels. Microsoft Access
includes the Label Wizard to help you create labels for mailings, name
tags and other purposes.
 For
the wizard to work, you must know what size labels you are going to print
on. Manufacturers put the dimensions of the labels on the packaging, as
well has having product numbers. The wizard lists a number of
manufacturers and sizes, so you should be able to get a good match. For
the wizard to work, you must know what size labels you are going to print
on. Manufacturers put the dimensions of the labels on the packaging, as
well has having product numbers. The wizard lists a number of
manufacturers and sizes, so you should be able to get a good match.


Envelopes: If you want to print addresses directly onto envelopes, it is easier to export the
data to Word as a mail merge and use Word to do the envelopes.
|
|

Where you are:
JegsWorks >
Lessons >
Databases
Before you start...
Project 1: Intro
Project 2: Access Basics
Project 3: Tables & Queries
Project 4: Forms & Reports

Import/Export/Link
Designing Forms
Designing Reports
Special Forms & Reports
 Switchboard
Form Switchboard
Form
Custom
Dialog
Label Wizard
Chart Wizard
Multiple Columns
Subform/Subreport
Subforms
Subreports
Summary
Quiz
Exercises
Search
Glossary
Appendix
|
|
Buying Label Stock
There are several things to consider when you buy label
stock to print your own labels. There is a wide variety available these
days, including special purpose labels like name tags and file folder
labels. Sheets of labels are a lot more expensive than plain paper. You
want to get this right!
-
Printer: Labels are available for laser, ink jet,
dot matrix printers and for typewriters. Labels can be in separate sheets
(most common!) or in continuous sheets. Choosing a type that matches your
printer will make a difference in the quality of your finished labels.
-
Size of label: How are you going to use the
labels? What size do you need for the type to be large enough for your
use.
-
Price/Quality: Avery is the dominant company for
labels but there are others, which may be cheaper.
Test First!
It is important that you check your print-out before
actually printing on those expensive labels. Print a sheet or two of
mailing labels on regular paper. Place your test sheet under a blank sheet
of labels, carefully aligning the edges together. Hold the combination up
to the light. You will be able to see the text underneath. Are the addresses are neatly within the edges of the labels or
not?
Printers can be quite contrary! If the pages do not feed
smoothly into the printer, your addresses will be crooked on the labels or
may print across two labels. A wasted page!
Older printers may not have the correct printer drivers
to communicate accurately with Access when it comes to picky layouts like
labels. To get updated drivers, go the printer manufacturer's web site.
 |
Step-by-Step: Label Wizard |
|
|
What you will learn: |
to use the Label Wizard |
Start with:
 ,
resource files,
worldtravel.mdb from the previous lesson ,
resource files,
worldtravel.mdb from the previous lesson
Using the Label Wizard
-
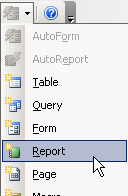 From
the New Objects button on the toolbar, select Report. From
the New Objects button on the toolbar, select Report.
The New Report dialog appears.
-
 Select
Label Wizard and Staff table as the source. Select
Label Wizard and Staff table as the source.
- Click on OK.
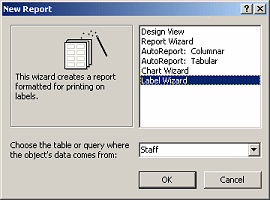
The Label Wizard opens for you to choose a label manufacturer and
a product.
-
 On
page 1 of the Label Wizard, select the following: On
page 1 of the Label Wizard, select the following:
Manufacturer: Avery
Unit of Measure: English
Label Type: Sheet feed
Product#:
8162, size 1 1/3" x 4", with has
two columns of labels per sheet
The sample labels at the left of the Label Wizard do not
change to match your choice.
The choices for products do change when you switch the unit of
measure or the label type or the manufacturer.
- Click on Next.
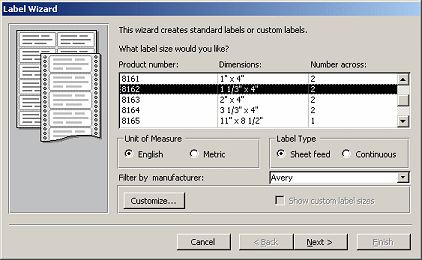
Page 2 of the Label Wizard lets you format the text for the label.
-
 On
page 2 of the Label Wizard, select the following: On
page 2 of the Label Wizard, select the following:
Arial
10 pt.
Normal font weight
Leave the text color as black.
- Click on Next.
Page 3 of the Label Wizard lets you choose what fields to put on
the label.
Prototype, in this case, means a model
layout, which does not use actual data. You cannot tell from the
prototype whether there is enough room for your data.
-
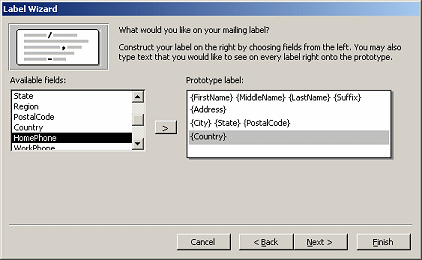 On
page 3 of the Label Wizard, click on the field
FirstName in the list at the left. On
page 3 of the Label Wizard, click on the field
FirstName in the list at the left.
- Click the > button.
The field moves to the first line of the prototype label at the
right.
- Press the spacebar to enter a space after the
FirstName field.
- Similarly, add the MiddleName,
LastName, and Suffix fields to
the label, with a space between them
- After the Suffix field shows on the
label, press the Enter key.
The gray bar moves down one line.
- Add the Address field to the second line and
press Enter.
- For the third line, add the fields
City, State, PostalCode and press
Enter.
- For the fourth line, add the field
Country.
- When your prototype label looks like the illustration,
click the Next button.
The fourth page of the Label Wizard lets you choose fields to sort on.
-
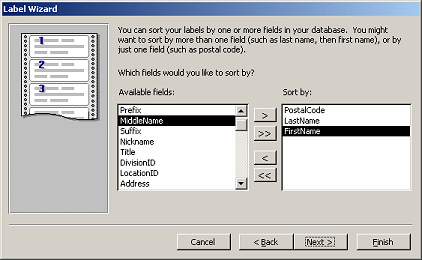 On
the fourth page of the Label Wizard, select the following
fields, one at a time and in this order and click the >
button to move each of them to the Sort by list: On
the fourth page of the Label Wizard, select the following
fields, one at a time and in this order and click the >
button to move each of them to the Sort by list:
PostalCode
LastName
FirstName
- Click on Next.
The last page of the Label Wizard asks you for a name for the
labels report.
-
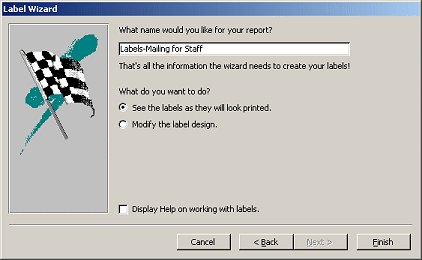 On
the fifth page of the Label Wizard, enter as the report's
name Labels-Mailing for Staff. On
the fifth page of the Label Wizard, enter as the report's
name Labels-Mailing for Staff.
- Click on Finish.
The wizard closes and tries to open your new report.
You may see a warning message that some data may not be displayed.
If the lines of text are long, they may not all fit.
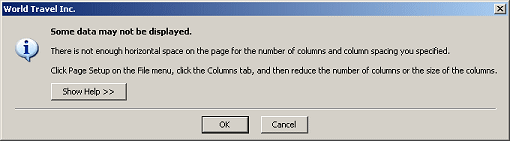
-
 Click
on OK. Click
on OK.
The report finally opens.
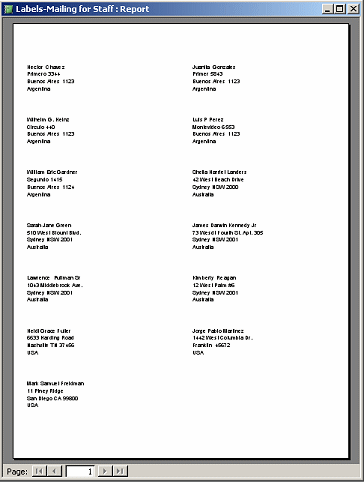
- Inspect the report onscreen carefully.
Are the fields wide
enough to show complete addresses? Are there errors in the data?
Are there blank records?
Some errors can be corrected by editing the report's design, like
making a text box wider or setting CanGrow to Yes.
Others errors can be corrected by changing the source to filter
out unwanted records.
Other errors are data input errors, which you correct by editing
the records.
-
 Print
(on normal paper). Print
(on normal paper).
Normally I would ask you to put your name on the page header,
but that throws off the layout, putting a record onto a second
page.
-
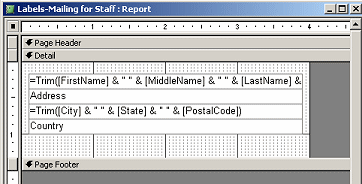 Switch
to Report Design View. Switch
to Report Design View.
You can see that the report is just a few text boxes that concatenate some
fields.
The Trim functions trims off any extra spaces at the beginning and
end of the text.
You could create your own label report. The tricky part is getting
the size of the Detail section exactly right so that the text is
on the labels correctly and to get the columns working correctly.
(See the upcoming lesson
Multiple Columns) This can be very frustrating to do on your
own.
|