|
Creating a Subform
You can create a subform by
dragging an existing table, query, or form and dropping it onto the main
form. Or you can use the Subform/Subreport tool from the Toolbox bar. The
Subform Wizard will open in either case and
take you through a few choices to create a new form. The wizard automatically
adds it to the list of
Forms in the Database Window. You can open the new form (your subform) and make changes,
just like any other form.
How to Select a Subform
In Form Design View, when the subform is not selected and neither is
anything inside it:
- To select the subform control: Click anywhere on the subform.
- To select the form inside the subform control:
- Double-click inside the subform but not on any part of the form itself
OR
- Click the subform to select it. Click inside the subform but not
on the form itself.
- To select a section or control in a subform:
- Double-click on the section or control you want to select.
OR
- Click the subform to select it. Click on the part you want to
select.
What's Selected?
A subform is actually a form inside a subform control. It
can be tricky to know what is selected and therefore to which object your
keystrokes and mouse clicks will apply.
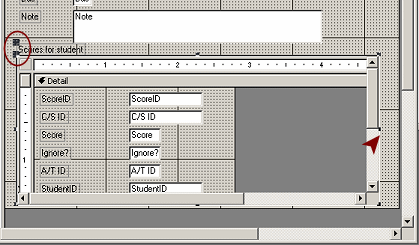 Subform
control: Subform
control:
Look for the handles. When the control is selected, you see Move handles for the control and for its
label. Resize handles appear on the edge.
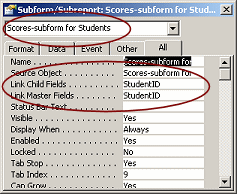
The Properties dialog shows the name and properties of the subform,
like the Link Child Fields and Link Master Fields properties.
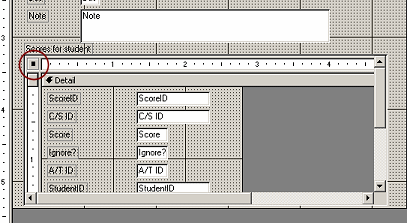 Form
inside the subform control: Form
inside the subform control:
When the form inside the subform control is selected, a black square
shows in the Select
Form button at the upper left of the form. There are no handles.
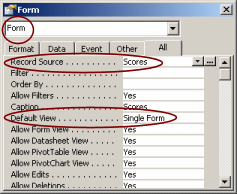
The Properties dialog shows "Form" and lists a Record Source and a
Default View.
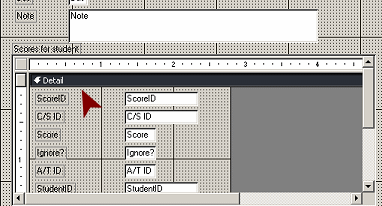 Section
of form in subform control: Section
of form in subform control:
When a section is selected, its selection bar will be black. No
handles.
The Properties dialog shows the name of the section, like "Detail"
or "Form Header.
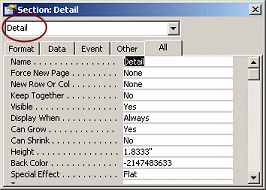
Particularly tricky is when a subform is on a page in a tab control. In
addition to the selections discussed above, you also have the selection
of the tab control and of the particular page.
Open Subform in New Window
Subform tend to be a bit small to work in easily in Form Design View.
Access allows you to open a subform in a new window, which you can resize
to get more working space. The subform must be selected for this
option to be available.
- Right click on a selected subform. Select OR
- With subform selected, from the menu select |
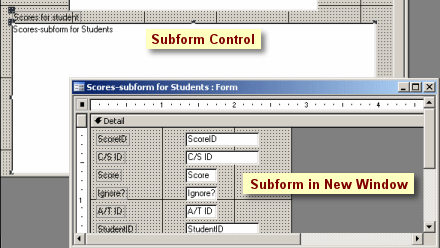 The
initial new window is the same size as the subform and in the same place.
It doesn't look different! If you drag the new window to a new location,
you can see that the subform control is a plain white box. The
initial new window is the same size as the subform and in the same place.
It doesn't look different! If you drag the new window to a new location,
you can see that the subform control is a plain white box.
   Close
separate window to view main form: Close
separate window to view main form:
While the subform is open in a separate window, you cannot view the
subform inside the main form in Form View. That is, if you try to open the main form in Form
View, you get a warning message and then the form opens with a blank subform.
 |
Step-by-Step: Subforms |
 |
|
What you will learn: |
to add a subform using drag-and-drop
to modify the source of a subform
to format a subform
to add a subform to a form using Toolbox
to rename a subform |
Start with:
 ,
resource files,
worldtravel.mdb from the previous lesson ,
resource files,
worldtravel.mdb from the previous lesson
You will use some forms that you already
created and modify them to include subforms to show:
Create Subform with Drag-and-Drop
You will modify an existing form of projects by adding a subform
of people assigned to the projects,
based on an existing table.
-
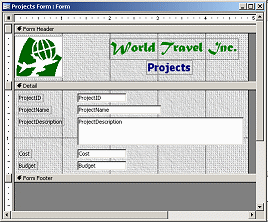 Open
the form Projects Form directly in Form
Design View. Open
the form Projects Form directly in Form
Design View.
This form was created in a previous lesson.
-
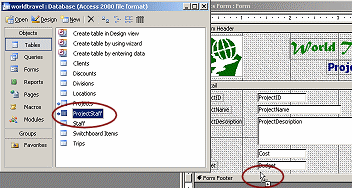 Arrange the Database Window and the Project Form
window so that you can see both. Arrange the Database Window and the Project Form
window so that you can see both.
-
In the Database Window, open the Tables list.
-
Drag
the table ProjectStaff and drop it
below the Budget text box.
The Subform Wizard opens.
-
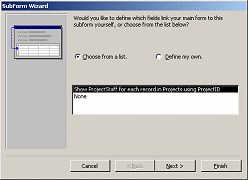 Accept
the default choice for fields to link the subform to the form. Accept
the default choice for fields to link the subform to the form.
-
Click on Next.
-
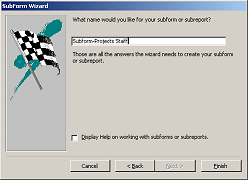 Enter
as the name Subform-Project Staff. Enter
as the name Subform-Project Staff.
 It is
handy to group subforms together in the Forms list by starting their
names with "Subform". This makes it easy to tell what's a subform and
what's not. It is
handy to group subforms together in the Forms list by starting their
names with "Subform". This makes it easy to tell what's a subform and
what's not.
-
Click on Finish.
The wizard closes, putting you back in Form Design View.
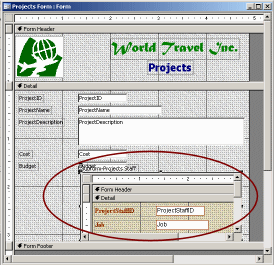 Access automatically resizes the Detail section and creates a
default-sized subform control. Access automatically resizes the Detail section and creates a
default-sized subform control.
The default size is small!
 The
AutoFormat used by the subform is the last one you used. This can be
disconcerting! The
AutoFormat used by the subform is the last one you used. This can be
disconcerting!
-
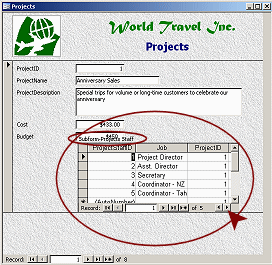 Switch to Form View. Switch to Form View.
Is the subform working?
It clearly is showing something! But is it useful?
Looks like too many numbers and not enough user-friendly data.
Strangely, the subform displayed as a form in Form Design View but it
actually shows as a datasheet when in Form View.
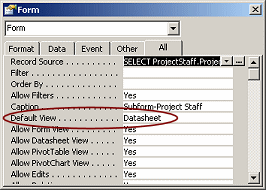 Click
on the subform while still in Form View. Click
on the subform while still in Form View.
If necessary, open the Properties dialog.
The Default View property for the Form (in this case your subform) shows
a value of "Datasheet". That's why you see a datasheet when in Form View.
It does not explain why you see a form when in Form Design View!
-
Click the horizontal scroll button at the bottom right of
the subform to see what other columns there are.
-
Inspect the datasheet for each record in the main form, using the
navigation buttons at the bottom of the window.
The subform does change with the records. Good! But there are issues...
Issues:
-
The column EmployeeID is blank for all
records. That's not right!
-
There are no names to go with those Job titles.
-
The label for the subform is overlapping the Budget text box.
Looks like some formatting is in order plus a change to the source of the
subform so we can see some names.
-
 Save the
form as Projects with Project Staff. Save the
form as Projects with Project Staff.
Change Source for Subform
Since there is something wrong with the datasheet (EmployeeID is
blank), that should be the first item to fix. We know that you put
values in the underlying table, so the problem must be that those values are
not linking properly to the main form.
Thinking:
What field do you need to link the subform to the main form? ProjectID.
What data do you really want to see in that subform? The full names of
staff members assigned to the project and their jobs.
- Switch to Form Design View.
- If necessary, click on the subform to select
it.
(Notice carefully whether the handles show up for the subform or for
part of the form inside the subform control.)
-
 Click
on the Form Selection button at the upper left of the subform. Click
on the Form Selection button at the upper left of the subform.
- In the Properties dialog, click in the Record Source
box and then on the ellipsis button
 that appears.
 A
message box appears, for you to confirm that you meant to open the Query
Builder. A
message box appears, for you to confirm that you meant to open the Query
Builder.
- Click on Yes.
The Query Builder opens with the ProjectStaff table already showing.
-
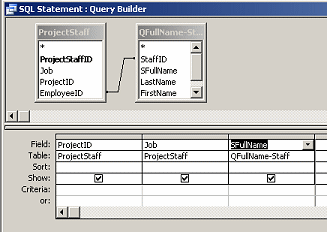 Add
the query QFullName-Staff to the Query
Builder. Add
the query QFullName-Staff to the Query
Builder.
You created this query earlier to concatenate the name parts into a
single name.
- Create a join between the two tables by dragging
EmployeeID and dropping it onto
StaffID.
- Drag to the grid the fields ProjectID,
Job, and SFullName.
-
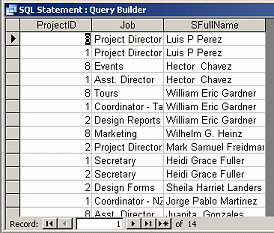  Run the query to verify that you are going to get the data that you
want.
Looks good. It shows the field that links and the two data fields that
you want to show in the subform.
- Close the query by clicking the Close button
 . .
(Do not click the Save button on the toolbar! You don't want this query
in the Queries list.)
A message appears asking if you want to save your changes to the SQL
statement.

- Click on Yes.
You are back in Form Design View, with the subform selected.
-
 Save the
form (Projects with Project Staff). Save the
form (Projects with Project Staff).
Format Subform
In the subform, you need to delete some controls and add a new one.
(You may need to scroll the subform to see some controls.)
-
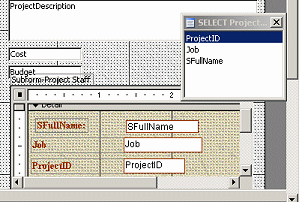 Delete
the following controls and their labels: Delete
the following controls and their labels:
ProjectStaffID
EmployeeID
ProjectID
You may wonder about deleting ProjectID, since it is needed to link the
form and subform. It is not needed on the subform itself, just in the
query underlying the subform.
- If necessary, click in the Form Selection box
to select the subform.
- If necessary, show the Field List.
-
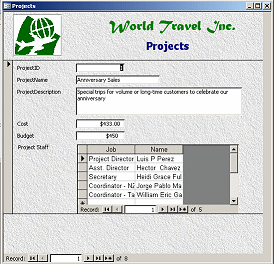 Drag
the field SFullName and drop it on the
subform somewhere. Drag
the field SFullName and drop it on the
subform somewhere.
It doesn't matter where at this point.
 Problem:
No SFullName in the list Problem:
No SFullName in the list
You do not have the subform's form selected. Click on a blank area
of the main form to deselect and try again.
- Drag the label for the subform to the left and line it
up with the other labels on the main form
- Edit the label to read Project Staff.
- Switch to Form View.
- Inspect the main form records and the subform records.
Much better.
But the columns are not wide enough. An easy fix.
-
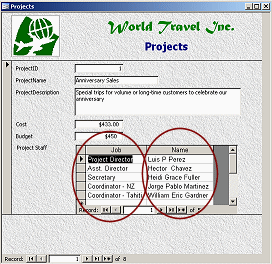 While
still in Form View, move your mouse over the right edge of the Job column
heading and double-click. While
still in Form View, move your mouse over the right edge of the Job column
heading and double-click.
The column widens to fit the displayed values.
- Repeat for the Name column.
This width will be remembered!
Would you rather see the Name column first? Also easy to do.
-
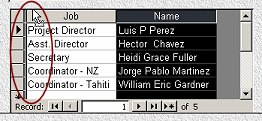 Click
on the Name heading. Click
on the Name heading.
The whole column is selected.
- Move your mouse pointer back over the Name heading and
drag left until a black bar appears at the left of the Job
column.
-
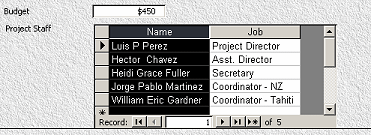 Drop. Drop.
The column moves.
This change will also be remembered. Sweet indeed!
-
 Save the
form (Projects with Project Staff). Save the
form (Projects with Project Staff).
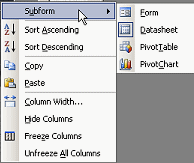  Changing
Views: The user can change the view and several other features of
the subform while in Form View. Right-click on a column heading. The
menu that appears has several useful choices. Changing
Views: The user can change the view and several other features of
the subform while in Form View. Right-click on a column heading. The
menu that appears has several useful choices.
Create a Query
Next you will create a form for agents that shows their
clients. You will create a new query to pull together the fields that you
need. This information meets in the Trips table. For the purposes of this form, you
only need to show the client's name, not all of the other info. You
already created a query that glued the name parts together, but to sort
those names alphabetically you must refer to the parts again. <sigh>
-
Open
a new blank query in Query Design View.
-
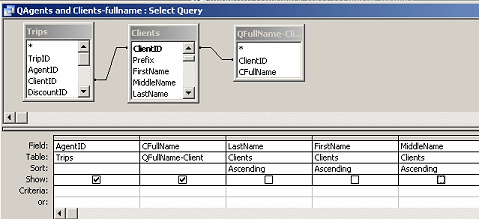 Add the tables Trips
and Clients and the query
QFullname-Client to the design. Add the tables Trips
and Clients and the query
QFullname-Client to the design.
These already have relationships defined, as the join lines indicate.
-
Drag the fields AgentID,
CFullName, LastName, FirstName,
MiddleName to grid at the bottom, with the resulting columns in that order.
-
Sort Ascending the name parts,
LastName, FirstName, MiddleName and uncheck their Show boxes.
-
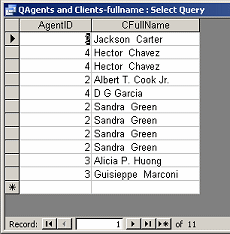  Run
the query. Run
the query.
There are 11 records in neat alphabetical order.
This list shows a client for each trip in the Trips
table. Some clients took more than one trip!
-
 Save the
query as QAgents and Clients-fullname. Save the
query as QAgents and Clients-fullname.
Create Subform with Tool
-
Open the form Staff-tabbed
in Form Design View.
You created this form in a
previous lesson.
The form has a tab control with several pages. You will add another.
-
 Right
click on the tabs. Right
click on the tabs.
A popup menu appears.
-
Select .
A new page appears with a default name, Page + a number, like Page225.
Recall that the number depends on how many controls you have inserted
already, including the ones that you have deleted.
-
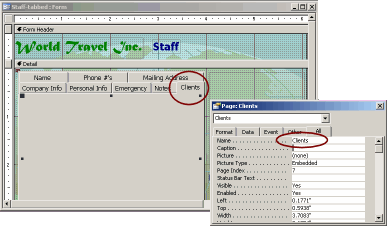 In
the Properties dialog for the page, change the Name to
Clients. In
the Properties dialog for the page, change the Name to
Clients.
The tab text changes to match.
-
Click on the Subform/Subreport tool on the
Toolbox bar.
-
Drag on the Clients tab to make a box about as
large as the tab page.
The Subform Wizard opens.
-
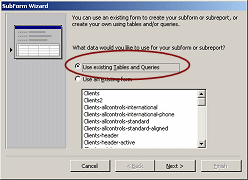 Accept
the first choice, Use existing Tables and Queries. Accept
the first choice, Use existing Tables and Queries.
-
Click on Next.
-
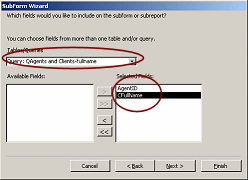 Select
the query that you just created, QAgents and Clients-fullname. Select
the query that you just created, QAgents and Clients-fullname.
-
Click on the >> button to move both fields
to the right.
-
Click on Next.
-
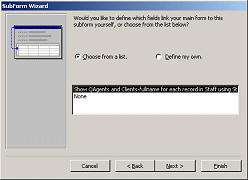 Accept
the suggestion selected in the list. Accept
the suggestion selected in the list.
-
Click on Next.
-
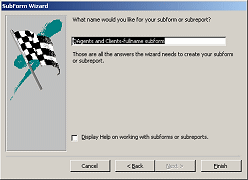 Accept
the suggested name for the subform. Accept
the suggested name for the subform.
-
Click on Next.
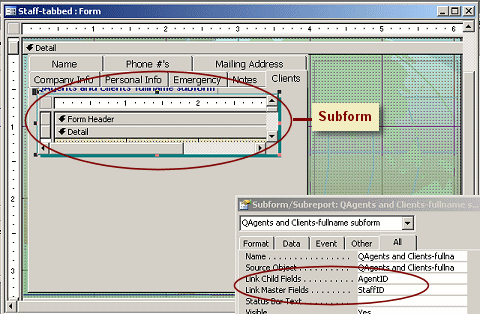
Access creates a subform using its default formatting.
In Form Design View, this looks horrible. Even though you dragged a large
control, Access made a little one. Humph!
-
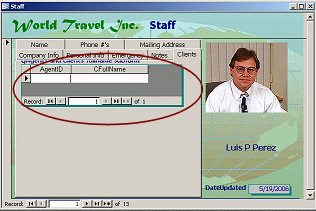 Switch
to Form View. Switch
to Form View.
- Click on the Clients tab.
Better than design view but still strange. You will fix this up
shortly.
 Problem:
Subform is on top of all the tab pages Problem:
Subform is on top of all the tab pages
You did not get the subform onto a tab page to start with. It is
floating on top of the tab control.
Solution: In Form Design View, click the edge of the subform
to select it. Copy. Delete. Click the Clients tab. Paste.
-
 Save the form
as Agents with Clients.
- Navigate through each of the Staff records with the
Clients tab page showing to see how the subform fits.
-
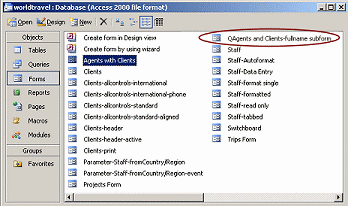 Switch
to the Database Window. Look at the list of Forms. Switch
to the Database Window. Look at the list of Forms.
Access created a new form for you, QAgents and Clients-fullnames
subform.
The awkward name is from the query that the subform
is based on.
Rename Subform
If you change the subform's name, Access is cooperative and changes the
references to it for you! Let's prove that! The main form and subform
must be closed.
- Close the form, Agents with
Clients.
- In the Database Window, right click on the new form,
QAgents and Clients-fullname
subform.
-
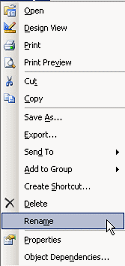 From
the popup menu select . From
the popup menu select .
If you did not close the form, a message appears telling you that you
cannot rename an open form.

-
 Type
Subform- Clients of Agent as the new name and
click out to accept the change. Type
Subform- Clients of Agent as the new name and
click out to accept the change.
(Watch the spaces!)
- Open the main form, Agents with
Clients and click on the Clients tab.
The subform shows up, even though you did not edit the form after the
name change. Thank you, Access!
Modify Form Source
Most of the staff members entered so far in the Staff table do not have any clients. That's because they
are not agents! You need to change the source for the main form so that
only Agents show. Currently the source is the table
Staff.
- Switch to Form Design View.
- In the Properties dialog for the whole form, click in the
Record Source box and then on the ellipsis button.
 A
message box asks if you meant to invoke the Query Builder. A
message box asks if you meant to invoke the Query Builder.
- Click on Yes.
The Query Builder opens with the Staff table loaded.
You need to restrict the records to just the agents.
-
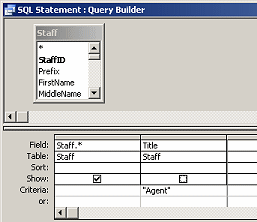 Drag
the * to the grid. Drag
the * to the grid.
This includes all fields in the query results.
- Drag the field Title from the
Staff list to the grid.
- Uncheck its Show box.
The Title field is already included in the
results because of the * column.
- Enter Agent in its Criteria row.
-
  Run the query.
Make sure that all of the records show Agent in the Title column and
there is only 1 column listing the titles.
Notice that the criteria are not case sensitive. Both "Agent" and "agent"
were accepted.
- Close the query by clicking the Close button
 . .
A message appears, asking if you want to save your changes and
update the property.

- Click on Yes.
-
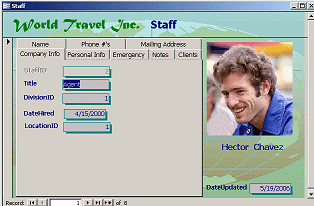 Switch
to Form View. Switch
to Form View.
Aha! A different first record and a different number of records in the
Status bar.
- Click on the Company Info tab.
That is the tab where the Title control is.
 Problem:
Title field shows #Name? Problem:
Title field shows #Name?
Access was confused because there were 2 fields named Title in the
query results. You forgot to uncheck the Show box for the field Title
that you dragged separately to the query grid. The * column includes
Title also.
Solution: Go back to Design View, open Query Builder, and fix the source query.
- Navigate the records and verify that all have the
title Agent and that the subform shows on the Clients tab.
If you checked the query datasheet, there should not be a problem.
Format Subform
That tiny subform needs help! You need to enlarge it and make some
changes to clean things up.
It can sometimes be a little tricky to select what you want. You can
select the subform control or the form inside the control,
plus you can select a section or a control in the subform. Watch the handles!
-
 Switch
to Form Design View. Switch
to Form Design View.
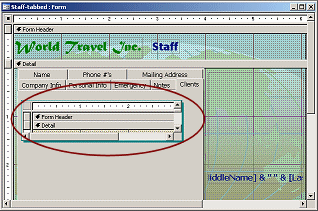
- Click on the edge of the subform to select it.
The handles should be on the outside.
The label for the subform may be partially hidden at the top.
- If necessary, drag the subform down a bit until you
can see the label.
- Click on the label for the subform.
-
 Delete
the label. Delete
the label.
-
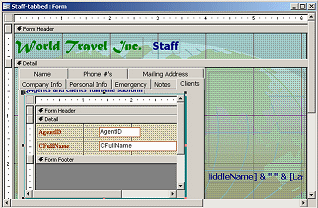 Click
on the edge of the subform, if necessary, to select it. Click
on the edge of the subform, if necessary, to select it.
Be sure that the handles are on the outside of the subform control.
-
Drag
the bottom edge of the subform down toward the bottom of the tab
page.
The subform is showing Form View instead of the Datasheet View that we
saw in the regular Form View. Confusing!
(Your subform may have a different look.)
-
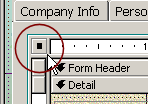 Click in the Form selection box, upper left of the
subform, to select the whole form. Click in the Form selection box, upper left of the
subform, to select the whole form.
(You may need to click it twice. Once to select the subform and again to
select the box.)
-
 Select the AgentID control and delete it. Select the AgentID control and delete it.
Now that the
form and subform are linked, it is OK to delete the
AgentID control from the subform. It is still in the underlying
query.
- Edit the label for the CFullName control to read
Client.
- In
the main form, change the label Staff in the Form Header
to read Agents.
- Switch to Form View.
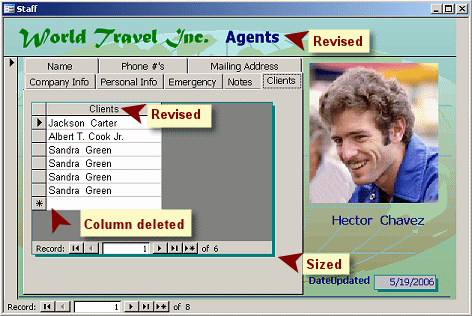
How is it looking now?
The extra height you gave to the subform results in blank areas. But as
more clients are added to the database, the vertical area will fill up
and scroll bars will appear.
-
 Save the form. (Agents with
Clients)
Remaining issue: Duplicate names in the Client list when a
client has arranged multiple trips. The
duplication of names cannot be resolved
easily for a form, but it can be fixed in a report.
|

