Not all alignment buttons are equal. The buttons
 do not
do the same thing all the time. It depends on what you are trying to align.

|
Step-by-Step: Format Text
|
 |
| What you will learn: |
to align text
to change color and font of text
to format headings
to change font size
to make text bold and italic
to insert a horizontal rule and format it |
Start with:  ,
hector 18.htm, resource files (FrontPage or FPX)
You will be making some changes to make Hector's page
more appealing and colorful. By changing the title to use just the text
graphic of Hector's signature, the top of the page will look cleaner. Then
you will change the font face, size, and color of the headings.
- Remove title:
Select the title Home page of Hector Chavez. Be careful
not to include the anchor at the left for the image of Hector's
signature.
|

FrontPage |

FPX |
-
 Delete.
If the image of Hector's signature is gone, then you also selected
the anchor mark at the beginning of the title line. In that case,
click on the Undo button immediately and try again.
 FPX does not keep
a list of actions for you to undo. You can only undo the last action.
FrontPage keeps a list of the last 30 actions.
 Save
as hector19.htm.
Center Title Image
To align an image, you add some code to the
<IMG> tag,
either by clicking an alignment button or by typing in the appropriate
code.
- With the cursor still on the title line, click on
 the Center
button. The cursor moves to the center, but the image remains at the
right. Did you expect that?
|

FrontPage |

FPX |
- Click on the image itself to select it and click on
the Center button. Hmmm. Nothing changes. You can handle this
problem yourself in the code window.
- Open the HTML View. The code window shows the
following code for the signature image:
<h1
align="center"><img
src="hchavez-transparent.gif"
align="right" hspace="0"
width="210" height="43"></h1>
Notice that the image has the attribute align set to
right but the H1 heading has
align="center". The
image won this battle!
 Once you have
aligned an image, you cannot center the image by using the Center
button. That button adds some code to the <P>
tag instead of to the <IMG>
tag. You must remove the align="right"
or align="left"
from the IMG tag by hand editing yourself or by opening Picture
Properties and setting the alignment to None.
-
 Select
align="right"
and delete it from the IMG tag. This puts the alignment for the
image back to the default. So now it will be the same as the paragraph.
- Click on OK. Finally, the signature image is
centered!
 Save.
[hector19.htm]
Format Heading
 It
is a common design practice to use a sans-serif font for headings and a
serif font for text. Arial is a sans-serif font
because the letters do not have the little extra pieces like
Times New Roman and Georgia, which are
serif fonts.
The browser default style for an H2 heading is larger
and bolder than regular text. You will make some more changes.
- Select the heading that is the second line:
My house is your house!
- Click on
 the Center button. The line is centered on the page.
-
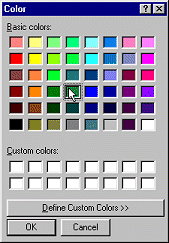 Color:
Click on
  the Color
button and then select the green color square.
- Click on OK. The text is now green. Since the text is
still selected, you will see the reverse colors.
- Font Face: Change the font to Tahoma by
selecting it from the drop list of fonts.
 If you open the font list by
clicking the arrow and type a T in the Font box, the list will scroll to
the first font with a name starting with T.
- Code: Open the HTML view and look at the HTML code for
line 2.
<h2
align="center"><font
color="#008040"
face="Tahoma"> My house is
your house!</font></h2>
- Edit the value for the attribute FACE in the
<font> tag to
include some other sans-serif fonts, in case Tahoma is not available.
Spell carefully!
face="Tahoma,
Trebuchet MS, Arial, sans-serif"
-
 Return
to Normal view. You will not see a change in your page since your
computer has the font Tahoma installed. It was on the list!
 Save.
[hector19.htm]
Format Headings
Browsers have default settings for the headings - H1, H2, H3, H4,
H5, H6. They are sized relative to the default browser text size.
When you format the headings, these default sizes still apply.
-
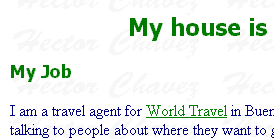 Select
the first heading: My Job.
- Format the heading with the font Tahoma and the color
green.
- View the HTML code for the heading.
<h3><font
color="#008040"
face="Tahoma">My Job</font></h3>
 Notice the size of the
heading. The browser displays <h2> headings at two sizes larger than the
default text size and displays <h3>headings at one size up from the
default.
- Return to Normal view.
- Repeat the steps above for the other H3 headings: My
Education, My Family, My Hobbies, Comments and Suggestions
 Save.
[hector19.htm]
Format Subheading: Font Size
The subheadings under My Hobbies are in term/definition form. The DT
(definition term) tag has the same default size as normal text. To make it
bigger than normal text, you must set the size.
-
 Select
the first Hobby - Travel.
- Change the font to Trebuchet MS
- Increase the size by clicking the button
 .
.
- Open the code window and look at the code for this line:
<dt><font
size="4" face="Trebuchet
MS">Travel</font>
</dt>
- Repeat the steps above for the other Hobbies: Fishing,
Soccer, Cooking
 In
FrontPage you can use the Format Painter to do this easily. Select the
formatted subheading Travel. Click on the Format Painter button and then
drag over or double-click the word "Fishing". The same formatting is
applied. Repeat for the other subheadings.
-
 Save.
[hector19.htm]
Bold and Italics
 In
FPX the buttons
  Bold and
  Italics apply the logical tags
 <strong> and <em>
to the selected text instead of the character formatting tags <b>
and <i>. Most browsers display <strong> text as
bold and <em> as italic.
-
 In
the section My Job, select the name of the newsletter and
click on
  the Bold
button and then on
  the Italics button.
- In the section My Family, select the name Carla and
click on
 the Bold
button.
- Repeat for the names Ricardo and Rosa.
- Select the phrase in parentheses (our
soccer star!) and click on
 the Italics button.
- Repeat for the phrase (our ballerina)

- Open the code window and look at the changes you just made.
2nd paragraph under
My
Job:
| <p>I
also write and edit our email newsletter <i><b>Here
and There</b></i>, which keeps our
customers informed about special deals and news in the travel
industry. </p> |
<p>I
also write and edit our email newsletter<em><strong>Here
and There</strong></em>,
which keeps our customers informed about special deals and news in
the travel industry. </p> |
|
FrontPage uses B & I |
FPX uses STRONG & EM |
Notice how the tags are nested- closed in reverse order from how they
were opened.
Paragraph under
My
Family:
| <p>I
married my wife <b>Carla</b>
in 1986. We have two children - <b>Ricardo</b>
who is 10 years old <i>(our
soccer star!)</i> and <b>Rosa</b>
who is 7 years old <i>(our
ballerina)</i>.</p> |
<p>I
married my wife <strong>Carla</strong>
in 1986. We have two children - <strong>Ricardo</strong>
who is 10 years old <em>(our soccer
star!)</em> and <strong>Rosa</strong>
who is 7 years old <em>(our ballerina)</em>.</p> |
|
FrontPage |
FPX |
- Switch back to Normal view.
 Save.
[hector19.htm]
Horizontal rule
The tag <hr> draws a line
across the text area, called a horizontal rule.
Such a line can help show what parts of your page belong together. Rules
are often used to separate the title and the footer from the rest of the
text and to separate logical sections.
You can choose the length, the height (that is, the
thickness), and the color of the horizontal rule. Browsers besides
Internet Explorer may just ignore these settings.
- Move your cursor to the end of the second line on the page.
-
 From
the menu select |
.
A thin line appears across the page below the cursor location and
moves the cursor to the beginning of what was line 3. The format of the
line depends on the format of the last line that was inserted.
The program remembers! This can be helpful... or a real pain!
You cannot format the line from the menu. You can only get to the
dialog from the popup menu for the line.
-
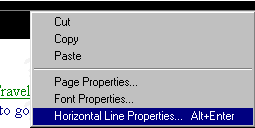 Right
click on the line. From the popup menu select Horizontal Line
Properties.
If the line is very thin, you may have to try several times to click in
the right spot.
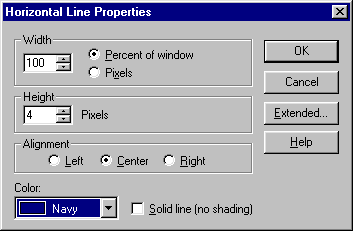 The
dialog Horizontal Line Properties appears.
- Change the settings to:
Height = 4 pixels
Color = Navy.
-
 Click
on OK.
- Repeat to add a horizontal rule between each section.
For this Step-by-Step, be sure to move the cursor to the end of the text
line above where you want the rule to appear. You need to
see what happens.
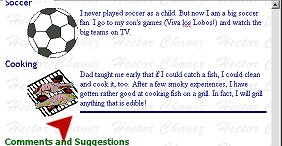 The
last line (above Comments and Suggestions) does not go all the way to
the left margin. Can you see why?
- Open the code window and scroll down to the last definition.
|
<dd><img
src="grill.gif"
align="left" hspace="5"
width="100"
height="94">Dad
taught me early that if I could catch a
fish, I could clean and cook it, too. After a few smoky
experiences, I have gotten rather good at cooking fish
on
a grill. I fact, I will grill anything that is edible!<hr
size="4"
color="#000080">
<p><br
clear="left">
</p>
</dd> |
The <hr>
tag is inside the definition tags, so it uses the same margins
and text wrapping. Logical, but not what we want!
The break is also inside paragraph tags. Not necessary! This
added extra white space that you do not need or want.
You need to start over with this horizontal rule.
- Return to Normal view.
- Select the horizontal rule by clicking on it and then
press the DELETE key.
-
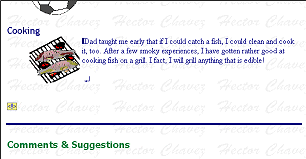 Put
the cursor at the beginning of the line
Comments and Suggestions:
- Insert a horizontal rule again. Aha! This time the line goes
all the way across the text area.
 Save.
[hector19.htm]
Below is an image of what the whole page would look like if you could
see it all at once.

hector19.htm as shown in FPX

![]()
![]()