
Jan's Working with Presentations
Advanced: Finishing
Do you think you have finished your presentation? There are a number of things to do before you can be sure that you are through.
Checklist: Am I Finished?
Check that the following are correct on your slides:
- Outline:
- Parallel structure
- All points included
- Text
- Bullet levels
- Grammar
- Spell Check
- Slides:
- Background
- Text formatting and alignment
- Images: position and size
- Readability against backgrounds/images
- Tables - readable, not too many cells
- Charts - readable, not too complicated
- Notes included. Proof for errors.
- Print handouts (Pre-Print Checklist
 )
and check text again.
)
and check text again.
(It's easier to read on paper than on screen!) - Play the Slide Show and verify:
- Transitions
- Animations
We have already covered all these items above. In this section you will add a few more items to the list:
- AutoAdvance? Check flow; rehearse timings
- Set Up Show - how the show will run - full screen by speaker, in a window by individual, in a kiosk looping
- Save As? New file type? New file name to reduce file size?
- Package for CD?
- Share?
This checklist is also in the Appendix.
AutoAdvance
You already learned how to make your presentation advance through the slides automatically, without any clicking or keystrokes by setting animations to run After Previous or With Previous.
When to Advance Automatically
When would you use a show that plays itself automatically? What could you include in the slides?
- Trade fair booth - company info, product descriptions, promotional info
- Before a meeting - general info and announcements, photos and info on speakers
- Banquet or awards event - photos of the year's events, portraits of officers and of people getting awards
- During break between speakers or discussion panels - schedule for the day, info on upcoming speakers or topics, announcements
- After awards ceremony - photos/list of this year's winners
Adjust with Rehearse Timings
Slide Show > Rehearse Timings
Use the Rehearse Timings feature to fine tune your timings. With this PowerPoint feature, you click through the slide show at whatever pace you find comfortable for each transition and animation. The times are saved and replace the timings you set when you selected the transitions and animations. This can be easier than guessing about times over and over again.
Dialog: Show Setup
 Slide Show > Setup Slide Show
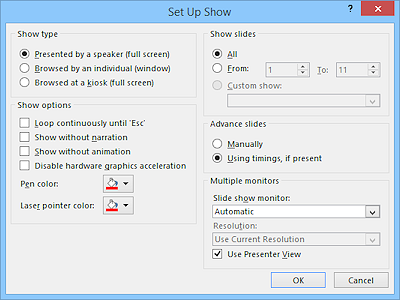
The default setup for your show assumes that the presentation will accompany a speech. It requires you to click or use keys to advance. You have other choices!
- Show type: How do you plan to run this
presentation?
- Along with a speaker at full screen size
- Browsed by an individual in a window on a monitor
- Browsed at a kiosk, at full screen
(Viewer cannot edit. Loops back to the first slide. Will start over after 5 minutes of no activity.)
- Show options:
- Looping continuously
(Press ESC to stop) - Show without narration
(You recorded narration but don't want to use it.) - Show without animation
(All slides will appear as though animations had finished.) - (2013, 2016) Without hardware graphics acceleration
(Usually the slide show will play more smoothly with hardware graphics acceleration.) - Select a default color for the onscreen pen or onscreen laser pointer.
- Looping continuously
- Show slides: You can chooose to use just part of the
presentation instead of editing the presentation. You may want to use one
version of the show for one event and a different one for a different
event. You don't have to edit the presentation! Enter slide numbers here
or create a custom show, Slide Show > Custom Show, to
pick which slides to show and in which order.
- Advance slides: How will you change slides
or start the next animation step?
- Manually = a mouse click or one of the keys that advances a slide or with the projector controller.
- Timings = automatically advances based on the times for the animations and Slide Transition.
You can combine these two methods by setting timings only on certain things.
-
Multiple monitors: Presentation View requires 2 monitors

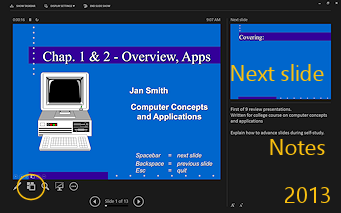
- Show Presenter View requires using
two monitors. One will show the presentation normally (large screen
monitor for the audience) while the
second shows a view better suited to the person running the
presentation (laptop usually). In Presenter View the slide Notes show in a separate
panel that you can zoom in on for easy reading. You can also see thumbnails of the
slides so you can skip around if you need to. PowerPoint 2013 and 2016 have a button
 to show the thumbnails in a popup that covers the screen. PowerPoint 2007 and 2010 show Thumbnails all the time across the bottom of the window in a scrollable pane.
- Show Presenter View requires using
two monitors. One will show the presentation normally (large screen
monitor for the audience) while the
second shows a view better suited to the person running the
presentation (laptop usually). In Presenter View the slide Notes show in a separate
panel that you can zoom in on for easy reading. You can also see thumbnails of the
slides so you can skip around if you need to. PowerPoint 2013 and 2016 have a button
Dialog: Save As
![]() PowerPoint 2007:
Office button
PowerPoint 2007:
Office button ![]() > Save As...
> Save As...
![]()
![]()
![]() PowerPoint 2010, 2013, 2016: File > Save As...
PowerPoint 2010, 2013, 2016: File > Save As...
Saving your presentation is not really as simple as it might seem. You have choices!
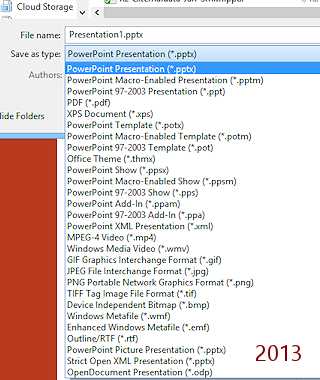
In the Save As dialog you can choose from a list of file types. Which one you should choose depends on what you plan to do with the presentation.
Each choice is perfect for certain situations and may be a disaster for others.
Choices for Type
While you are creating a presentation, you will normally want to save with the default format, PowerPoint Presentation (*.pptx). The file format is basically the same for PowerPoint 2007, 2010, 2013, and 2016, but it is different from earlier versions. Simple enough. But sometimes there are complications.
![]() Use
Save As to reduce file size: After doing a lot of editing, the file
size for your presentation can get larger and larger. Saving the file with a
new name can reduce the file size, sometimes dramatically.
Use
Save As to reduce file size: After doing a lot of editing, the file
size for your presentation can get larger and larger. Saving the file with a
new name can reduce the file size, sometimes dramatically.
Some of the File Types Available:
- To show or edit using PowerPoint:
- PowerPoint Presentation(*.pptx) for 2007, 2010, 2013, and 2016
- PowerPoint 97-2003
(*.ppt)
Newer features will be lost in older versions, including multiple masters, font smoothing, and some animations and transitions. - PowerPoint Macro-Enabled
Presentation(*.pptm)
- As a template for future presentations:
- PowerPoint Template (*.potx)
- PowerPoint Macro-Enabled Template (*.potm)
- PowerPoint 97 - 2003 Template(*.pot)
- As an Office theme:
- Office Theme (*.thmx)
- Office Theme (*.thmx)
 PowerPoint 2007: To show over the Internet as a web page:
No animations or transitions. No font smoothing.- Web Page: (*.htm *.html)
Creates an HTML page and a folder for supporting files. - Single File Web Page: (*.mht, *.mhtml)
Creates a single file that includes all supporting files. Larger total file size than as a Web Page.
- Web Page: (*.htm *.html)


 PowerPoint 2010, 2013, 2016: To show
as a Windows Media Video
PowerPoint 2010, 2013, 2016: To show
as a Windows Media Video
- Windows Video: (*.wmv)
Creates a video of the presentation with its transitions and animations.
- Windows Video: (*.wmv)
- PowerPoint 2013, 2016: To show as an MPEG-4 video
- MPEG-4 Video (*.mp4)
- To run as a show when opened:
Launches the slide show immediately without showing the PowerPoint interface. Handy for formal presentations.- PowerPoint Show (*.ppsx)
- PowerPoint Macro-Enabled Show (*.ppsm)
- PowerPoint 97-2003 Show (*.pps)
- Just an outline:
- Outline/RTF (*.rtf)
No images. No tables. No charts. Only basic formatting like fonts, font size, bold, and italics.
- Outline/RTF (*.rtf)
- To turn each slide into a graphic to use on web pages:
- GIF
- JPG
- PNG
- To turn each slide into a graphic for printing:
- TIF
- BMP
- WMF
- EMF
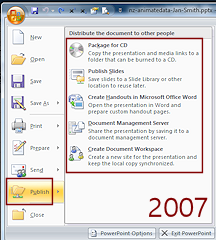
Package for CD
![]() PowerPoint
2007: Office button
PowerPoint
2007: Office button ![]() > Publish > Package for CD
> Publish > Package for CD
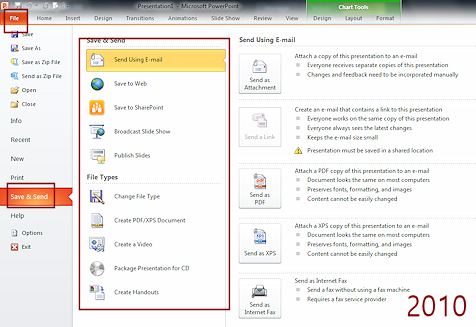
![]() PowerPoint
2010: File > Save & Send > Package
Presentation for CD
PowerPoint
2010: File > Save & Send > Package
Presentation for CD
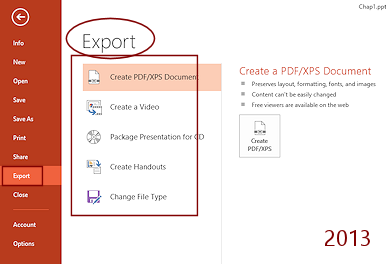
![]()
![]() PowerPoint 2013, 2016: File > Export > Package Presentation for CD
PowerPoint 2013, 2016: File > Export > Package Presentation for CD
What does Package for CD do for you?
The idea is to pack up everything you need for the presentation to play exactly like it does on the computer you created it on. The package will include:
- Presentation file, of course
- All linked files
- Files needed to make a CD start up automatically.
 PowerPoint
2007: PowerPoint Viewer, so you can play the presentation on a computer that does not have PowerPoint installed. Other versions have a link to a Microsoft site where you can download the viewer.
PowerPoint
2007: PowerPoint Viewer, so you can play the presentation on a computer that does not have PowerPoint installed. Other versions have a link to a Microsoft site where you can download the viewer.- Can include fonts, if you choose.
- Can password protect the presentation for opening and/or for modifying, if you choose.
Package for CD can write the files either to a CD or to a folder on any hard disk or removable disk that has enough space.
Ways to Share
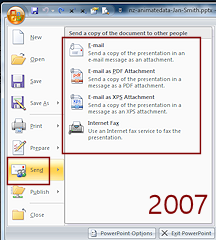
PowerPoint makes it easy to share your presentation in several different ways. Of course the ways are not quite the same in each version of PowerPoint. That would be TOO easy!
![]() PowerPoint 2007: Office button
PowerPoint 2007: Office button ![]() > Send or Publish.
> Send or Publish.
![]() PowerPoint
2010: File > Save & Send
PowerPoint
2010: File > Save & Send
![]()
![]() PowerPoint 2013, 2016: File > Share or Export
PowerPoint 2013, 2016: File > Share or Export
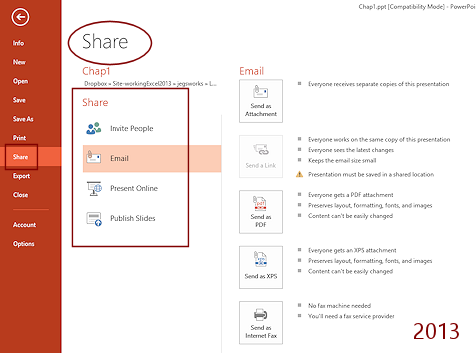
![]() Email Account: Only Outlook accounts are recognized by Office programs.
Email Account: Only Outlook accounts are recognized by Office programs.
![]() Web: Saving to the web means saving to your OneDrive account.
Web: Saving to the web means saving to your OneDrive account.
![]() SharePoint: You won't have access to a SharePoint server unless your school or business has one. It is useful in situations where people need to collaborate with others on tasks or documents.
SharePoint: You won't have access to a SharePoint server unless your school or business has one. It is useful in situations where people need to collaborate with others on tasks or documents.
|
|
| © 1997-2017 Jan Smith All Rights Reserved |
Site Map What's New |
Privacy Policy Terms of Service Copyright Acknowledgements |
~~ 1 Cor. 10:31 ...whatever you do, do it all for the glory of God. ~~
Last updated: March 22, 2017