
Jan's Working with Presentations
Advanced: Images: Animate Images
Images and objects can have PowerPoint animations, just like text. You can have an image swirl into view or fade in and out or swoop around the screen and out of sight. But, beware! It is entirely too easy to get overly enchanted with animations.
When does an image use the animation from the Slide Master?
-
Image inserted into a placeholder: Uses the animation that the Slide Master assigns to the placeholder.
-
Image inserted on its own: You must apply animations yourself.
In Normal View, you can use ![]() the Custom Animation Pane or
the Custom Animation Pane or ![]()
![]()
![]() the Animations ribbon tab or
Animation Pane to add new
animations and to adjust or remove existing animations - except those from the
Slide Master.
You have to be in Slide Master view to handle those.
the Animations ribbon tab or
Animation Pane to add new
animations and to adjust or remove existing animations - except those from the
Slide Master.
You have to be in Slide Master view to handle those.
![]() Problem:
Don't like Slide Master animation for a particular slide
Problem:
Don't like Slide Master animation for a particular slide
Solution
1: Create a new layout master to use on those slides.
Solution 2: Right click the Master items in the Animation Pane and
select Copy Effects to Slide. The Master items
vanish and you have animations instead that you can edit or remove - for that slide only.
Just remember that if you delete the animations that are on the Slide Master, to get them back you will need to reapply the layout. That might mess up other changes you have made.
| |
Step-by-Step: Animate an Image |
|
| What you will learn: | to apply custom animation to an image to apply a sequence of animations: Entrance, Emphasis, Exit |
Start with: ![]() , nz-pictures-Lastname-Firstname.pptx from the previous lesson
, nz-pictures-Lastname-Firstname.pptx from the previous lesson
Verify Lack of Animation Effects
- If necessary, open nz-pictures-Lastname-Firstname.pptx from
your Class disk.
- Play the slide show and verify that none of the images you inserted are using an
animation.
When you inserted these images, the text placeholders already had text, so these images will not inherit the animation from the Slide Master.  Save
As nz-animate-Lastname-Firstname.pptx to your Class disk in the folder powerpoint project3.
Save
As nz-animate-Lastname-Firstname.pptx to your Class disk in the folder powerpoint project3.
Title Slide: Add Entrance Animation to Image
- Select Slide 1 and click on the map.
- Add Entrance animation:
 PowerPoint 2007:On the Animations ribbon tab, click the Custom Animation button
  to show the
animation pane. Click the Add Effect button, hover over Entrance to
expand its menu, and then click on Grow & Turn, if it is in the short list.
to show the
animation pane. Click the Add Effect button, hover over Entrance to
expand its menu, and then click on Grow & Turn, if it is in the short list.If it is not there, click on More Effects... In the Add Entrance Effect dialog, scroll to the Moderate section and click on Grow & Turn.


 PowerPoint 2010, 2013, 2016: On the Animations ribbon tab, open the palette of animations and click on the Entrance animation Grow &
Turn
PowerPoint 2010, 2013, 2016: On the Animations ribbon tab, open the palette of animations and click on the Entrance animation Grow &
Turn 
- Change the Start box to After
Previous.
Now the image will show up after all of the text.
-
Save.
[nz-animate-Lastname-Firstname.pptx]
Text Slides: Add Entrance Animation to Images
-
 Switch to Slide 2: Volcanoes.
- Select the picture of a volcano.
- Apply the Entrance animation Wedge.
You may need to click the More Entrance Effects link and look for Wedge in the Basic section. - Change the Start box to After
Previous.
- Repeat these steps for the images on slides 3 through
5.
You get to choose a what animation effect to apply! You can pick three different ones or use the same on all three. It's up to you!
-
Save.
[nz-animate-Lastname-Firstname.pptx] Unfortunately
there is not a way to make an image appear after a particular bullet
point and before the rest of the text in the placeholder.
Unfortunately
there is not a way to make an image appear after a particular bullet
point and before the rest of the text in the placeholder.
Work-around: Create a set of separate text boxes to hold the bullet points. Of course only one can be a placeholder that the Slide Master controls. You will have to add your own formatting and animations yourself. <sigh> At least Format Painter and Animation Painter (PowerPoint 2010, 2013, and 2016) can help.
Last Slide: Add Entrance, Emphasis, and Exit Animation
-
 Switch to Slide 8, the last slide, and click on the Clip Art
or Online Picture image at the bottom right of the slide.
Switch to Slide 8, the last slide, and click on the Clip Art
or Online Picture image at the bottom right of the slide.
- Add the Entrance animation Fly In - From Left., to play On Click.
- Click the button Add Effect/Add Animation and
add the Emphasis effect Spin, to play After Previous.
- Click the button Add Effect/Add Animation and
add the Exit effect Fly Out -
To Top Right, to play After Previous.
- Add a delay:
 PowerPoint 2007: Right click the Exit effect and click on Effect Options. Click the
Timing tab and change Delay to 1 sec. Then click on OK.
PowerPoint 2007: Right click the Exit effect and click on Effect Options. Click the
Timing tab and change Delay to 1 sec. Then click on OK.
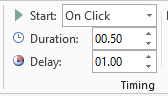 PowerPoint 2010, 2013, 2016: On the Animations ribbon tab, change the Exit effect to use a Delay of 1 sec.
- Select all three effects and change Start to run After Previous.
- Click on
the Play button
 to run the animations in the Slide Pane.
Does the combination of effects work well together? You may need to move your image to the left so that the Exit effect shows.
-
Play the Slide Show from the beginning.
Be careful not to click too fast. If an animation is running when you click, it finishes immediately. Backing up: If you click too many times and the animation jumps to the end, you can back up using the Left arrow key on your keyboard. -
Compare what you saw with the Play button to what you saw when running the slide show. Did the Play button give you a good idea of how the show actually works?
You should have noticed one problem at least.
 Problem: Animation of map requires a click
The Grow and Turn animation of the map on slide #1 will not run "With Previous" or "After Previous" but requires a click. This is because there is a subtitle placeholder on the slide that is blank and is not animated. The Slide Master provides an animation for a title or text placeholder (text with bullets) but not for a subtitle.
Solution: Delete the blank placeholder. - Delete the subtitle placeholder from slide #1.
- Make any corrections to your slides, transitions, and animations.
- Save.
[nz-animate-Lastname-Firstname.pptx]
Naming Versions of a File
![]() Evaluate: In this project you have been changing the
name of your saved presentation with an identifying word instead of a
number. Do you find that this method makes it easier or harder to find
the most recent version? Do you have a naming method of your own that
works better?
Evaluate: In this project you have been changing the
name of your saved presentation with an identifying word instead of a
number. Do you find that this method makes it easier or harder to find
the most recent version? Do you have a naming method of your own that
works better?
|
|
| © 1997-2017 Jan Smith All Rights Reserved |
Site Map What's New |
Privacy Policy Terms of Service Copyright Acknowledgements |
~~ 1 Cor. 10:31 ...whatever you do, do it all for the glory of God. ~~
Last updated: March 22, 2017
You may have to wait for the whole page to load before the animations below will work.
(Play the snow animation.)
Link to video
PowerPoint animation - Applies a motion or a change in appearance to an image, an object, or group of things. The image files are not changed.
The MP4 video at the right shows a single slide that uses multiple animation effects. Current versions [Jan. 2015] of major browsers all support this format.
To play the video, you may need to move your mouse over the video to make the controls appear. Click the > arrow to play. || button pauses.
If the video won't play on the page, click the Link below it to open the video its own tab. You may have to give permission to run whatever plug-in your browser wants to use.
IE11 shows an error on the page for all of my MP4 videos but Firefox, Edge, and Chrome show them correctly. IE11 does play the video from the link and once played that way, the video will run on the page in IE11. Go figure!