
Jan's Working with Presentations
Advanced: Finishing: Save As
When your presentation is running just right, you next have to decide in what form you want to save it:
- PowerPoint presentation - current or older format
- PowerPoint Template
- PowerPoint Show
 PowerPoint 2007: Web page
 PowerPoint 2010, 2013, 2016: Windows Media Video
- PowerPoint 2013, 2016: MPEG-4 video
- Outline only
- Set of images - several formats available
Plus, you must decide if you need to use the Package for CD feature to package it for transport to another computer.
Will the decisions ever cease???
To play and edit later in an older version of PowerPoint:
- Preferred method: Save in the older format, PowerPoint 97-2003
Presentation (*.ppt).
- SmartArt and objects are converted to bitmap images. No more editing of these!
- New transitions and animations will not work.
- If you do not edit in the older version of PowerPoint, you can reopen or play the file in the newer version without losing any of the original features!
- If you do make changes with the old version of PowerPoint, you may not see the original features when you open the file again in the new version. It depends on what the changes were.
To play without PowerPoint at all:
- Preferred method: Play on PowerPoint Online
Upload the presentation to your OneDrive and open it with PowerPoint Online at the Office web site . (You have to log in with a Microsoft account.)
Click on Play Slide Show to view the slide show. Check carefully to see if any formatting, transitions, or animations were lost or if another was substituted. The online version of PowerPoint does not have all of the features that the desktop version has. For example, you cannot open a Master view and you cannot view or edit timings.
-
Play on Google Slides online
Upload to your Google Drive and open with Google Slides.
(You must log in with your Google account)Google Slides has more issues than PowerPoint Online does with correctly showing a PowerPoint presentation. It might work for you in a pinch.
To edit with Google Slides you must convert the presentation to the Google version. Once again, not all features are supported
- Download PowerPoint Viewer 2007 from Microsoft
It will not install in Windows 8, 8.1, or 10.- Some features are lost.
- The owner of the computer may not allow you to install new software.
- No editing at all in PowerPoint Viewer
| |
Step-by-Step: Save As |
|
| What you will learn: | to save as PowerPoint 97-2003 file type to view Document Properties dialog to use Package for CD to view your new versions - from CD or folder or online |
Start with: ![]() , nz-finished-Lastname-Firstname.pptx,
, nz-finished-Lastname-Firstname.pptx, ![]() writable CD/DVD or a flash drive
writable CD/DVD or a flash drive
Save As: PowerPoint 97- 2003 Format
-
With your latest version of the presentation, nz-finished-Lastname-Firstname.pptx, open:
 PowerPoint
2007: Office button
PowerPoint
2007: Office button  > Save As...

 PowerPoint
2010, 2013, 2016: File > Save As
PowerPoint
2010, 2013, 2016: File > Save As The Save As dialog or pane opens.
- Select your folder for this project on your Class disk, powerpoint project3.
-
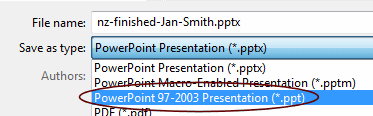 Change the box Save as Type: to PowerPoint 97-2003
Presentation (*.ppt).
Change the box Save as Type: to PowerPoint 97-2003
Presentation (*.ppt).
 Point
of Confusion: Dialog does not show saved presentations
Point
of Confusion: Dialog does not show saved presentationsThe dialog only shows files that match the current file type. All those versions you saved before have extension pptx, not ppt. In fact, if you see any presentations, you saved your earlier work with the wrong file type!
Point of
Confusion: Same file name, different extension
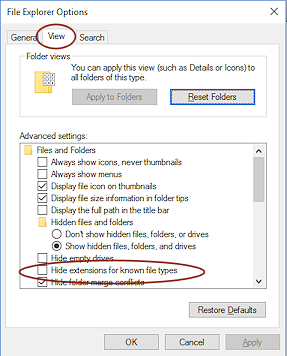
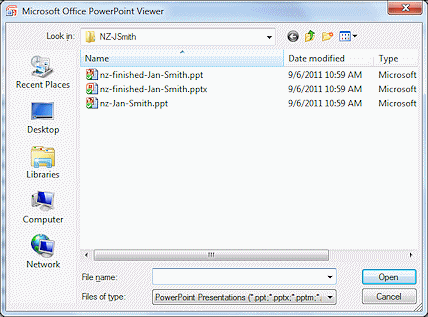
If your computer does not show the file extensions, the window will show files that seem to have the same name!

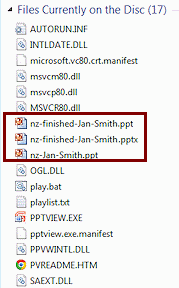
In the illustration there are three files named nz-Jan-Smith. One is a presentation, one is a template, and one is a text file. They have different extensions and different icons. At this icon size, it is hard to see the difference between a template icon and a presentation icon.
 This behavior is an excellent reason to always have
your file management windows show the extensions.
This behavior is an excellent reason to always have
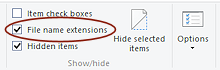
your file management windows show the extensions.In recent versions of Windows there is a check box on the View ribbon in File Explorer windows to show/hide file extensions. Check the box to show.
This choice is also in the File Explorer Options dialog in the View tab, Advanced settings. Check the box to hide. The ribbon makes more sense than the older dialog choice!
 Click the Save button.
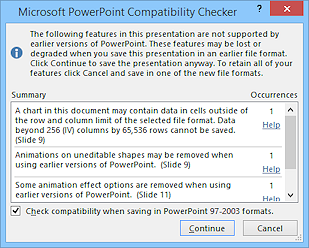
The Compatibility Checker runs and opens a message window with reminders about what you will be losing with this file format. Looks like Slide 9, Rainy Days, and its chart may be a problem. Slide 11 may have a problem with the animations of the clip art image, too.
- Click on Continue.
PowerPoint continues the process of saving the presentation in the old format. PowerPoint switches to show the version you just saved, ppt.
-
 Experiment: Open old
file type in new version of PowerPoint
Experiment: Open old
file type in new version of PowerPoint
If necessary, open your ppt version in your current version of PowerPoint.
Run the slide show to see what has changed. Anything? Probably not.
Try to edit the chart and table in particular. Did the saving process turn them into pictures?
- Close the presentation.
-
Compare file sizes: Open a Computer/File Explorer window and look at the folder where you saved your Project 3 files.

The version in the old file type (ppt) is MUCH larger than the one in the newer file type (pptx). The screen shot shows files that were created with PowerPoint 2013. Your own files may not have the same file sizes.
Why did the file size increase?
When saving in the old format, PowerPoint adds in the parts it needs for the old format but keeps what it needs for the new format. At this point the file can be opened with both recent and old versions of PowerPoint. BUT, if you edit the file in PowerPoint 2003 or older and save it, you may lose the new features altogether. - Experiment: Use old
version of PowerPoint
If you have access to a computer with PowerPoint 97, 2000, 2002, or 2003...- Attach to the computer your Class flash drive or another drive with copies of your two versions of the presentation.
-
Try to open the presentations in the old PowerPoint.
What happens? Do you get any messages?The PPTX file will not open. The PPT file will open but a few things will be different.
- Play through the slide show to see what has changed.
Anything?
- Try to edit the chart and table.
- Save with a new name to your flash drive. Do NOT save over the existing file!
- Safely remove the flash drive and take it back to your usual computer.
- Try to open the file with the new name in a more recent version of PowerPoint. Will it open? What messages do you get?
- Play the slide show? Did anything change?
- Check the file size. Did it stay the same or increase or decrease?
- How do your results match with what the Compatibility Checker warned about?
My Experiment: I tried this with a WinXP computer and PowerPoint 2003 after creating the original presentation on a Win8.1 computer using PowerPoint 2013.
In PowerPoint 2003:
- The PPTX file would not open. Windows did not know what program to use. The PPT version opened without any trouble.
- The transitions were a little jerky.
- The table and the chart did not animate.
- The chart did not have all of its formatting.
- The blue arrow was in the wrong spot.
I edited the presentation in PowerPoint 2003 to add an animation to the table and to the chart and to move the arrow. Then I saved the file and moved it back to the computer with PowerPoint 2013.
Back in PowerPoint 2013:
- The presentation played with BOTH animations for the table, the original and the one I added while in PowerPoint 2003.
- The arrow was in the correct spot.
- The chart showed all of its formatting.
- The chart used only the new animation I had applied in PowerPoint 2003.
- The file size was 190 KB larger than before.
Conclusion: The results can be unexpected when moving between versions!
View Document Properties Dialog
-
Open nz-finished-Lastname-Firstname.pptx again.
- Open the Document Properties dialog to see
what others can see.
PowerPoint
2007:
Office button > Prepare > Properties > Document Properties > Advanced
Properties
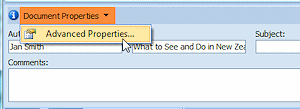
PowerPoint
2010, 2013, 2016:
File > Info > Properties button > Advanced Properties
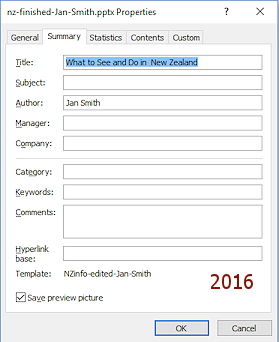 The dialog for Properties opens.
 - Click on each tab and inspect the information available.
 Can you think of situations where you
would not want some of these document properties to be viewed by just anyone?
Can you think of situations where you
would not want some of these document properties to be viewed by just anyone? - Close the dialog.
What about the other things that the Compatibility Checker looks at? The off-slide
material could easily be a problem or maybe invisible content that you
should have deleted instead. Review comments might be embarrassing for
strangers to see, if you or your co-workers get sarcastic with each other!
Package for CD
Package for CD can save your presentation(s) along with any fonts or linked files. This guarantees that you have all the parts you need for your presentation to play in PowerPoint, just the way you created it. This is a great method to use when transporting your presentation to a strange computer that has a compatible version of PowerPoint.
However, if PowerPoint is not installed, you have a problem. There is a PowerPoint Viewer that can run on older computers. But the viewer will not install on Windows 8, 8.1, or 10.
The Package for CD process in PowerPoint
2007 can include the files to install the viewer.In PowerPoint 2010, 2013, and 2016, Package for CD does not include the actual installation files. Instead you get a page with a link to download the viewer ![]() (60 MB), which must then be installed. But, some company and school computers are locked down so that the user cannot install anything. Double problem! Of course, it is never nice to install something without asking on a computer that is not your own.
(60 MB), which must then be installed. But, some company and school computers are locked down so that the user cannot install anything. Double problem! Of course, it is never nice to install something without asking on a computer that is not your own.
Even with PowerPoint Viewer, you will not be able to edit the presentation, no matter how awful the spelling error is that you notice at the last minute.
Instead, if the computer has an Internet connection, you should consider running your presentation from PowerPoint Online or Google Slides, but you must have an existing (free) Microsoft or Google account.
-
Open Package for CD dialog:
PowerPoint
2007: Office button > Publish... > Package for CD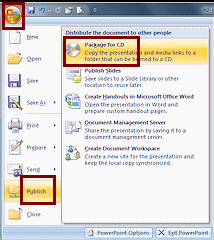
PowerPoint
2010:
File > Save & Send > Package Presentation for CD > Package for CD button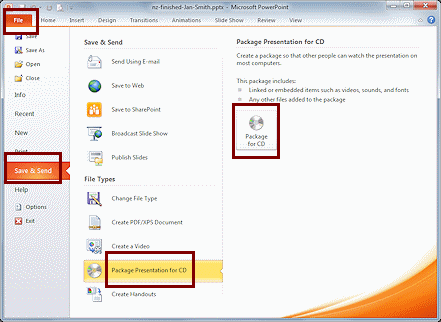
PowerPoint 2013, 2016:
File > Export > Package Presentation for CD > Package for CD button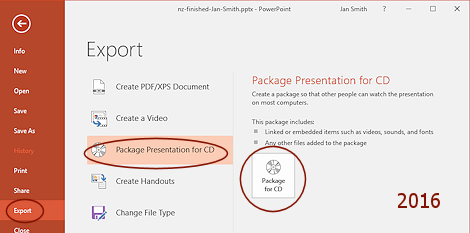
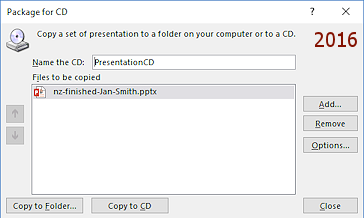
The dialog opens with the default name for the CD = PresentationCD. Boring!
-
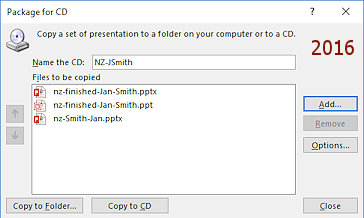
Change the name to NZ-InitialLastname, where you replace InitialLastname with your first initial and your last name.
The whole name for the CD must be 16 characters or less. If you try to type in more characters than this, your computer will ding at you! If your name is too long to fit, decide on a short version that will be different from your classmates. Don't strain your teacher's brain with trying to figure out whose file it is!
Now you can add more presentations to the package for practice.
-
 Click the Add... button.
The Add Files dialog opens, probably to the same folder as your current presentation.
- If necessary, navigate to your Class disk to
the powerpoint project3 folder and click on nz-finished-Lastname-Firstname.ppt, the old format version you created.
- Hold the CTRL key down and click on
your first version, nz-Lastname-Firstname.pptx.
-
Click on the Add button.
You are back in the Package for CD dialog with 3 presentations listed.Notice the arrows at the left, which let you change the order of the files on the CD.
-
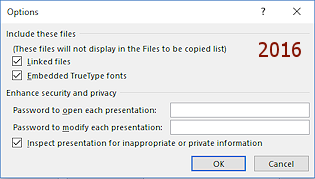 Click on the Options... button.
The Options dialog appears with several choices.- Linked files
- Embedded TrueType fonts
- Password to open each presentation
- Password to modify each presentation
- Inspect presentations for inappropriate or private information
- Verify that Linked files and Embedded TrueType fonts are checked.
If you had linked the Excel chart to the presentation, this step would insure that the linked file was available when you run the presentation. Critical!!
- Do not create a password.
- Check the box by Inspect presentations for
inappropriate or private information.
- Click on OK to close the Options dialog.
You are returned to the dialog Package for CD.
You are now ready to choose where to save the packaged files - a folder or to a CD.
- Check with your instructor on where to save your package - folder,
CD, or both!
If you are working on your own without an instructor, try this both ways if you have a writable CD or DVD and a CD/DVD drive that can write.
- Save your package to CD or to a folder:
-
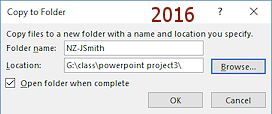 Folder: Click on Copy to Folder and choose the powerpoint project3 folder on your Class disk.
 The dialog automatically uses the name you picked for the CD as the name of the folder for the copies.
Now you have a collection of files that include the fonts and linked files that go with your presentation(s). You can upload this whole set to your OneDrive or Google Drive account to run from there.
-
CD:
 Warning: While writing to a CD or DVD disc, do
not do anything else on the computer. Turn off automatic actions, like
checking for email, before you start to write to the disc. Sometimes
other computer tasks interfere enough with the writing to corrupt the file.
Warning: While writing to a CD or DVD disc, do
not do anything else on the computer. Turn off automatic actions, like
checking for email, before you start to write to the disc. Sometimes
other computer tasks interfere enough with the writing to corrupt the file. If you wish to burn a CD, you must have a CD or DVD burner and a blank writable CD or DVD disc. Click on Copy to CD.
With either choice, a message box appears to make sure you understand that linked files will be included in the package.

-
 Click on Yes in the message box.
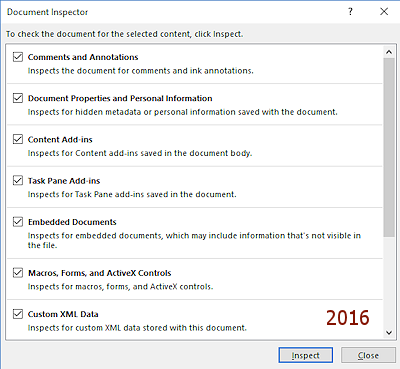
The Document Inspector dialog appears and shows what items it will inspect.
-
Check all of the boxes and click on Inspect.
PowerPoint inspects the features your checked and shows which ones may need attention.
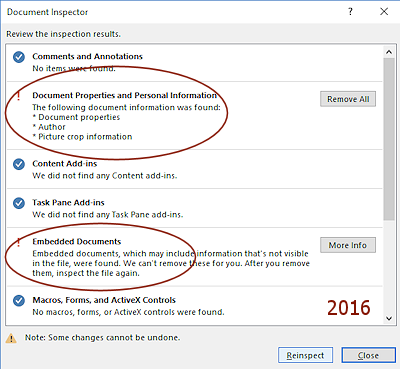
If you ever have concerns about personal information being part of the saved file, you should view the properties early in the creation process. You don't want to Remove All just because the choice is there!
-
Click on Close to close the Document Inspector.
The Document Inspector repeats its inspection for each of the presentations.Once all presentations have been checked, you are back at the dialog Package for CD.
-
Folder: The files are copied to the selected folder immediately.
CD: Follow the prompts to insert a blank CD. Wait for the CD to spin up and then click Retry. Once the CD has been been burned and ejected, take it out of the drive. Label it using a Sharpie marker or marker made for writing on CD/DVDs- NOT a Magic Marker, ballpoint pen or pencil or sticker. Anything that scratches the surface of the disc will eventually ruin it. - Click on Close to close the Package for CD dialog.
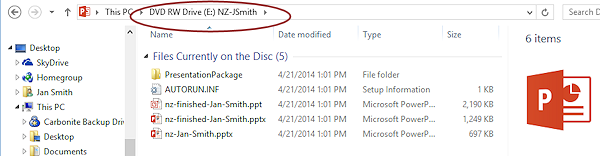
- Open a Computer/File Explorer window to the folder or drive where you told Package to CD to put the files. (The disc will have to be in the drive, of course.)
There is a new folder, NZ-InitialLastname. - Open the folder and inpect the list of files.
Test: Run the CD Copy
-
 Insert your new CD back into the CD/DVD drive.
After the CD spins up to speed (which can take a while), a new window should open with choices for what you can do. This feature may be turned off. (See the Problem section below.)
OR


 Win8, Win 8.1:
A fly-out message tells you to tap to see choices.Click on the message to get a list of options.
OR
PowerPoint 2007: The PowerPoint Viewer may launch
automatically.
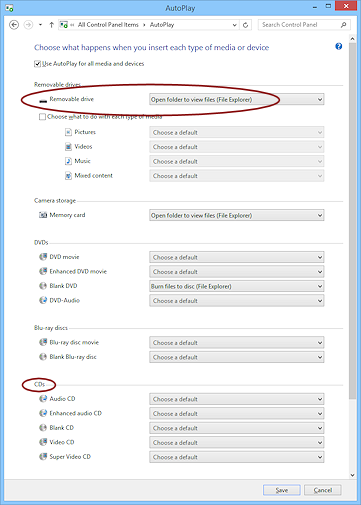
 Problem:
AutoPlay window does not open up automatically
Problem:
AutoPlay window does not open up automatically
Perhaps the files did not get written correctly or perhaps your computer has turned off the feature for CDs and DVDs to start automatically. It is off by default in Windows 10.The Control Panel AutoPlay feature lets you control the AutoPlay behavior for removable drives including CD and DVD drives. AutoPlay is an item in the Control Panel.
Solution:- Open a File Explorer window to display the contents of the CD/DVD drive.
- Double-click the presentation file.
Your presentation should open in PowerPoint.
- Open a File Explorer window to display the contents of the CD/DVD drive.
-
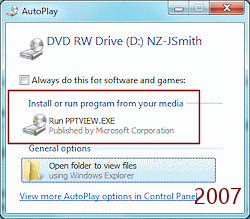
Run presentation
You created the CD/DVD with PowerPoint
2007:
-
 PowerPoint is installed
- In the Auto Play dialog, click on Open folder to view files.
- Click on the presentation that
you want to run.
- PowerPoint is NOT installed
-
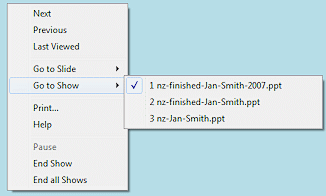 In the AutoPlay dialog, click on Run PPTVIEW.EXE
The PowerPoint Viewer loads and runs your presentations. - Right click on a slide.
- In the context menu, click on the a new command, Go to Show.
A list of the presentations in the Package for CD appears.
If you just advance through the slides normally, all three presentations will run. Not a good plan in this case!
With this menu you can select a presentation.
-
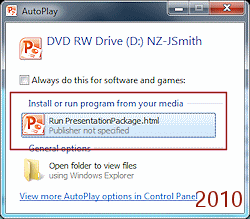
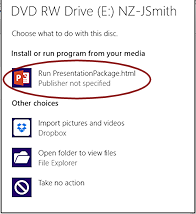
You created the CD with PowerPoint
2010, 2013, or 2016:-
 If Auto Play is turned on:
The AutoPlay dialog may appear. Click on Run PresentationPackage.html.A web page opens in your default browser that shows a link for each presentation in the package plus a Download button if you want to download PowerPoint Viewer.
If AutoPlay is not on:
Navigate in a File Explorer window to your CD/DVD drive. Open the folder PresentationPackage and double-click Run PresentationPackage.html to see the page with links, which is prettier but no more functional than the File Explorer window.
Alternate method: In File Explorer, double-click the presentation you want to see in PowerPoint.
-
Click on the presentation you want to view.
 It will download just as if it were
on a web site.
It will download just as if it were
on a web site. Depending on your browser, the presentation may automatically start up in PowerPoint or in a browser window, you may be given the choice to Save or to Open as in the illustration from IE9, or you may have to find it in the Downloads folder and double-click it to view it. That would be awkward!
-
Test: Run the Folder Copy with PowerPoint Viewer
If you must use PowerPoint Viewer to show your presentation, some animations may not run as expected, or at all!
Be wise. Practice how to open the presentation from PowerPoint Viewer before you are in a strange place using a strange system to show an important presentation!
![]() PowerPoint
2010, 2013, and 2016 do not include a copy of the PowerPoint Viewer with the other Package
for CD files like PowerPoint 2007 does. They put a link to download the
viewer on a web page that lists the included presentations. This is not
helpful if the computer you are trying to run the presentation on cannot
access the Internet. You should plan ahead and have a copy of PowerPoint
Viewer with you to install if you need it. The download will not install on Windows 8, 8.1 or 10.
PowerPoint
2010, 2013, and 2016 do not include a copy of the PowerPoint Viewer with the other Package
for CD files like PowerPoint 2007 does. They put a link to download the
viewer on a web page that lists the included presentations. This is not
helpful if the computer you are trying to run the presentation on cannot
access the Internet. You should plan ahead and have a copy of PowerPoint
Viewer with you to install if you need it. The download will not install on Windows 8, 8.1 or 10.
-
Open PowerPoint Viewer:
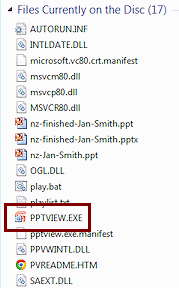 PowerPoint 2007: If necessary, navigate in Windows Explorer to the
CD/DVD drive to show the files that you saved with Package for CD. Double-click the file PPTVIEW.EXE.
PowerPoint 2007: If necessary, navigate in Windows Explorer to the
CD/DVD drive to show the files that you saved with Package for CD. Double-click the file PPTVIEW.EXE. 
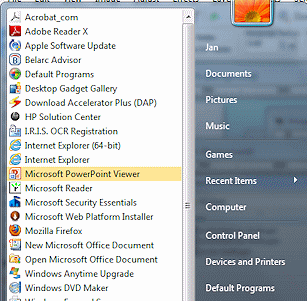
 Vista, Win7: Click the Start button and then All
Programs. Then click on Microsoft PowerPoint Viewer, which should be in the
upper part of the All Programs list.
Vista, Win7: Click the Start button and then All
Programs. Then click on Microsoft PowerPoint Viewer, which should be in the
upper part of the All Programs list. -
If you do not see the program name in the list, it may not be installed. You can type the name in the Search box back on the Start menu to see if Windows can find it for you.
A splash screen appears and then a dialog lists the presentation(s) on the CD.
- Click on the presentation you want to show.
- Click the Open or Show button. The show begins.
- Advance through the whole show.
There may be changes! What does not work as you expected?
![]() Planning for PowerPoint Viewer: If you expect to have to play your show with PowerPoint Viewer, be extra
careful in your choices for transitions and animations and the order of
animations. Be sure to test that all works reasonably well in the viewer.
Planning for PowerPoint Viewer: If you expect to have to play your show with PowerPoint Viewer, be extra
careful in your choices for transitions and animations and the order of
animations. Be sure to test that all works reasonably well in the viewer.
Experiment: Play Presentation Online
You must log into your Microsoft account for OneDrive or your Google account for Google Drive. Both of these offer free accounts.
- Copy and paste your presentation from your Class drive to your OneDrive or Google Drive on your home computer or use your browser to log into OneDrive or Google Drive online and upload the presentation. (Right click in a blank area of the file listings and choose Upload.)
-
OneDrive: Click the presentation in OneDrive to open it in PowerPoint Online. Click the Start Slide Show button at the top to play the presentation. What changes do you find?
Google Drive: Right click a presentation in Google Drive and select Google Slides. Your presentation will be coverted to Google Slides format and opens in Google Slides. Click the Present button to play the slide show. What changes do you find?
Experiment: Other File Types
- Try saving
with other file types
Try out various file types that you think you might use. It's an experiment! Have fun with it.
|
|
| © 1997-2017 Jan Smith All Rights Reserved |
Site Map What's New |
Privacy Policy Terms of Service Copyright Acknowledgements |
~~ 1 Cor. 10:31 ...whatever you do, do it all for the glory of God. ~~
Last updated: March 22, 2017
This can be very confusing if you are saving a copy to a different location or with a different file name or as a template!
Therefore,