
Jan's Working with Presentations
Format: Templates & Themes:
Save As Template
Once you put together a look that you really like for a presentation, you might want to keep it handy to use again. PowerPoint can save your design as a custom template.
Template files use the extension .potx, for PowerPoint template. The x is for the new XML based file format. Older versions of PowerPoint use just .pot.
Location of Templates
Saving a presentation as a template is easy, usually. Finding a template in a File Explorer window can be trickier! The templates that come with PowerPoint, the ones you download, and the ones you save yourself may be in different folders!
- Original templates:
Located in a folder called Templates, in the folder where Microsoft Office was installed, which is usually similar to -
C:\Program Files\Microsoft Office\Templates\1033
C:\Program Files\Microsoft Office 15\root\Templates\1033
C:\Program Files (x86)\Microsoft Office\root\Templates\1033(The 1033 is for English. Other languages have a different number for the folder.)
-
Templates downloaded through the New dialog or pane:
Located in a hidden folder for AppData.
C:\Users\<username>\AppData\Roaming\Microsoft\Templates - Templates downloaded through browser from web site:
Located in the folder that your browser uses for downloaded files unless you pick a different folder. This varies with the browser and version of that browser! If you want to use a downloaded template without having to download it again, you will have to save it in or move it to the folder for original templates or to the folder for custom templates.
- Custom templates:
Located in a folder where Windows saves your user settings for some versions and for PowerPoint 2013 in a Documents folder.
Examples:
 WinXP -
  PowerPoint 2007-
C:\Documents and Settings\<username>\Application Data\Microsoft\Templates![Save in: box showing folder tree to custom templates- c:\Documents and Settings\[username]\Application Data\Microsoft\Templates](dialog-saveas-template-savein.gif)
 Win7 -
 PowerPoint 2010-
the HIDDEN AppData folder -
C:\Users\<username>\AppData\Roaming\Microsoft\Templates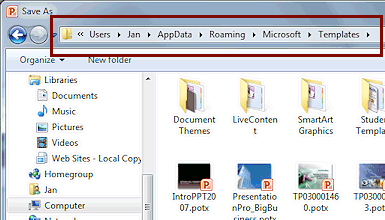
 PowerPoint 2013
C:\Users\<username>\Documents\Custom Office Templates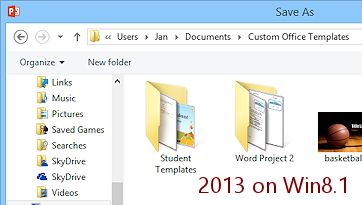
How to find the folder for 'custom' or 'personal' templates:
Method 1: Use the Save As dialog to save a template
In the Save As dialog, start to save a presentation as a template. When you change the file format to (*.potx), the dialog normally changes
automatically to the location to the folder for custom templates. Inspect the path at the top of the dialog. Now you know where custom templates are kept.
But, if you recently saved a template to a different folder, PowerPoint goes to that folder. Close and reopen PowerPoint and try again. This time the Save As dialog will change to the default location for custom templates as soon as you change the file type to (*.potx)
 Method 2:.
![]()
![]() PowerPoint 2013, 2016: Options dialog
PowerPoint 2013, 2016: Options dialog
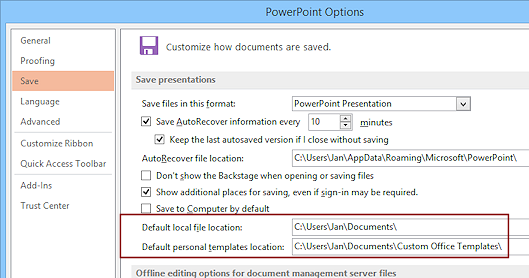
Open the PowerPoint Options dialog to the Save page.
File > Options > Save
This dialog shows the default locations that PowerPoint will use for files and personal templates.
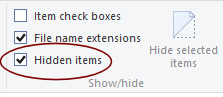
Hidden Folders:
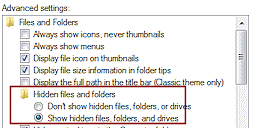
The AppData folder is used by some versions for custom templates, but this folder is hidden by default. That certainly makes it hard to manually copy those templates you downloaded with your browser into it! You can make the folder show in a Computer or File Explorer window by changing one of the Advanced settings in Folder Options. Unfortunately you cannot show only certain hidden files and folders. It's all or none.


Win8, Win8.1, Win10: In a File Explorer window, on the View ribbon tab in the Show/Hide tab group, check the box Hidden items.
To keep things confusing, your own custom templates might be in a different location if you are using an older version of Windows or Office or if you upgraded from an older version of Office.
Special Folders for Templates in various versions:
 .
.
Recent presentations:
|
Installed with PowerPoint:
|
Custom or Personal:
|
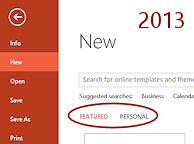
In PowerPoint 2013 and 2016 the New pane does not show the links FEATURED/Featured and PERSONAL/Personal until after you have saved a presentation as a custom template.
Of course, you can save a custom template to whatever
folder
you want. You will just have to remember where that was and navigate to it
when you want to use the template later. The New Presentation dialog or pane will only see the templates in the default folders.
What a Template Controls:
|
|
|
|
We will hold off on transitions and animations until later.
| |
Step-by-Step: Save As Template |
|
| What you will learn: | to save as a custom template with a new name to use a custom template to create a new presentation to use an existing presentation as a theme |
Start with: ![]() AnniversaryTripsOffer3-Lastname-Firstname.pptx from the previous lesson
AnniversaryTripsOffer3-Lastname-Firstname.pptx from the previous lesson
Save As Custom Design Template
You can save your changes to your Masters as a new template that you can use later.
![]() Be sure
to save your
presentation first!
Be sure
to save your
presentation first!
- If necessary, open AnniversaryTripsOffer3-Lastname-Firstname.pptx from your Class disk. You saved it in the previous lesson.
 Save As.
PowerPoint 2007, 2010: The Save As dialog appears.
-
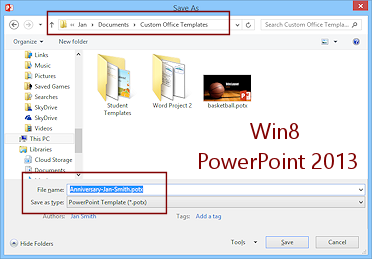
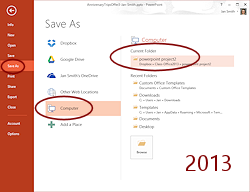 PowerPoint 2013: Select a location first - it does not matter where at this point!
The easiest choice is the folder powerpoint project2, which should show as the Current Folder since the current presentation is stored in this folder.Now the Save As dialog appears.
-
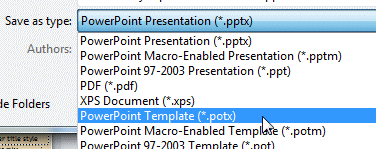 Scroll the list of files types in the Save as
type: box and select PowerPoint Template (*.potx).
Scroll the list of files types in the Save as
type: box and select PowerPoint Template (*.potx).
The Save in: location changes automatically to where PowerPoint expects to see custom templates. This is not usually where the original templates are!
 Point of Confusion: Save location remembered
temporarily
Point of Confusion: Save location remembered
temporarilyIf you have already saved a template to a different location and then start to use Save As again for another template, the dialog will not bring up the standard location. It remembers where you saved before. Once you close the presentation or else start a new one, then the dialog goes back to the standard template location. This behavior can scramble your brain until you figure out what is going on!
The default name for the template is the same as for the presentation itself. That is may not be a good plan!
-
Change the File name: box to read Anniversary-Lastname-Firstname.potx, but replace the Firstname and Lastname with your own name, of course.
Examples:

Your dialog may show previously saved custom templates.
-
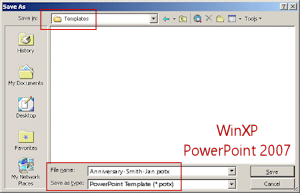
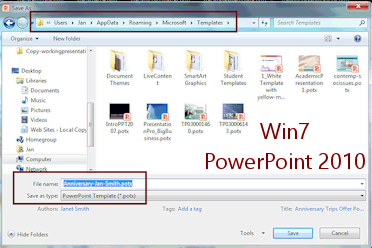
Windows XP: Open the Save in: list at the top of the
dialog. Write down the hierarchy of folders to where your template is going to
be saved.
- Write down the full path to the custom templates. For the
illustrations the paths are:
C:\Documents and Settings\[username]\Application Data\Microsoft\TemplatesC:\Users\[username]\AppData\Roaming\Microsoft\TemplatesC:\Users\[username]\Documents\Custom Office TemplatesWhat your PowerPoint shows will depend on which version of Windows, which version of PowerPoint, and whether you upgraded from a previous version or have a fresh installation.
-
Click on Save.
The dialog closes.
 Warning: The title bar of your window changes to show
the template name instead of the presentation name! PowerPoint is ready for you to edit the template, adding or removing parts.
Warning: The title bar of your window changes to show
the template name instead of the presentation name! PowerPoint is ready for you to edit the template, adding or removing parts.Did you expect that? In many programs when you use Save As, the document on display changes to be the copy you just saved.
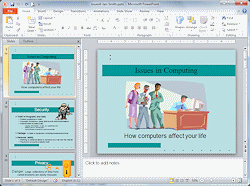
The Normal view still shows all the slides and text that you created before, so they must be part of the template. Those parts will show up again if you use your custom template to create a new presentation. But if you apply the template as a theme to an existing presentation, all you get is the formatting in the Slide Masters and layouts.
-
Close the template!
Warning: If you keep working, any
changes you made now would be saved to the template not to your presentation! You will have to open the presentation back up to work on it
some more. - Close the template but do not close PowerPoint.
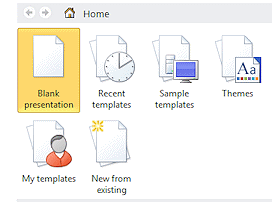
Use a Custom Template to Create a New Presentation
- Start a new presentation:
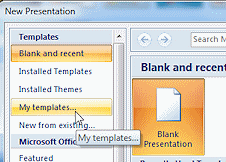
PowerPoint 2007:
 Office button > New > My templates
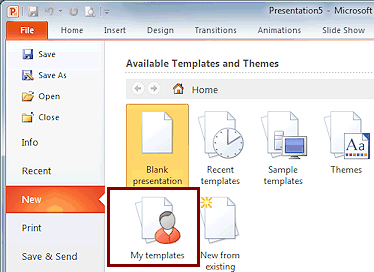 PowerPoint 2010:
File > New > My templates
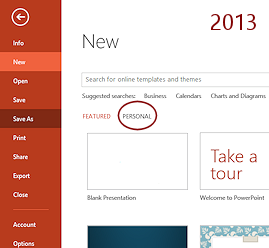
 PowerPoint 2013, 2016:
File > New > PERSONAL
-
Click the My Templates or PERSONAL folder.
You may have only one template showing or you may have a large number of saved templates. PowerPoint 2007, 2010:
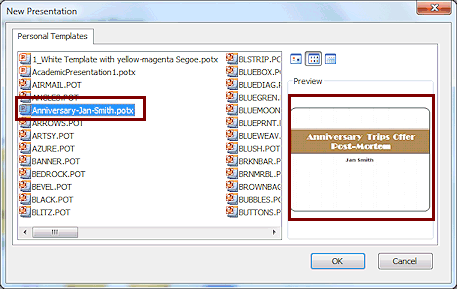 The New Presentation dialog opens.
 The illustration shows a large number of old templates that were downloaded and moved into this folder so that they would be easy to find.
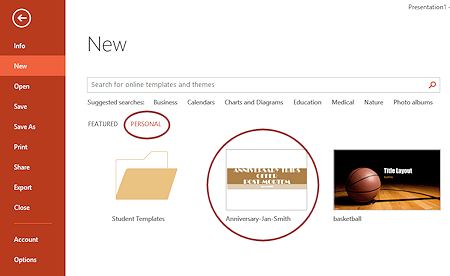 PowerPoint 2013, 2016: The pane shows the contents of the custom templates folder.
The illustration shows a folder of student templates and a downloaded template (basketball) as well as the custom template created for these lessons.
-
Click on Anniversary-Lastname-Firstname.potx and then on OK or Create.
Pick the one with your own name if there are several in this folder.A new presentation opens, using your template to get started. What parts of the original presentation show up here?
- Scroll the new presentation.
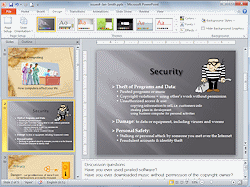
Wow! All of the slides came through with all of their text.
- Close your new presentation without saving it.
Use an Existing Template or Presentation as a Theme
When you select an existing template or an existing presentation as a theme, the slides are formatted with the first Slide Master and layouts in that template or presentation. All of the other masters are available in the Slide Master view. They also show in the palette of Themes. But you must apply the layouts yourself for these alternate masters.
You do not get the content of the original presentation or template with this method.
 From your Class disk, open your
presentation from PowerPoint Project 1,
From your Class disk, open your
presentation from PowerPoint Project 1,
issues4-Lastname-Firstname.pptx.
- On the Design ribbon tab, open the
full palette of Themes.
- Click on Browse for Themes.
-
Navigate to your Class disk to the powerpoint project2 folder and click on AnniversaryTripsOffer3-Lastname-Firstname.pptx.
 Use existing template or presentation as theme: You must
navigate to where that template or presentation was saved. This might be the hardest
part of your day!
Use existing template or presentation as theme: You must
navigate to where that template or presentation was saved. This might be the hardest
part of your day!Alternate method: Create a new presentation with the template and save it to a location that you can easily find. Then apply the new presentation as a theme.
-
 Click the Apply button.
The presentation changes to use the Masters from the selected presentation.The order of the masters is important! Only layouts from the first master in the list will be applied.
In this case, the masters switched places somewhere along the way and the Equity or Banded master comes first.
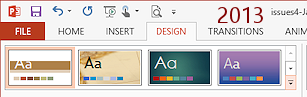 In the Themes gallery, both Slide Masters are showing on the first
row.
In the Themes gallery, both Slide Masters are showing on the first
row.
-
 Click on the second theme, presentation
for project post-mortem.
Click on the second theme, presentation
for project post-mortem.
(PowerPoint 2013 calls this Office theme, which it is definitely not!)
All the slides change to use that theme.
- Scroll the slides to see what effect changing
the theme has made.
- Titles that were white text on a white background now show up. That's good!!
- The annotation ovals around certain words that you saved are not lined up with the words any more.
- Click on the thumbnail for slide 2.
-
 Right click on a theme in the Themes gallery, other than the current theme.
A context menu appears.
 Click on Apply to Selected Slides.
The one slide gets a new theme.
- Open the Slide Master View and
scroll the Navigation pane.
There are 3 different Slide Masters with their layouts. Wow! What a lot of choices.
-
Save
As, with the name issues5-theme-Lastname-Firstname.pptx as a new file on your Class
disk in the folder powerpoint project2.
|
|
| © 1997-2017 Jan Smith All Rights Reserved |
Site Map What's New |
Privacy Policy Terms of Service Copyright Acknowledgements |
~~ 1 Cor. 10:31 ...whatever you do, do it all for the glory of God. ~~
Last updated: March 22, 2017
That depends!
It depends on the version of Office you are using, the operating system, and on whether you have enabled different users for the computer. Confusing!