 |
PowerPoint comes with a number of
design templates for formatting presentations. When you apply a design
template, you are actually changing the Masters.
Custom Template
You can create your own
Masters and then save them as a template. It is usually faster to modify an
existing template and then save it under a different name.
To see your new template in the list of choices you must save it to the
right location. Problem! The location varies with the version of PowerPoint
and the version of Windows you are using. The lesson
Save As Template deals with this
issue.
 Content template as a
design template: A content template is intended
to create a
new presentation. You can, however, apply it as a design template to an existing
presentation by browsing to the template from the task pane
Slide Design: Design Templates or in the
Templates dialog. The text and images in the content template are not
applied, just the background and design settings. Content template as a
design template: A content template is intended
to create a
new presentation. You can, however, apply it as a design template to an existing
presentation by browsing to the template from the task pane
Slide Design: Design Templates or in the
Templates dialog. The text and images in the content template are not
applied, just the background and design settings.
|
 |

Where you are:
JegsWorks > Lessons > Presentations
Before you start...
Project 1: PowerPoint Basics
Project 2: PowerPoint Formatting
Design Issues
Templates

 Content
Template Content
Template
 Design
Template Design
Template
 Save
As Template Save
As Template
Transitions & Animations
Summary
Quiz
Exercises
Project 3: Advanced PowerPoint
Search
Glossary
Appendix
|
|
 Missing templates: You may not have the templates used in the
exercises. Different versions of PowerPoint come with
different templates.
Microsoft has grouped the templates that came with
PowerPoint 4.0, 97, and 2000 into 3 zipped files for you to download. Some
features may not work in earlier versions of PowerPoint but the backgrounds and
formatting should be OK.
Download details: PowerPoint Templates Pack 1 - A - EL - 1268 KB
Download details: PowerPoint Templates Pack 3 - EM - P - 1357 KB
Download details: PowerPoint Templates Pack 2 - Q - Z - 1554 KB
(and, yes, Pack #3 has the templates from the middle of the alphabet.)
 |
Step-by-Step:Design Template |
 |
What you will learn: |
to apply a different design template to all slides
to apply a design template to selected slides
|
Start with:
Anniversary Trips Offer.ppt from the previous lesson
About Current Design Template
-
View
Title Master: From the menu select View | Master | Slide Master. If necessary,
click on the thumbnail for the Title Master.
 The current template's name is in the middle of the status bar:
Project Post-Mortem. The current template's name is in the middle of the status bar:
Project Post-Mortem.
The Title Master shows what the design template has assigned for the background
and fonts.
-
Task Pane:
If necessary,
click on
 the Design button in the Formatting bar to open the Slide Design Task Pane.
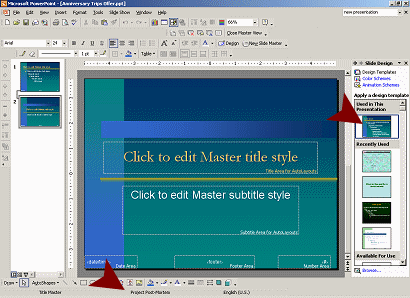
The current slide design is at the top of the pane.
Other recently used designs are in the second section of the task pane,
Recently used. Below that section are other slide designs that are
available to you. Your choices are almost certainly different from what is
showing in the illustration.
-
 Move
your mouse over the two masters at the left. A popup tip shows which
slides use which master. Move
your mouse over the two masters at the left. A popup tip shows which
slides use which master.
 Handy! Handy!
- View Slide Master:
Click on the Slide Master (first one in the Slides pane at the
left.)
This master controls the slides with bulleted
text.
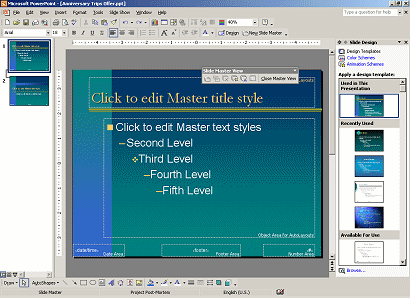
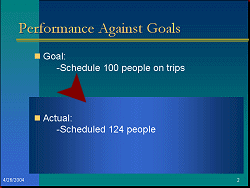 Hmmm. The
Master does not show the colored box that is at the bottom of certain slides.
The content template added something that is not part of the Masters for
the template. Interesting! Or is it going to be confusing?? Hmmm. The
Master does not show the colored box that is at the bottom of certain slides.
The content template added something that is not part of the Masters for
the template. Interesting! Or is it going to be confusing??
If you apply a different design template, the text may not be positioned properly over this box. You
will have to learn how to move and resize some slide parts!
- From the menu select | again but pick . The content template did not make
any changes from the default for this Masters.
- Repeat for the Notes Master. Again, no changes from the standard layout.
- Close the Master view by clicking
 the Close Master View button on the
Masters toolbar. (This bar appeared when you switched to Master view.) the Close Master View button on the
Masters toolbar. (This bar appeared when you switched to Master view.)
Apply Design Template: All Slides
You can apply a new design template at any time.
-
Click
on another Slide Design to apply it to all slides.
-
View each slide with this new design template. Does it work well for this
presentation?
For some templates, the text of the bullet point Actual is not over the box.
You could, of course, change the position of the blue box on each of the
slides that has one.
-
Return to the original template, Project Post-Mortem. (Select it from the Task Pane or use Undo.)
Apply
Design Template: Selected Slides
You can apply a design template to a single slide or to
selected slides.
-
 Switch
to Slide Sorter view by clicking Switch
to Slide Sorter view by clicking
 the Slide Sorter button on the Views bar.
-
Select the title slides 1, 6, and 11.
-
Scroll down the design thumbnails in the Task Pane. Let your mouse hover over each
thumbnail. A popup tip will tell the file name.
-
Find the
Stream.pot template. It is dark blue, shading to black at the top with
faint curvy lines at the bottom right. The lines do not really show in the
thumbnail and the shading looks more like stripes.
 If
you do not have this template, choose one with a dark, fairly simple
background. We will be changing the color shortly. If
you do not have this template, choose one with a dark, fairly simple
background. We will be changing the color shortly.
-
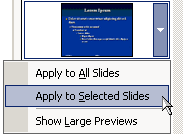
Click the down arrow at the right of the Stream.pot template in the
Task Pane. A menu appears that gives you the choice of applying the template
to the whole presentation or to just the slides currently selected. Neat!
-
Select Apply to Selected Slides. The selected
slides change and the new template shows in the Slide Design pane as
Used in this presentation.
-
Select slide 1 and run the Slide Show by clicking
 the Slide Show button in the Views bar. The dark blue color in the new
template is one of the colors in the original slide design, but is it the best color? Aha! An opportunity to change things on the Master.
Check Outline
The design template you applied to the text slides has
created a nice layout using two placeholders for Goals text and
Actual text. Some of this text will not show in the outline. Does that
matter? That depends on what you might want to do with the outline!
-
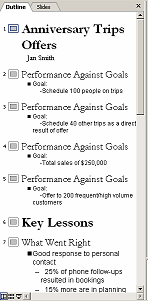 Click
on the Outline tab in the Navigation pane at the left. The outline
of the presentation shows, but it is missing some of your points! The Actual text
on slides 2 - 5 is not in the outline. Unexpected! Click
on the Outline tab in the Navigation pane at the left. The outline
of the presentation shows, but it is missing some of your points! The Actual text
on slides 2 - 5 is not in the outline. Unexpected!
 PowerPoint
recognizes only the default text and title placeholders when it creates
the outline. PowerPoint
recognizes only the default text and title placeholders when it creates
the outline.
The Project Post-Mortem
template contains a second text placeholder on each Performance
Against Goals slide. This placeholder lines up over the blue box.
Save As
-
 From
the menu select Save As.
The Save As dialog appears. Use the name Anniversary Trips Offer2.ppt
and save it to your Class disk. From
the menu select Save As.
The Save As dialog appears. Use the name Anniversary Trips Offer2.ppt
and save it to your Class disk.
 How to handle a full Class disk
   
~~ 1 Cor. 10:31 ...whatever you do, do it all for the
glory of God. ~~
Last updated:
30 Apr 2012 |

