 |
Once you put together a look that you
really like for a presentation, you might want to keep it handy to use
again. PowerPoint can save your design as a custom template.
Template files use the extension .pot, for PowerPoint
template.
Location of Design Templates
 A custom template may not show in
the usual list of templates, depending on exactly where it was saved. A custom template may not show in
the usual list of templates, depending on exactly where it was saved.
Original templates:
The templates that come with PowerPoint are in a folder called
Templates, in the folder where Microsoft Office was installed, which
is usually-
c:\Program Files\Microsoft Office\Templates\Presentation Designs.
Custom template:
The templates that you save are probably not in the same folder as the templates
that come with PowerPoint, even if they show
in the same lists! For recent versions of Windows, your custom templates are probably in
C:\Documents and Settings\[username]\Application
Data\Microsoft\Templates
![Save in: box showing folder tree to custom templates- c:\Documents and Settings\[username]\Application Data\Microsoft\Templates](dialog-saveas-template-savein.gif)
Your custom templates may be saved to a different location by default, if
you are using an older version of Windows or Office or if you upgraded from
an older version of Office. Of course, you can save a custom template to whatever
folder
you want. You will just have to remember where that was and navigate to it
when you want to use the template later. |
 |

Where you are:
JegsWorks > Lessons > Presentations
Before you start...
Project 1: PowerPoint Basics
Project 2: PowerPoint Formatting
Design Issues
Templates

 Content
Template Content
Template
 Design
Template Design
Template
 Save
As Template Save
As Template
Transitions & Animations
Summary
Quiz
Exercises
Project 3: Advanced PowerPoint
Search
Glossary
Appendix
|
|
What a Design Template Controls:
- Slide:
- Background of slide
- Color scheme
- Background
- Text & lines
- Shadows
- Title text
- Fills
- Accent
- Accent & hyperlink
- Accent & followed hyperlink
- Text:
- Font
- Font size
- Font color
- Bullet
- Line spacing
|
- Placeholders:
- Display/hide placeholders
- Title
- Bullet text
- Date/time
- Slide number
- Footer
- Size
- Lines (i.e. borders)
- Background of placeholder
- Slide transitions
- Animations
|
We will hold off on transitions and animations until the next lesson, but
you will work with most of the other features in the Step-by-Step below.
 |
Step-by-Step:Save As Template |
 |
What you will learn: |
to modify a design template:
color scheme
font and font size
bullet
to remove and restore placeholders
to format a placeholder - fill, lines, size, position
to copy placeholder formatting with Format Painter
to format text directly
to save as a custom template with a new name
to apply a custom template
|
Start with:
 Anniversary Trips Offer2.ppt from the previous lesson Anniversary Trips Offer2.ppt from the previous lesson
Master: Change Color Scheme
- If necessary, open Anniversary
Trips Offer2.ppt from your Class disk.
- Open the Masters view. [View | Master | Slide Master]
At the left are thumbnails of the title and slide masters for the two design
templates being used in this presentation.
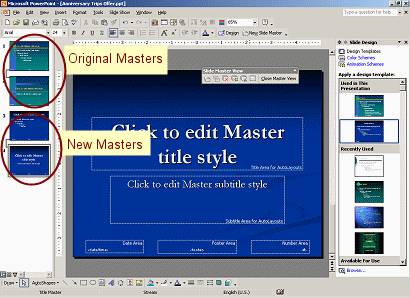
- If necessary, click on the bottom thumbnail at the left, the
new title master.
-
 In
the Task Pane, click on the Color Schemes
link at the top of the pane. Some standard colors schemes appear. Different
color schemes are available for different templates. The default
color scheme is at the top. The thumbnail of the color scheme being used right now
will have a dark
blue border. In
the Task Pane, click on the Color Schemes
link at the top of the pane. Some standard colors schemes appear. Different
color schemes are available for different templates. The default
color scheme is at the top. The thumbnail of the color scheme being used right now
will have a dark
blue border.
None of these schemes are better than what we already have. But you can modify
a color scheme in many ways. Let's make a change!
- If necessary, click on the color scheme with the dark
blue background, at the top of the pane. Unfortunately, these color schemes do
not have names.
- Click on the link
 at the bottom of the pane, Edit Color Schemes...
The dialog Edit Color Schemes appears with two tabs, Standard and
Custom. The Standard tab repeats the same schemes you saw in the Slide
Design task pane.
-
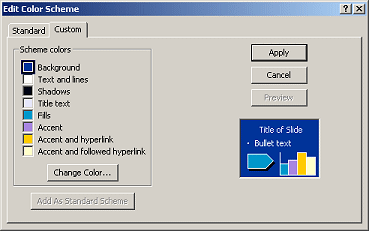 Click
on the Custom tab, if necessary. Click
on the Custom tab, if necessary.
There is a list of aspects of a slide for which you can choose a color. We are
interested only in the Background this time.
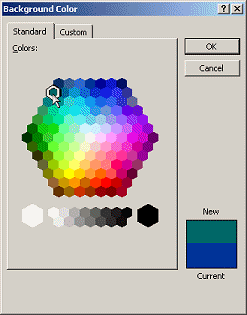
-
With
Background selected, click on the Change Color... button. A new
dialog appears with an interesting palette of colors in a hexagon shape.
-
Click on the first hexagon in the second row, a dark blue
green, and click on OK to close the dialog and then on Apply to
close the Edit Color Scheme dialog.
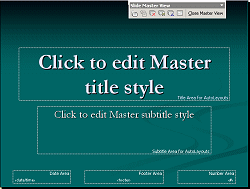
The
Title Master has changed to use the new background color, but it still has the
color gradient. Super cool. How do they do that!???
 Try to use one of the colors in the
color scheme when you format text or objects manually. That way, if you change
to a new color scheme, your formatting will change automatically to match. Try to use one of the colors in the
color scheme when you format text or objects manually. That way, if you change
to a new color scheme, your formatting will change automatically to match.
Master: Fonts
Changing the fonts in the Slide and Title Master will change all of the
slides automatically. Very slick feature!
-
 In the
new Title Master, click in the Title placeholder to select it. In the
new Title Master, click in the Title placeholder to select it.
-
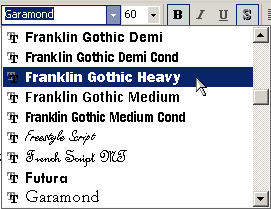 On the Formatting toolbar, change the font to
Franklin Gothic Heavy. On the Formatting toolbar, change the font to
Franklin Gothic Heavy.
 If you do not see Franklin Gothic
Heavy in the
list of fonts, choose a similar sans-serif font with a wide stroke, like
Arial Black. If you do not see Franklin Gothic
Heavy in the
list of fonts, choose a similar sans-serif font with a wide stroke, like
Arial Black.
-
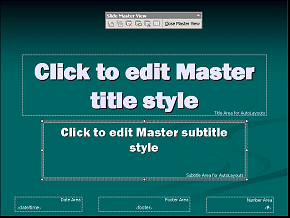 Similarly, change the font for the Subtitle placeholder to
Franklin Gothic Heavy. Similarly, change the font for the Subtitle placeholder to
Franklin Gothic Heavy.
-
 Switch
to the Slide Master. Switch
to the Slide Master.
- Click on the first thumbnail in the
Slides at the left.
- Click in the Slide Title placeholder to select it.
- Change the font to Franklin Gothic Medium
 Use Arial if Franklin Gothic
Medium is not available. Use Arial if Franklin Gothic
Medium is not available.
- Click the Bold button.
- Click in the Text placeholder with the bullet list items.
-
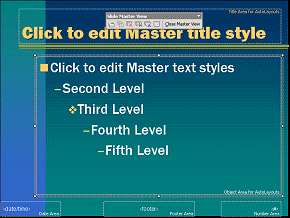 Click the placeholder's border to select all of the bullet
items at once. Click the placeholder's border to select all of the bullet
items at once.
- Change the font to Franklin Gothic Medium
 Use Arial if Franklin Gothic Medium
is not available. Use Arial if Franklin Gothic Medium
is not available.
- Change the font size to 36.
Master: Bullets
You are not stuck with the choices of bullets for the different bullet levels
in the template. You can change any of them to any symbol or picture that you
have access to. So many choices!
- If necessary, open the Slide Master.
-
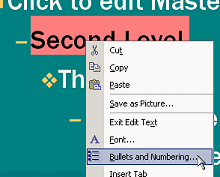 Right click on the second level of bullets, which has a dash as its
bullet shape. Right click on the second level of bullets, which has a dash as its
bullet shape.
-
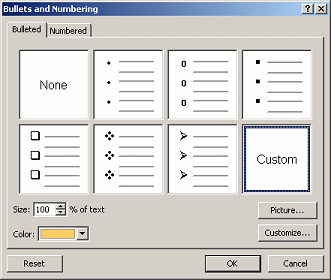 From the popup menu, select . If necessary click on the tab Bulleted. From the popup menu, select . If necessary click on the tab Bulleted.
- Click on
 the Customize button
or Character button at the bottom right. The
Symbol dialog appears. The Font box lists only fonts that PowerPoint recognizes as
symbol fonts. the Customize button
or Character button at the bottom right. The
Symbol dialog appears. The Font box lists only fonts that PowerPoint recognizes as
symbol fonts.
-
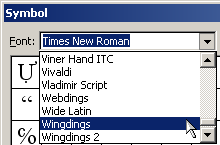 Scroll the Font list and select Wingdings. The
characters in this font appear in the dialog. Scroll the Font list and select Wingdings. The
characters in this font appear in the dialog.
-
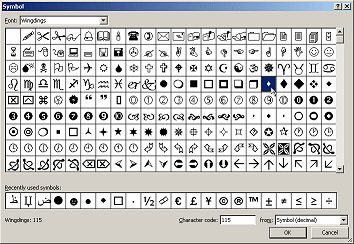 Select the smallest size
diamond. Select the smallest size
diamond.
 Your dialog may be smaller so that
the smallest diamond appears in a different row and column. Your dialog may be smaller so that
the smallest diamond appears in a different row and column.
-
 Click on OK to close the Symbols dialog and on OK
again to close the Customize dialog. Your new symbol is now what you will see
for all second level bulleted text on all slides. So cool! Click on OK to close the Symbols dialog and on OK
again to close the Customize dialog. Your new symbol is now what you will see
for all second level bulleted text on all slides. So cool!
Master: Remove Placeholders
PowerPoint shows all of the possible placeholders by default: Title, text,
date/time, slide number, and footer. If you don't want to see one of these
placeholders, you must delete
it from the Master. If you change your mind, to add it back you must use the
Master Layout checkboxes.
- If necessary, open the Master View again and select the
Slide Master.
- Click in the Date/Time placeholder at the bottom left of the Master
and press the DELETE key. The placeholder vanishes. So simple!
-
 Repeat for the Footer and Slide Number placeholders. Repeat for the Footer and Slide Number placeholders.
Let's change our minds and return the Footer, but this time you will put some
text into it.
Master: Restore Placeholder
Once a placeholder has been deleted, you can get it back from the Master
Layout dialog.
-
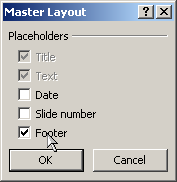 From
the menu select | .
The Master Layout dialog appears. The gray boxes are already being displayed. From
the menu select | .
The Master Layout dialog appears. The gray boxes are already being displayed.
- Click in the checkbox for Footer and click on OK.
The footer placeholder reappears with its default position, size, and
formatting.
-
 Click in the Footer area and type
PowerPoint Formatting - and then type your name. The text
will wrap since the placeholder is not wide enough to hold this much text
unless your name is really, really short! Click in the Footer area and type
PowerPoint Formatting - and then type your name. The text
will wrap since the placeholder is not wide enough to hold this much text
unless your name is really, really short!
 Only slides that use this
master will now show the footer. You must format all of the slide and title
masters if you want your footer on every slide. Only slides that use this
master will now show the footer. You must format all of the slide and title
masters if you want your footer on every slide.
 To
see your new footer, the dialog Headers and Footers must also select to show
the footer. Confusing! To
see your new footer, the dialog Headers and Footers must also select to show
the footer. Confusing!
Master: Format Placeholder
Placeholders are a special type of textbox, so they can be formatted with
fill color and lines. Their length and width can be changed, too.
- If necessary, select the footer placeholder on the Slide Master
again.
-
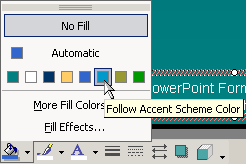 From the Drawing bar, open the Fill
palette and choose the Accent Scheme Color. From the Drawing bar, open the Fill
palette and choose the Accent Scheme Color.
-
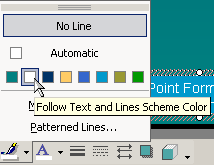 From the Drawing bar, open the Line Color palette and
select White, which is the color for Text and Lines in this color
scheme. Hmm. Guess this one was already chosen! From the Drawing bar, open the Line Color palette and
select White, which is the color for Text and Lines in this color
scheme. Hmm. Guess this one was already chosen!
-
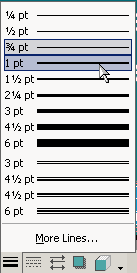 From the Drawing bar, open the Line Style palette and
select the 1 pt. solid line. From the Drawing bar, open the Line Style palette and
select the 1 pt. solid line.
-
 Right click on the
Footer placeholder and choose from
the popup menu. The Format AutoShape dialog appears with a number of choices, some of which you
could also do from the Drawing bar or manually. Right click on the
Footer placeholder and choose from
the popup menu. The Format AutoShape dialog appears with a number of choices, some of which you
could also do from the Drawing bar or manually.
-
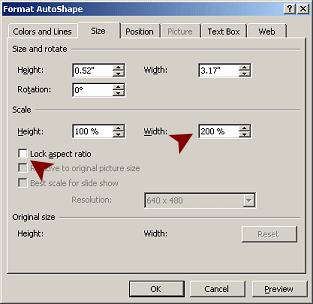 If necessary,
click on the Size tab. If necessary,
click on the Size tab.
- With the Lock Aspect box not checked, change the width to 200%.
The placeholder stretches out to the right, but is now not centered. There is
no automatic way to center a textbox!
- Click on OK to close the dialog.

- Drag the placeholder back to the left until it seems centered again.

  Center
a placeholder: Center
a placeholder:
When the ruler is showing
at the top [View |
Ruler], a dotted line shows where the mouse is. To check the centering of the
placeholder, position your mouse pointer over the
top center handle of the placeholder
 and see if the dotted
line is near the 0 on the
ruler. and see if the dotted
line is near the 0 on the
ruler.
Placeholder: Copy Formatting
Format Painter can copy formatting from one textbox or placeholder to
another. A great time-saver when you need to do the same formatting on different
slides or masters!
-
 Select the Footer
placeholder on your Slide Master. (The border should show as dots.) Select the Footer
placeholder on your Slide Master. (The border should show as dots.)
- Click
 the Format Painter button on the Formatting bar. The
mouse pointer changes to the Format Painter button on the Formatting bar. The
mouse pointer changes to
 the Format Painter shape. the Format Painter shape.
- Switch to the Title Master.
This master still has the default placeholders across the bottom.
-
Click on the Footer placeholder.
The placeholder formatting is copied.
-
 Use
Format Painter again on the second Title Master (the bottom thumbnail in
the Slides pane). Use
Format Painter again on the second Title Master (the bottom thumbnail in
the Slides pane).
Surprise! The formatting is not the same as on the Slide Master! What
happened??
When you selected the blue for the footer background for the Slide Master, you
selected from the colors in the Color Scheme. That blue is the color for Accents,
as the popup tip showed. In the color
scheme for the Title Slide, Accents are lavender, not blue. So Format Painter
did its job right, just not the way we expected.
Not to fear. It is
easy to get the color we meant to use.
-
 With
the footer still selected,
open
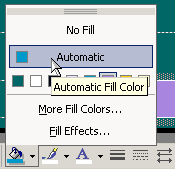
the Fill palette. Our blue is the Automatic color! Click on Automatic.
TaDa. The background is blue at last. With
the footer still selected,
open
the Fill palette. Our blue is the Automatic color! Click on Automatic.
TaDa. The background is blue at last.
 If the color you want is not in
view, click the link More Fill Colors... to get to the palette of colors. If the color you want is not in
view, click the link More Fill Colors... to get to the palette of colors.
- Type the same text as before: PowerPoint
Formatting - your name
- Close the Master View.
- Run the slide show again.
 Footer
does not show: From the View menu select Headers and Footers, the Slides
tab. Check the box for Footer. Do not type anything in the textbox. You put
the text in the master. Footer
does not show: From the View menu select Headers and Footers, the Slides
tab. Check the box for Footer. Do not type anything in the textbox. You put
the text in the master.
 Evaluate: Does this new background color
blend
well with the other slides? Do the new fonts and font sizes work well? How
does the new bullet shape do? Do you like the footer? Is it annoying? What
would you change about this presentation to improve it?? Evaluate: Does this new background color
blend
well with the other slides? Do the new fonts and font sizes work well? How
does the new bullet shape do? Do you like the footer? Is it annoying? What
would you change about this presentation to improve it??
- Open the dialog Headers and Footers from the View menu. Uncheck
the box for the Footer and then click Apply to all.
Now the footer will not show on the slides, but it is still part of the
Master.
Slides: Fonts
Sometimes you want different formatting for just a couple of
slides or even just certain words. It's easy to make formatting changes directly on the slides.
Such changes are not saved to the template.
PowerPoint does not have a way to remember your formatting for just words or
phrases. There are no character styles like Word has. Formatting from a Master
is applied to a whole placeholder. At least the manual ways of formatting still
work!
If you want to use a different format on more than just one
slide, you might want to create an additional master.
-
View Slide #9: What Went Wrong in
Normal view. The text is running close to the bottom of the slide.
-
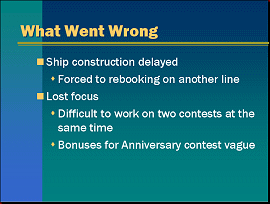 Click in the bullet list area and then click the border to
select the text placeholder. Click in the bullet list area and then click the border to
select the text placeholder.
-
If necessary,
change the font size to 32.
-
Select the word "two" in the line "Difficult to work on
two contests..."
-
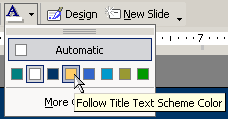 Change
the color to gold using the Font Color button's palette. Change
the color to gold using the Font Color button's palette.

The popup tip over the Gold color square does not name the color as
usual. Instead, it tells you the what part of the current color scheme
the color is, Title Text in this case. Is this helpful?
-
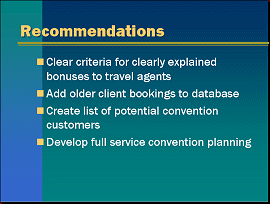 If
necessary, on Slide #10: Recommendations
change the font size of the bullet list to 32. If
necessary, on Slide #10: Recommendations
change the font size of the bullet list to 32.
-
 From
the menu select |. Use the name
Anniversary
Trips Offer3.ppt to save your changes as a new file on your Class
disk. From
the menu select |. Use the name
Anniversary
Trips Offer3.ppt to save your changes as a new file on your Class
disk.
 How to handle a full Class disk
Save As Custom Design Template
You can save your changes to your Masters as a new template that you can use
later.
 Be sure you saved your
presentation first! Be sure you saved your
presentation first!
Where will it be saved? That depends!
It depends on the version of Office you are using, the operating system, and on
whether you have enabled different logons for different people for the
computer. Confusing!
- From the menu, select |. The Save As dialog appears.
- Scroll the list of files types in the Save as
type: box and select
Design Template (*.pot). The Save
in: location changes automatically to where PowerPoint expects to see
custom templates. This is not necessarily where the original templates are!
 Save location remembered
temporarily: If you save to a different location and then start to use
Save As again for this template, the dialog will not bring up the standard location. It
remembers where you saved before. Once you close the presentation or else
start a new one, then the dialog goes back to the standard template location.
It's useful but scrambles your brain until you figure out what is going on! Save location remembered
temporarily: If you save to a different location and then start to use
Save As again for this template, the dialog will not bring up the standard location. It
remembers where you saved before. Once you close the presentation or else
start a new one, then the dialog goes back to the standard template location.
It's useful but scrambles your brain until you figure out what is going on!
The default name for the template is the same as for the presentation itself.
That is probably not a good plan!
- Change the File name: box to read
Anniversay-xxx.pot, but replace the xxx with
your own initials.
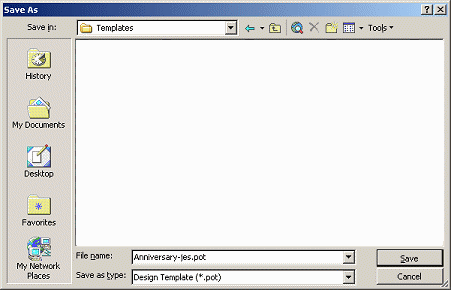
Your dialog may show previously saved custom templates.
-
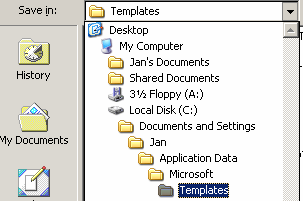 Open the Save in: list at the top of the
dialog to see where your template is going to be saved. Your PowerPoint may
show a different location than the illustration at the right, which is from a
WinXP computer and Office XP. Open the Save in: list at the top of the
dialog to see where your template is going to be saved. Your PowerPoint may
show a different location than the illustration at the right, which is from a
WinXP computer and Office XP.
- Write down the full path to the custom templates. For the
illustration the path is:
C:\Documents and Settings\Jan\Application
Data\Microsoft\Templates
-
 Click on Save. Click on Save.
The dialog closes.
The title bar of your window changes to show
the template name instead of the presentation's! Did you expect that?
In most programs when you use Save As, the document on display changes
to be the one you just saved.
The Normal view still shows all the slides and
text that you created before, so they must be part of the template. Will those
parts be applied if you apply this design template to a new
presentation?? No! Just the masters.
 If you keep working, any
changes you made now would be saved to the template not to your
presentation! You will have to open the presentation back up to work on it
some more. If you keep working, any
changes you made now would be saved to the template not to your
presentation! You will have to open the presentation back up to work on it
some more.
- Close the template but do not close PowerPoint.
Apply Custom Template
-
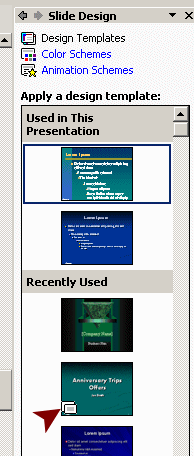 Open a new blank presentation by clicking Open a new blank presentation by clicking
 the New button on the
toolbar. the New button on the
toolbar.
- Open the Slide Design task pane to Design Templates. Your
new customized template may show as a Recently used template. Or it may be in
the section Available for Use.
  The thumbnail of the template has
an icon at the bottom left of two overlapping slides. This indicates that
the template has multiple slide masters. Smart! The thumbnail of the template has
an icon at the bottom left of two overlapping slides. This indicates that
the template has multiple slide masters. Smart!
But what if it has been too long since it was used. How do you find it again?
Depending on where it was saved to, it may be one of the thumbnails in the Design Templates pane.
These are apparently arranged in alphabetical order, by location. What if you
cannot find it there either?
- Click
 the Browse...
link at the bottom of the pane. The dialog Apply Design Template appears.
PowerPoint brings together a list of templates that may actually be in
different folders! Your custom template should be in this list. The templates that came with
this version of PowerPoint are in the folder Presentation Designs. You might
see other custom templates along with the one you just saved. This could work out well! the Browse...
link at the bottom of the pane. The dialog Apply Design Template appears.
PowerPoint brings together a list of templates that may actually be in
different folders! Your custom template should be in this list. The templates that came with
this version of PowerPoint are in the folder Presentation Designs. You might
see other custom templates along with the one you just saved. This could work out well!
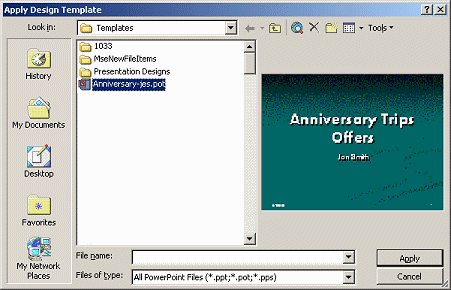
If you saved your template to a folder of your own choice, you can navigate to
it from here. Whew! So many variations can be confusing!
- Select your custom template and click on Apply.
A message box tells you that there are multiple masters in this template.
PowerPoint will apply the first one automatically. Click Yes to include all of
the masters from your custom template. The initial slide of the new
presentation is formatted with your design template.

- Close your new presentation without saving it.
Save As Custom Content Template
Once you have saved an existing presentation as a design template, you
can add it to the list of Content Templates that appear in the AutoContent
Wizard. Open the AutoContent Wizard and click the Next button. Select the
category that you want your template to appear in. Click the Add... button
and select your template.
You're done! You can Cancel or continue with the wizard to create a new
presentation that will show all of the text and images in your slides. So
easy, when you know how!
   
~~ 1 Cor. 10:31 ...whatever you do, do it all for the
glory of God. ~~
Last updated:
30 Apr 2012 |

