
Jan's Working with the Web
Interface: Options
Your browser has many different option settings that affect the way your browser behaves. The default settings are fine for most of the option settings.
In the Step-by-Step section that follows, you will look at a few options. But new versions and updates may add features or change the layout. It's a quickly moving target! At least you will become familiar with some of the features of browsers in general and yours in particular.
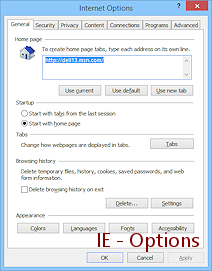
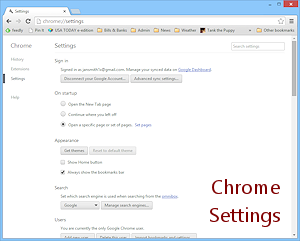
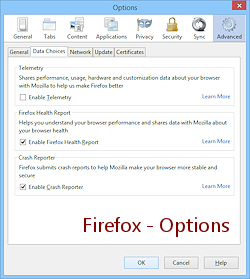
Dialog: Internet Options (IE); Settings (Chrome); Dialog Options (Firefox)
Home Page:
Sets what page will be displayed when you click the Home button ![]()
![]()
![]() .
.
A house symbol has become the
standard symbol for a Home button.
The default home page is normally a page from the browser's own web site or a related search page. (Surprised?) Recent browsers may allow you to open more than one page when you click Home or when the browser starts up or both.
Examples of Options dialog for multiple 'home' pages:

IE allows multiple Home pages.
Chrome allows multiple pages at startup but only one Home page.
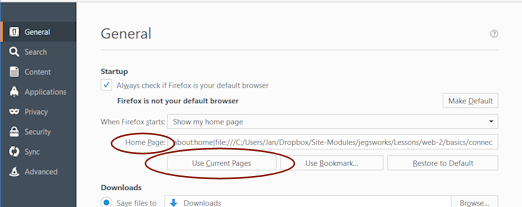
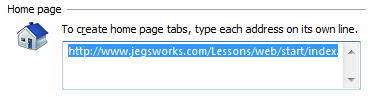
Firefox allows multiple pages as Home Page and loads those at start up.
A portal site is sometimes a good choice to use as a home page. A portal contains services and links for the most common Internet tasks for the audience for which the portal is designed.
A personal portal usually shows news headlines, local weather forecast, sports scores, a search box, web-based email, and whatever else they think you might want. These pages can get quite messy since they try to do so many different things. Many sites let you remove the parts you don't want (stock market quotes, horoscope, Quote of the Day) and add in features that other users might not want (baseball scores, health news, Sudoku of the Day).
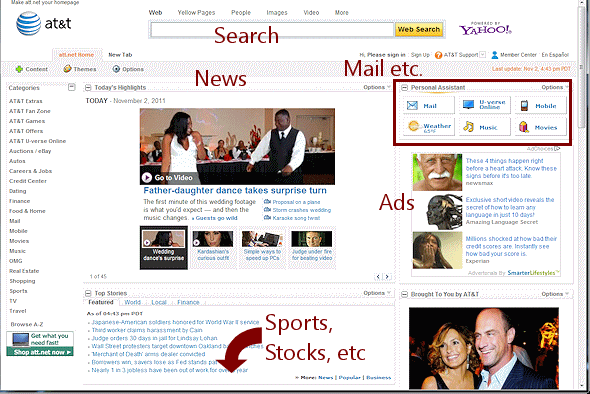
Example: Portal from an ISP (ATT.net)
Page is two
screens tall. You can pick which parts to show.
A corporate or school portal site is for
a particular company, school, or university. A company portal would offer access
to company databases, reports, email, and calendars.
Colleges and universities often have a portal page with links to the areas that students often use - admissions info, course catalog, financial aid, course web sites, student email account, list of faculty email addresses, school calendar. A portal page for faculty and staff would have links to payroll, human resources, class rolls, reporting of grades, email.

Example: School Portal (Roane State
Community College)
Used as the default home page on school computers
Raider Net --> Log in (student) -->
Register for courses, View financial aid status, View business office
account
Raider Net --> Log in (faculty) --> View courses and class
lists, Submit grades,attendance, View paycheck stub
Momentum --> Log in
--> Access web sites for your courses, View assignments, Submit papers
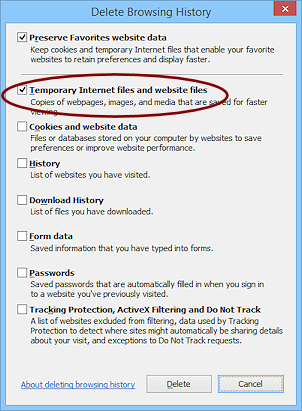
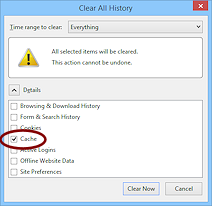
Browsing Data:
Temporary Internet Files or Cache:
These are the files that your browser must store on your hard drive
to display a web page - the HTML file, images, videos, sounds, linked style sheets and
linked scripts. The page will display faster
on a second visit if the files are already in the cache on your
hard drive. You normally want to keep these files around for a few days
at least. But, too large a cache will slow down your browser. It can take longer
for the browser to check what it already has than it would have taken to just download
all of the pieces again.
![]() Slow loading: If the browser seems to be getting slower
and slower to load pages, cleaning out
the Temporary Internet files/cache may speed things up.
Slow loading: If the browser seems to be getting slower
and slower to load pages, cleaning out
the Temporary Internet files/cache may speed things up.
To delete cache:
![]() IE:
IE:
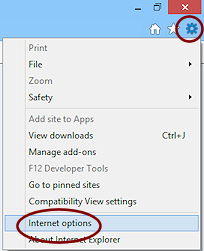
![]() > Internet Options > General tab > under Browsing History - Delete... > Select Temporary Internet files and website files
> Internet Options > General tab > under Browsing History - Delete... > Select Temporary Internet files and website files
![]() Chrome:
Chrome:
![]() > Settings > Advanced Settings > Privacy > Clear browsing data... > Select Cached images and files
> Settings > Advanced Settings > Privacy > Clear browsing data... > Select Cached images and files
![]() Firefox:
Firefox:
![]() > History > Clear recent history... > Select Browsing and download history and select a time frame
> History > Clear recent history... > Select Browsing and download history and select a time frame

Delete/Clear browsing data: IE, Chrome, Firefox
Choose carefully what to delete:
Recent browsers let you pick and choose what to delete. You do not normally
want to delete all of the temporary files, even if a
tech support person suggests it! Push them to tell you how to identify the
parts (usually cookies) that really need to be deleted to solve your
problem.
History/Browsing History:
A
list of the web pages you have visited.
Download History:
A list of the files you have downloaded, including PDFs. These are NOT
the files needed to view a web page.
Passwords:
Recent browsers may
offer to remember your login and password for sites that use those. It's
tempting! Usually that would be a bad idea!! But if you accidentally
accepted this offer, you can wipe out the record by deleting saved
passwords.
Form data/Autofill form data:
Lets the browser fill in text boxes for your address and phone
numbers automatically.
Cookies:
Records of choices you made about how you wanted the site
to behave or what parts you have seen. A bank site for example, can use a
cookie to 'remember' your computer so that you do not have to answer the
security questions each time you log in. A site with rotating ads can use a
cookie to remember which ads you have already seen.
![]() Tech Support Overkill: Sometimes a web site will stop behaving correctly and tech support will tell
you to delete all of your cookies and browsing history. Yikes! That is totally not necessary.
You just need to delete the data saved about that web site.
Specific sites in your browsing
history are easy to remove. It may not be as easy for cookies. Some companies carefully label their cookies but others
use names are do not help. I have yet to find a tech support person who knew
which cookies were actually involved. Grrrr! Sometimes I could figure it out myself.
Tech Support Overkill: Sometimes a web site will stop behaving correctly and tech support will tell
you to delete all of your cookies and browsing history. Yikes! That is totally not necessary.
You just need to delete the data saved about that web site.
Specific sites in your browsing
history are easy to remove. It may not be as easy for cookies. Some companies carefully label their cookies but others
use names are do not help. I have yet to find a tech support person who knew
which cookies were actually involved. Grrrr! Sometimes I could figure it out myself.
![]() Find
which cookies are from a site
Find
which cookies are from a site
You can search a list of cookies for the site name, IF the site is cooperative about how it names its cookies and IF the browser lets you view the list of cookies. Chrome and Firefox have a way to see cookies linked to a particular site. If the page included advertising, you will probably see sets of cookies from the company that manages the ads, not from the company being advertised.
To view all cookies:
![]() IE:
IE:
![]() > Internet Options > General tab > under Browsing History - Settings > View files > scroll to items with names like cookie: yourusername@login.live.com/
> Internet Options > General tab > under Browsing History - Settings > View files > scroll to items with names like cookie: yourusername@login.live.com/
![]() Chrome:
Chrome:
![]() > Settings > Advanced Settings > Privacy > Content settings > All cookies and site data
> Settings > Advanced Settings > Privacy > Content settings > All cookies and site data
![]() Firefox:
Firefox:
![]() > Internet Options > Privacy tab > History section > Link: remove individual cookies
> Internet Options > Privacy tab > History section > Link: remove individual cookies
To view cookies for a particular site in ![]() Chrome: View a page from the site in the browser.
Chrome: View a page from the site in the browser.
[Finding this sort of neat
feature is one of the things that makes writing these lessons fun!] Right click the icon at the left of the URL in the Address bar. A popup shows how many cookies there are. Click on 'Show cookies and site data' to see a dialog with a list of cookies. These are grouped by the originating URL.
Plug-Ins, Add-Ons, Extensions
Your browser needs help to show more than text and simple images. Videos and interactive pages often need to use additional programs. These useful extras need to be updated regularly to keep your computer as safe as possible.
Other types of extensions include special toolbars and special buttons to access other sites, like searching (Google, Bing), social networking (Facebook), shopping (eBay, Amazon), or news (CNN, FoxNews, CBS).
Showing Plug-Ins, Add-Ons, Extensions:
If you do not see a toolbar or add-on button that you expect at the top of your browser window, it may have been disabled. Or the browser may be set to not show any of these enhancements. You can also hide any that you don't expect to use.
![]() IE: (2 steps)
IE: (2 steps)
![]() > Internet Options > Advanced > Allow third-party extensions.
> Internet Options > Advanced > Allow third-party extensions.
![]() > Manage add-ons
> Manage add-ons
Opens a dialog listing all of your
extensions and add-ons. You may disable or enable them individually.
![]() Chrome:
Chrome: ![]() > Settings > Extensions
> Settings > Extensions
Opens
a web page listing all of your extensions and add-ons. Enable/disable as you
please.
![]() Firefox:
Firefox: ![]() > Add-ons
> Add-ons
Opens a web page showing types of extras - Extensions, Appearance themes,
Plug-ins. Each item can be enabled or disabled separately.
| |
Step-by-Step: Options |
|
| What you will learn: | to open a second browser window to view options for the browser to change the Home page to delete Temporary Internet files to view Plug-ins/Add-ons/Extensions |
Start with: ![]()
Open Second Browser Window
Clearly you have a browser window open already in order to read these directions! Your first task is to get another copy of the browser open. As you might suspect, Windows and your browser combine to offer several ways to do that!
-
 Experiment: New
Browser Window
Experiment: New
Browser Window
-
Open a new browser window using each method that is available on your computer:
- Start menu or Start screen
- Desktop icon
- Right click pinned icon on Taskbar and choose 'New Window' or 'Open new window' or click on the program's name in the menu.
Which do you prefer?
-
Tabs: How
many tabs open and load a page at start up?
Probably the same as when you opened the first window. This is a new feature. Previously only a blank tab opened when you opened a second new window. - Open link in new window: Right click on a link or on a shortcut in your Favorites or Bookmarks bar. On the context menu, click on 'Open in a new window'. You should also see 'Open in a new tab', which is usually more convenient than having an extra window.
-
Drag tab: Click on the page's tab in the browser window. Drag down until the tab releases from the browser window, creating a new window. Drop.
- Close any extra windows until you have only two open - one for this page and one other.
-
View Options/Settings Dialog
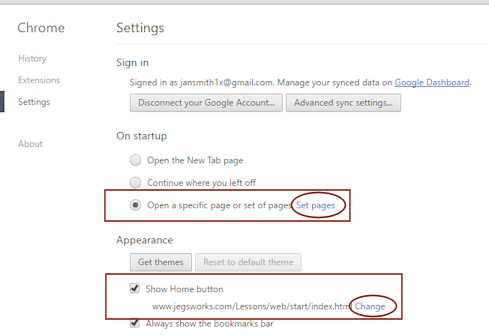
Your browser will let you change the Home page. Some browser versions allow you to pick multiple pages that will open at start up of your first browser window.
-
In the second browser window (not this one!), click the Home button,


 .
.
What loads? This is your Home page or pages. -
Open the Options dialog for your browser by ...
 IE:
IE:  > Internet Options > General tab
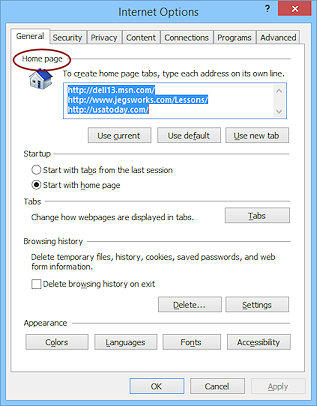
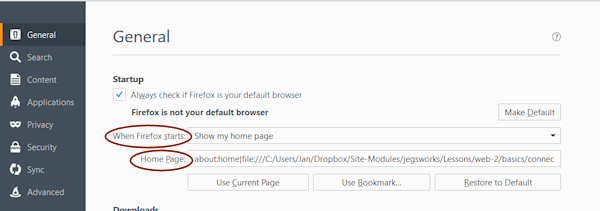
The Internet Options dialog opens with several tabs. The General tab has a section about the Home page.
Note: IE lets you list several pages which will open when you click the Home button or when you start IE.
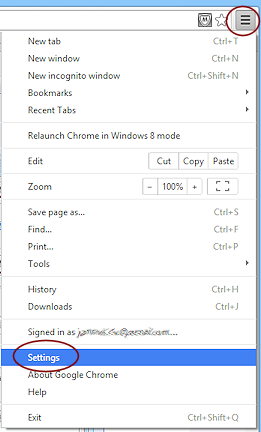
 Chrome:
  > Settings
 Chrome lets you set several pages to open when the browser starts, but you can set only one page to open with the "Home" button. That one page does not have to be any of the "On startup" pages.
 Firefox:
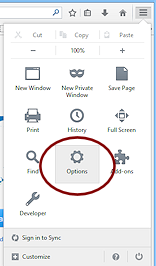
 > Options > General
OR
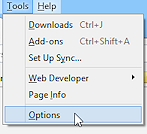 If the Menu Bar is showing, Tools > Options
The Options dialog opens. The General page has the settings for Firefox's startup and Home pages.
-
Experiment: What
Options
Explore the dialog. Look at each tab or page. What settings are here? Do you see a need to change any of them?
When you are ready to continue, return to the General tab or Settings page.
Change Home Page
You will be changing the Home Page temporarily to one of the pages on this site.
- Make a note of what the current Home Page settings are if you wish to restore them
later.
- Type the URL for a new home page in its text box:
http://www.jegsworks.com/Lessons/web-2/start/index.html IE: Delete any existing links in the Home page box and type in the new URL. Click on the OK button. When IE starts or when you click the Home page button, this page will appear.
 Chrome: Remove any existing startup pages by clicking the X at the right that appears when you hover over the link. Then type the new link into the 'Add a new page' box. Click on OK. Next click in the box 'Show Home button' and then on 'Change'. Type in the new URL again. Now the Home button will show in the Chrome window and the same page will show when Chrome starts up and when you click the Home button.
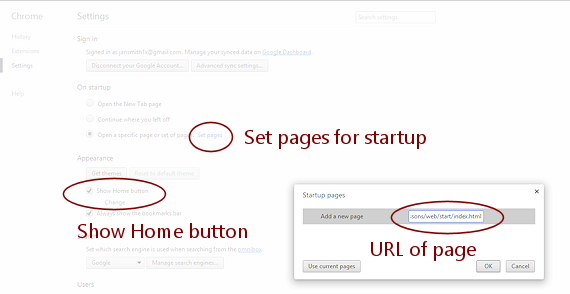 Firefox: Replace any existing link in the Home Page text box with the new URL. Click on OK. When Firefox starts or when you click the Home button, this page will appear.
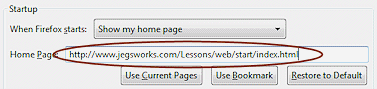
Alternate for offline:
If you put the resource files for these lessons on your hard drive (which you need to do if your computer is not online), you will want to use the path to the file on your hard drive.
For example, C:\My Documents\complit101\web-2\Start\index.html The precise path depends, of course, on where you put the files. - Close and return to the browser:
IE: Click the OK button to close the dialog. Chrome: Click out of the text box. Firefox: Click the OK button to close the dialog.
-
Click the Home button,
.
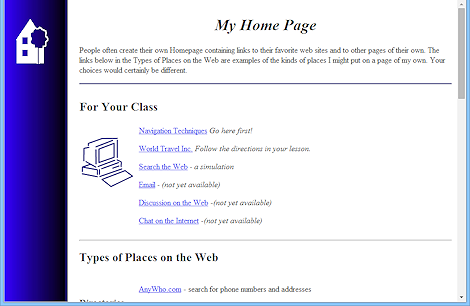
A page opens that is an example of a very basic personal Home page. It includes links to various resource files you will be using in the following lessons. If this computer is shared with others, be courteous. When you finish working with your browser for the day, you should restore the previous Home page or at least the default. Good manners, always!
Delete Temporary Internet Files/Cache
Next we will look at the settings for your temporary Internet files, also known as the cache. From time to time you may need to delete some of these files to speed up the loading of web pages. But you want to be very careful about what you delete. You will not be deleting anything this time!
-
Open the Options dialog again:
IE:
> Internet Options > General tab > Delete... buttonA new dialog opens that shows what things can be deleted that the browser remembers.
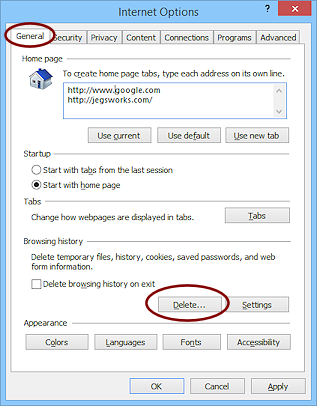
IE does a good job of explaining what the choices mean.
Click on Cancel and then on Cancel again to close out of the Options dialog.
 Chrome:
> Settings > Tools > Clear Browsing Data A new dialog opens that shows what kinds of data you can delete. Chrome lets you choose a time interval, too, which can be quite helpful.
Click on Cancel to get back to the Settings page
Alternate method:
 CTRL + SHIFT + DELETE
Alternate method: Customize button > Settings > Advanced settings > Privacy > Clear browsing data...
Firefox:
> Options >
Privacy tab
OR
if the Menu Bar is showing,
Tools > Options > Privacy tab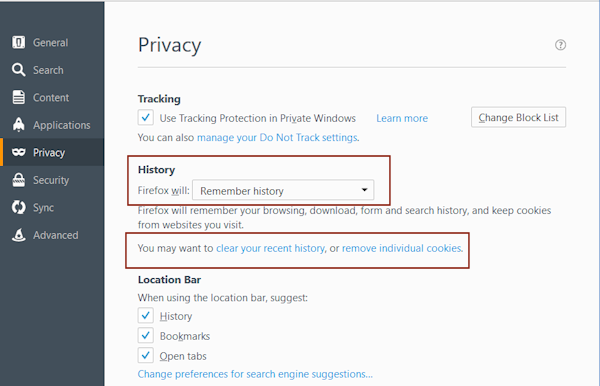
Inspect the choices in this tab carefully. Try them out to see where you can choose what. Do not remove any of the history or cookies at this time.
Firefox offers you a lot of control, but only if you know how to dig down to it!
Click on Cancel to close the dialog.
View Plug-Ins, Add-Ons, Extensions
Recent browsers have made it much easier to find out what extras have been installed for your browser and to enable or disable them. What you install in one browser is usually not installed for other browsers on your computer. Each browser may have to have its own version of the extra program. Let's go find out which ones your browser has.
- Inspect the list of the extensions, add-ons,
plug-ins for your browser.
IE: > Manage add-ons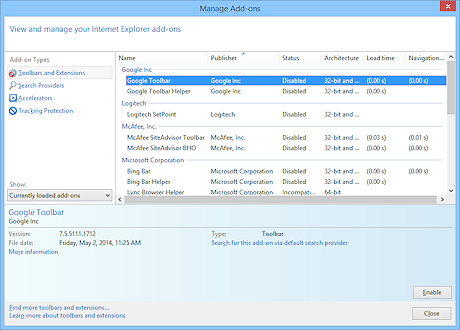 A new window opens. After a pause to gather the data, the window
shows a list of all add-ons, whether they are currently enabled or
not, as marked in the Status column.
A new window opens. After a pause to gather the data, the window
shows a list of all add-ons, whether they are currently enabled or
not, as marked in the Status column.
To enable/disable: Select the toolbar or extension and click the button in the bottom area: Enable or Disable.
Notice that IE has four types of Add-ons. Look at all of them, just so you will know what is there.
Chrome: > Settings >Extensions 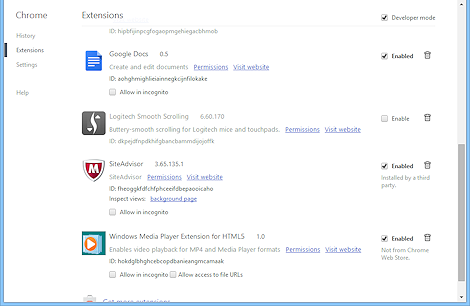 The
Extensions page lists all the extensions that are installed. The ones that are currently disabled
are in gray.
The
Extensions page lists all the extensions that are installed. The ones that are currently disabled
are in gray.
To enable/disable: Check or uncheck the box at the right.
The Remove button (trash can icon) uninstalls the extension.
Firefox: > Add-ons > ExtensionsOR if the Menu Bar is showing, Tools > Add-ons > Extensions
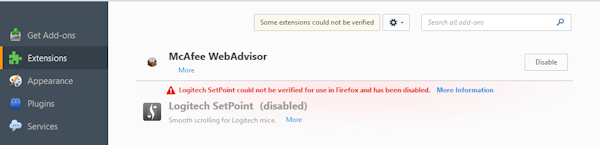
A new dialog appears in the browser with several pages. Firefox breaks the extras available into three categories - Extensions, Appearance, and Plugins - which connect Firefox to other programs.
To enable/disable: Click the button that appears by the item in the list.View each of these categories and see which can be removed or disabled or enabled.
- Close the page or dialog you used to view the extensions.
Where do these add-ons/plug-ins/extensions come from?
- Needed for Function:
Some web pages prompt you to download and install a plug-in for part of the web page to work, like a video or interactive part that requires a plug-in like Flash, Shockwave, or Silverlight. - Offered for Convenience:
A web site or program might suggest that you download a toolbar or extension so you can easily access the program or the site's features, like eBay, Facebook, CNN, or DropBox. - Unexpected Tag-Along:
Some programs automatically install tag-along programs or toolbars without telling you what is going to happen. Very rude! Polite programs have a way for you to opt out of these extras, but you must pay attention to the installation screens and check the correct boxes. For example, Apple's QuickTime plug-in may install iTunes also.
|
|
| © 1997-2017 Jan Smith All Rights Reserved |
Site Map What's New |
Privacy Policy Terms of Service Copyright Acknowledgements |
~~ 1 Cor. 10:31 ...whatever you do, do it all for the glory of God. ~~
Last updated: March 22, 2017