Browser
Basics:
Printing

español![]()
Did you want IE9+, Chrome, Firefox; Notepad? ![]()
Browser
Basics:
|
| |||||
|
|
||||||
Printing Web DocumentsMost web pages are not designed with printing in mind. The printed web page may be surprisingly different from what you saw on the screen. Text may wrap differently on paper than on the screen. Part of a wide page may not be printed at all.
Under the default settings the background color or graphic will not be printed. This is usually good. Printing in black and white or grayscale may lose information that was conveyed by colored text.
|
Project 1: Browser Basics
Connecting Search Glossary Appendix |
||||||||||||||||||||||||||||||||||||||
Alternate version for print?Some web sites provide a separate file in a word processing or PDF (Portable Document Format) file to download for printing, at least for some pages. Other sites provide a link to a separate printer friendly web page. Such a page would leave out navigation bars and sidebar information. It's a big difference, as the example below shows. Example of link to friendly version:
Problems with printing Web pages
Dialogs for printing Web pagesYou have a choice of ways to mess up your print job! There are three different dialogs that affect how your print job is handled by the printer: Print, Page Setup, and Printer. Orientation and Page Size show up in two different dialogs. Are you experienced with printing other kinds of documents? Then you will not be surprised by much here. The Print dialog, however, has some features that you should look at. Print dialog
| |||||||||||||||||||||||||||||||||||||||
Printer |
The Print to file check box lets you save a copy of a document that is ready to print on the selected printer. It does not print at this time, but is saved in a file. The Properties button opens the printer's own dialog, where you
have other choices, as shown below.
| ||||||||||||
| Copies |
Choose how many copies you want. For documents with several pages, when you print more than one copy, you can choose whether to print all copies of a page together or to print the whole document through and then go back and print the second copy all the way through. This second way is called collating. It will save you a lot of paper cuts and time since you won't have to put the pages in order yourself. |
||||||||||||
| Print Range |
|
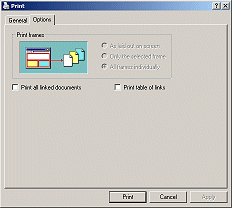
![]() IE6
has a separate Options tab for the last three
items above.
IE6
has a separate Options tab for the last three
items above.
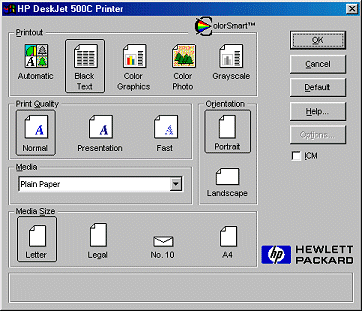 | | opens a dialog that adjusts settings
for how the printer prints. Each printer
company designs its own dialog that offers choices that fit the particular
printer. You will generally see the choices like those listed
here somewhere in the printer's dialog.
Colors: Black text, grayscale, color photo, or color graphics. Gray scale means all colors will be printed in shades of gray.
Quality: normal, draft or fast (less ink, less quality), presentation or high (most ink, best quality)
Orientation: portrait or landscape
Media: plain paper, glossy paper, cardstock, transparency, etc. It makes a big difference what you choose here, especially for slick paper or transparencies.
Media Size: The actual size of what you are printing on - letter, legal, normal envelope (No. 10), A4, etc.
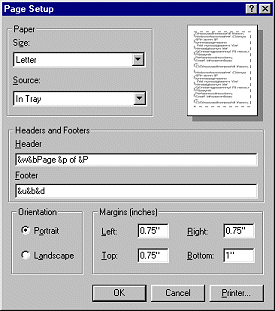 | opens a dialog that
controls many features of the page layout. Unfortunately, it is not as user
friendly as we would like. There are no nice icons to help you see
what you've chosen. In the Headers and Footers section you must
use special codes.
Paper Size - Letter is the default choice.
Paper Source - Tray or Automatic Feeder will be the default choice.
Paper Orientation - Portrait (vertical) or Landscape (horizontal)
Margins - Left, Right, Top, and
Bottom. Most printers can print with margins of .5" of the top and bottom and of
.25" of the left and right. Save paper! Use small margins.
 Header and Footer of the
pages. You can type into the text boxes whatever you want to print in the
header or footer of each sheet of paper.
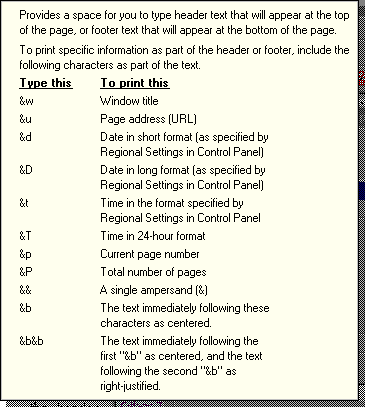
Unfortunately, you must use codes to automatically include useful information like the URL, page number, and total number of pages.
![]() Where is the list of codes? In the Page Setup dialog, put your
cursor in the text box for the header or the footer and press the F1 key
on your keyboard. The list of codes
shows as a popup tip.
Where is the list of codes? In the Page Setup dialog, put your
cursor in the text box for the header or the footer and press the F1 key
on your keyboard. The list of codes
shows as a popup tip.
Also, you could click the
![]() button
in the dialog title bar and then click on the header or footer text box.
button
in the dialog title bar and then click on the header or footer text box.
The default settings in Page Setup add text to the top and bottom of the page.
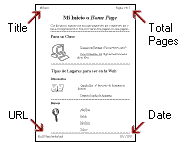 |
Top left: title of the page (the words on the title bar when you view the web page) Top right: the page number and the total number of pages it takes to print the web page. Bottom left: URL Bottom right: date in short format. |
~~ 1 Cor. 10:31 ...whatever you do, do it all for the glory of God. ~~ |