|
The idea of HTML tags is easy to
understand. You mark the logical parts of your document. But, when you put a
bunch of text and tags together to make a whole page, things start looking
complicated!
To make things worse, tags often have more stuff in
between the < and > than just the name of the tag. Sometimes there's a LOT
more.
What does a tag look like?
A simple case is the P tag (marking paragraphs). It often
includes the alignment for the paragraph, like <p align="justify">.
Such extra parts are called attributes.
They set various characteristics for the tag. Each attribute has two or more
possible values.
General form for a tag with attributes is like:
<tagname
    attribute="value">
In our example above, the attribute is ALIGN and there
are four possible values: LEFT, RIGHT, CENTER, and JUSTIFY.
You will now look at a very simple web page and figure out what each part
of the code is doing.
|
|

Where you are:
JegsWorks >
Lessons > Web
Before you start...
Project 1: Browser Basics
Project 2: HTML Basics
HTML Code
 Code
Example Code
Example
About HTML
What You Need
Code by Hand
WYSIWYG
FrontPage/FPX
Images in HTML
Formatting
Tables
Print
Convert
Summary
Quiz
Exercises
Search
Glossary
Appendix |
|

|
Step-by-Step: Look at the Code
|
|
| What you will learn: |
to view source code
to identify HTML tags in use |
Start with:

View Source Code
- Open a new browser window.
- If you are connected to the Internet, type the path
http://www.jegsworks.com/Lessons/web/start/html.htm
in the browser's Address box.
ORIf you installed the resource files on your hard drive to
the default location, you can type
c:\My Documents\complit101\Start\html.htm in the browser's
Address box.
This is a very simple page with one image, three lines of text, a
footer, and a background image.
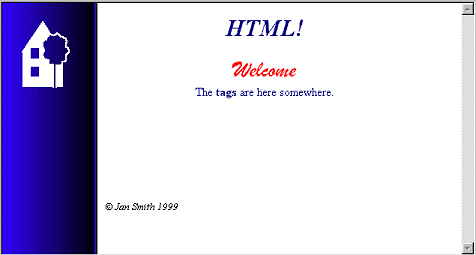
  The
browser will display the text "Welcome" exactly as it is shown on the
illustration above only if your computer has the font Brush
Script MT installed. Otherwise, the browser's default font is used. IE
for Windows uses Times New Roman, for example. In the illustration at
the right, Brush Script MT is used for the first Welcome and Times New
Roman is used for the second. When you look at the code, you will see
what the tag is doing to choose a font. The
browser will display the text "Welcome" exactly as it is shown on the
illustration above only if your computer has the font Brush
Script MT installed. Otherwise, the browser's default font is used. IE
for Windows uses Times New Roman, for example. In the illustration at
the right, Brush Script MT is used for the first Welcome and Times New
Roman is used for the second. When you look at the code, you will see
what the tag is doing to choose a font.
- From the Internet Explorer menu select
| to show the
source code (the HTML code) in Notepad. You will be able to see
the basic features of an HTML document.
- Inspect the code. Looks like quite a mess! So many lines to
display such a short document!
You will see many of the tags you learned
about in the previous lesson. Some of them have a lot more between the <
and > than the tables showed!
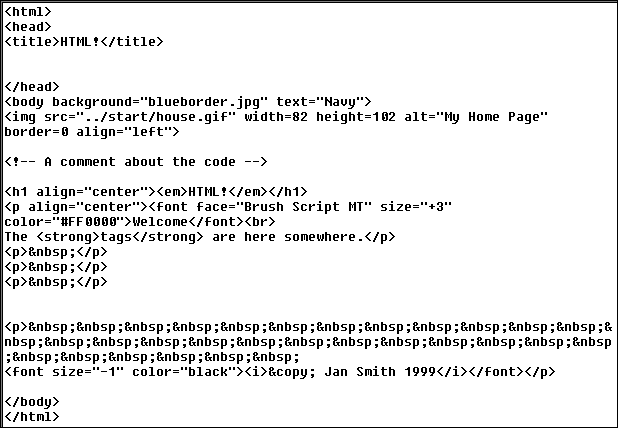
- Compare these lines with what is displayed in the
browser. Can you tell what each code line is doing? Some do not seem to
do anything! But all are important. (It may be easier to read if you
print the code from Notepad.)
The key feature of HTML is the words between the symbols < and >.
These are the tags. Some tags give information
to the browser but do not show anything on the screen.
- Open taglist.doc from the
web or
from
your resource files or create on a sheet of paper a table
with 3 columns. Title the columns "Tag", "Part", and "Attribute". In the
Tag column, list all the different tags used in this document. You will
complete the table shortly.
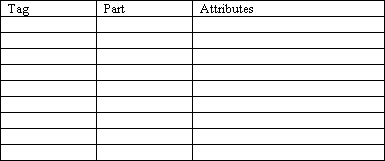
Most tags come in pairs- an opening tag and a closing tag. Put
them together in your list. The closing tag includes a / before the name
of the tag. For example the opening tag <html> has the
matching closing tag </html> . This document also has four
unpaired tags.
Tag Types
- In your table of tags, find the ones that do not match
anything you see when you look at the page in your browser. Mark them in
the Part column of your table as "hidden". Every HTML document must
include the paired tags
<html> and <body>.
- In your table of tags, find the tags that surround the
text that actually showed in the browser. In the Part column
of your table, tell which part of the document that tag marks.
- Find in your table the tags that have extra
information between the < and >. These parts are called
attributes. They set various characteristics
for the tag. Each attribute has two or more possible
values. List the attributes in column 3 for those tags in
the page html.htm that have attributes.
For example, the <font> tag can have attributes that
control the font face, the font size, and the color of the text. In this
document you should see:
<font face="Brush Script MT" size="+3"
        color="#FF0000">Welcome</font>
If this font is not
installed on the computer, the browser will use its default font, which
is Times New Roman for most Windows browsers.
Note that the FONT tag has
been deprecated. That means it is not included
in the recent rules for HTML. The commands for how a page looks are now
done with stylesheets. But current browsers are still able to understand
the FONT tag. That may not be true in the future.
Special Codes: &xxxx;
There are more characters available to you than what you see on your
keyboard. You must use a special code for them, however, and you must use
a font that includes those characters.
You also need a special code to see more than one space. Your browser
will only show 1 space no matter how much blank space is in the source
code unless you use the code for a space.
All these special codes start with &
(an ampersand) and end with ; (a semi-colon).
- Switch back to the browser window showing html.htm and
look at the last line of text shown on the page:
© Jan Smith 1999
- Spaces: Switch to Notepad and
find the code that produced that line. You will see
used many times. This is the HTML code for a blank space - a
non-breaking space. (By the way, this string
of spaces is not a good example of good coding practice!)
In word processing you
actually see a space for each time you pressed the spacebar. In HTML you
must use the code for each space you want to
guarantee. All the white space in your source code will collapse to a
single space.
- Character not on keyboard: Find the second special code in
the sentence:
© This is the HTML code for the
copyright symbol - © a circle around the
letter C.
Most text fonts contain
letters from several languages and also symbols, like
 .
Your keyboard will only have keys for the special characters that are
common in the language for which the keyboard was designed. You can make
the browser display the characters that are not on your keyboard by
typing special codes for them. .
Your keyboard will only have keys for the special characters that are
common in the language for which the keyboard was designed. You can make
the browser display the characters that are not on your keyboard by
typing special codes for them.
The HTML codes for special characters use an abbreviation of an
English description of the character, like í for í
and ñ for ñ. You can also use number codes for the
special characters, like í for í and ñ
for ñ.
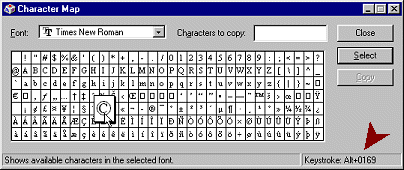
Special Characters: Character Map
To find the code for a special character, you can use Character Map,
which comes with Windows. Problem:
Unexpected characters in a web page.
Cause: The special character was
written with a font that your computer does not
have. Your default font has a different character with that code. Curly
quotation marks are a particular problem.
Solution: None for the viewer. For
the author, be careful! Avoid special characters when possible. Use an image if the symbol or character is very
important.
- Open the program Character Map:
| | |
or
use the Run dialog: |
, type
charmap and click OK.
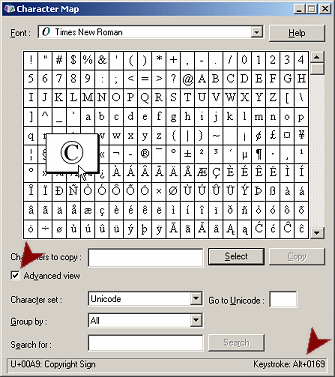
- Select a text font in the Font list.
- Click on the copyright symbol ©, a circle with a C in
the middle. At the bottom right of the Character Map dialog you can see
the keyboard combo for the selected character: ALT + 0169. So in HTML
you would type © or ©.
 In WinXP
to see the key combo to use, you must display the Advanced view
by checking its box. In WinXP
to see the key combo to use, you must display the Advanced view
by checking its box.
- Inspect several fonts in Character Map. There are lots of
characters that don't have keys on your keyboard.
Problem: Some characters do not show a keystroke combination.
Cause: The
characters on your keyboard don't have combos. The keys are already
there! New versions
of common fonts include new symbols and characters from other languages
that do not have a keystroke combo assigned.
Instead of typing the special code with & and ; , you can insert the character with the key combo directly or
copy and paste from Character Map. There are, however, situations where
your character may not display as you planned with these two methods.
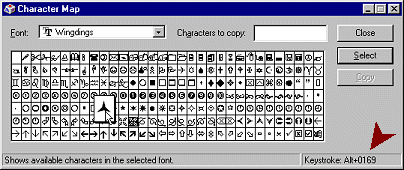
Your choice of font does make a difference. If you use a
symbol font, like Wingdings, instead of a text font, the same codes that
made í and ñ produce instead little arrows:
 ,
and instead of the copyright symbol you get
,
and instead of the copyright symbol you get
 a 3-pointed star. How unexpected!
The abbreviations are easier to remember than all these
numbers!
Problem:
Character is too small to really see in Character Map.
Solution: Left click on the character but keep holding the mouse button
down. A larger version of the character pops up.
 In WinXP just click the character. The larger version will stay up.
Problem:
Typing on the keypad does not type characters.
Solution: Press the NumLock key. When NumLock key is
OFF, the keypad works
as navigation keys instead of typing numbers.
Codes for the Code characters:
& " < >
HTML code uses some characters itself: ampersand &, quotes ",
left angled bracket <, right angled bracket >. What if you want those
characters to show in your text for some reason? (Like in the previous
sentence!)
To use these coding characters in normal text in an HTML page, you must
use a special set of characters for them. (Getting a bit crazy here!)
If you do not, the browser may try to interpret them as HTML code instead of
text, which will do unhappy things to your web page.
|
Symbol |
To
show as normal text, use: |
Description |
|
a space |
|
non-breaking space |
|
< |
< |
'Less than' sign |
|
> |
> |
'Greater than' sign |
|
& |
& |
Ampersand |
|
" |
" |
Double quote sign |
Now you have seen tags in action. Some of the attributes and special
codes may not make sense to you yet, but you should have an idea of the
general way HTML documents work. |