|
You have now inspected the
actual source code for a web page and you have seen how some basic tags
work. It is time to try writing your own source code.
You will start by using a basic text editor. The
directions will assume you are using Notepad.
It is important to be able to edit the raw code, even if
you usually use a high-end WYSIWYG editor. Sometimes the automation built
into these high-end editors is not quite as smart as you wish it was! You
will find that you do have to do some things yourself. |
|

Where you are:
JegsWorks >
Lessons > Web
Before you start...
Project 1: Browser Basics
Project 2: HTML Basics
HTML Code
About HTML
What You Need
Code by hand

 Page Page
List
Readable
code
WYSIWYG
FrontPage/FPX
Images in HTML
Formatting
Tables
Print
Convert
Summary
Quiz
Exercises
Search
Glossary
Appendix |
|

|
Step-by-Step: Create a Page
|
|
| What you will learn: |
to create a simple HTML page
to view your page in a browser
to view source code from inside the browser
to edit the source code |
Start with: 

Create a Basic HTML Document
Before you type in the text of the page, you need to create the basic
parts of an HTML document. Then you can start entering your headings and
paragraphs.
- Open Notepad (from the Start menu: | |
)
- Type the lines below onto the blank page in Notepad (but
replace your name with your own name). Check
your typing carefully! These parts create a blank page.
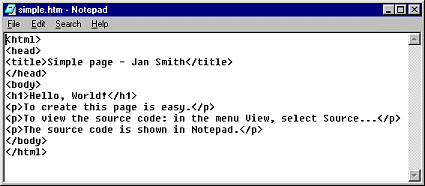
<html>

            <head>

            <title>Simple page - your name</title>

            </head>

            <body>


            </body>

            </html>
|
 Type these required tags
when you first start your document so you won't forget them, especially
the closing tags. Type these required tags
when you first start your document so you won't forget them, especially
the closing tags.
TITLE tag: The text in the
<title> tag is shown in the browser's title bar instead of
on the web page itself. It will also be used as the name for the
shortcut to the page in Favorites if you bookmark the page.
Use a TITLE that makes it clear what the page is about. Avoid titles
like "Welcome to my Home page" and "Home page" which do not give any
information at all.
A search engine's list of results will likely use your title. The
title strongly affects how your page is ranked by some search
engines.
- Type in between the
<body> and
</body> tags the following lines to create a heading and 3
paragraphs:
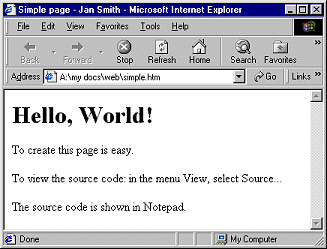
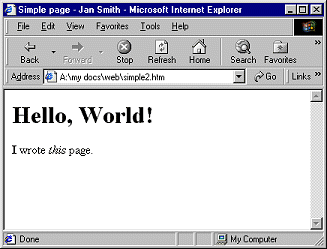
<h1>Hello, World!</h1>


            <p>To create this page is easy. </p>


            <p>To view the source code: in the menu View,


            select Source... </p>


            <p>The source code is shown in Notepad. </p>
|
The <p> tag
does not actually require a closing </p> tag under
the recommendations of HTML 4.0. But it is a good idea to include the
closing tag. Without the closing tag, in complex pages you may sometimes get unexpected
formatting of later text.
-
Insert your Class disk in the floppy drive.
-
From the menu select |
and type in the path
a:\my docs\web\simple.htm to save the new
document. The folders should already exist if you have done the
previous lessons. If they do not, you will need to create them.
An HTML document must use
an extension that browsers recognize. The most common extensions are
.htm and .html. Pages that are generated by the server may
have a different extension.
- Close Notepad.
View HTML Document
To see what you have created, you must view the
document in a browser.
- Open Internet Explorer, using either the Start menu or
 the Quick Launch icon. the Quick Launch icon.
-
 Type
in the address bar the path to the file you just saved:
a:\my docs\web\simple.htm Type
in the address bar the path to the file you just saved:
a:\my docs\web\simple.htm
 The
page displays using the default fonts for IE. The
page displays using the default fonts for IE.
Print from Browser
You learned to print from your browser in
Browser Basics: Printing.
-
 From the IE5.5/6 menu select | From the IE5.5/6 menu select |
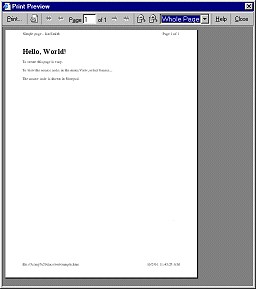
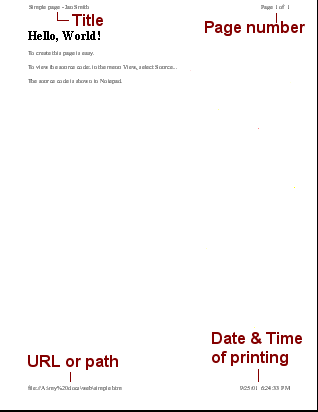
You should always preview before printing a web page. It may take
a lot more sheets of paper than you think. This obvious feature was not
introduced until IE5.5.
-
 If
necessary, open the Page Setup dialog:
| where you can set margins
and the contents for the header and footer. If
necessary, open the Page Setup dialog:
| where you can set margins
and the contents for the header and footer.
Header - &w&bName&bPage &p of &P
Footer - &u&b&d
 From the menu
select | The Print dialog appears. From the menu
select | The Print dialog appears.
- Select All and click on the button OK to print your
web page.
Be sure your name is in the Title bar instead of the words
"your name". The TITLE text will print in the page header, by default.
The default settings for printing web pages in IE will put
information in the header and the footer of each sheet.
View Source Code
- From the IE menu select |
Notepad opens and shows the code
for the page.
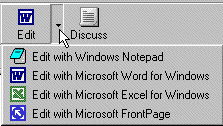 For
some browsers you can choose what application is used to show the source
code, but with IE you are stuck with Notepad for the command
|
The Edit toolbar button may list other programs, depending on what you
have installed. For
some browsers you can choose what application is used to show the source
code, but with IE you are stuck with Notepad for the command
|
The Edit toolbar button may list other programs, depending on what you
have installed.
If some of the lines of text extend
out of view to the right in the Notepad window, either enlarge the
window or select | to wrap the text.
You can view the source code for
any HTML page that you can view in your browser. This is a good way
to learn about writing HTML pages. When you see a page that does
something interesting, look at the source code to see how it was done.
Some actions, like scoring quizzes, may be handled by the server that
hosts the page, using a server-side script. You will not be able to see
how those actions are managed.
Edit Source Code
- In Notepad, delete the three paragraphs and their paragraph
tags.
- Type
<p><b>I</b> wrote <i>this</i> page.</p>
below the line <h1>Hello, World!</h1>
-
With the Class disk in the floppy drive, select
|
In the dialog that appears, save your changed document in the
web folder as simple2.htm .
Be careful to check where you
are saving your page.
- Close Notepad.
- Switch to IE. In the address bar, change the
name of the file to simple2.htm so that the
path reads a:\my docs\web\simple2.htm
-
 Press
the ENTER key. IE loads your revised document in the browser window. Press
the ENTER key. IE loads your revised document in the browser window.
- Print
the new document and congratulate yourself! You have just written your
first HTML document.
Error: Order of Closing Tags
It is easy to get your closing tags out of order when tags
are nested inside other tags.
Rule on Nesting: Nested tags must be
closed in reverse order from how they were opened.
Example: To display-
This is hard!
Right: <p>This is <b><i>hard!</i></b></p>
Opposite order as opened
Wrong: <p>This is <b><i>hard!</b></i></p> B
and I closed
in the same order as opened.
Wrong: <p>This is <b><i>hard!</p></i></b>
P tag was closed out of order.
Wrong: <p>This is <b><i>hard!</p></b></i>
All closed out of order.
 Internet Explorer will
try to figure out what you should have written, but other browsers (Netscape
in particular) may not be as forgiving. Sometimes bad nesting can even make
parts of the document disappear! Internet Explorer will
try to figure out what you should have written, but other browsers (Netscape
in particular) may not be as forgiving. Sometimes bad nesting can even make
parts of the document disappear!
|