 |
There are several ways to create a
list with HTML. A list can use bullets or
numbers, with a variety of types for each.
Or a list can be arranged as terms and
definitions. The term is on a line by itself. The
definition starts on the next line and is indented. Other types exist but
are being phased out. These three are enough to handle most of your needs.
|
Bullets |
Numbers |
Definitions |
- Pay bills
- Haircut
- Doctor 10:15
- Computer class
|
- Pay bills
- Haircut
- Doctor 10:15
- Computer class
|
- Monday
- Pay bills
- Haircut
- Tuesday
- Doctor 10:15
- Wednesday
- Computer class
|
|
 |

Where you are:
JegsWorks >
Lessons > Web
Before you start...
Project 1: Browser Basics
Project 2: HTML Basics
HTML Code
About HTML
What You Need
Code by hand

 Page Page
 Lists Lists
 Readable
code Readable
code
WYSIWYG
FrontPage/FPX
Images in HTML
Formatting
Tables
Print
Convert
Summary
Quiz
Exercises
Search
Glossary
Appendix |
|
Code for Lists
In the steps below you will practice with three basic types of lists.
Bulleted lists and numbered lists require two kinds of tags -
- a tag pair that starts and stops the list - either
<ul> </ul> for bullets (unordered list)
or
<ol> </ol> for a numbered list (ordered list).
<li> </li> for each item in the list (list item)
Terms and definitions need three different tags -
<dl> </dl> to start and end the list (definition
list).<dt> </dt> for the term (definition- term).<dd> </dd> for the definition of the term. (definition-
description)
All of the listed items must come between the start and
close tags for the list. A logical arrangement! The ending tags for DT and
DD are optional in HTML 4. If you have lists inside of lists, it is
important to close all the tags to keep the browser from getting confused.

|
Step-by-Step: Create & Modify a List
|
 |
| What you will learn: |
to create a bulleted list
to create a numbered list
to create a terms and definitions list |
Start with: 

Starting with this
lesson you will build a web page for Hector Chavez. You will first learn
how the raw source code works. Later you will use more advanced editors.
Create Document
- Open Notepad to a new blank document. (
| | | )
- Type the following code to create the basic document parts,
replacing your name in the TITLE tag with your own name:
<html>

            <head>

            <title>Home of Hector Chavez - your name</title>

            </head>

            <body>


            </body>

            </html>
|
List: Bullets
You will now enter some text and make a list. To show a bullet in front
of each item in the list, you start the list with the tag <ul>,
from "unordered list" in English. End the list with </ul>.
Each item in the list starts with the tag <li>, from "list
item" in English, and ends with </li>. The tag <li>
does not actually require an ending tag in HTML 4.0 but it will in
future HTML versions. In complex nested lists, having an ending </li>
is definitely important.
- Below the
<body> tag, type as an H1 heading:
<h1>Home page of Hector Chavez</h1>
Do not forget the closing tag!
- Below the H1 heading, type the second level heading:
<h2>My house is your house!</h2>
- Below the H2 heading, type the paragraph:
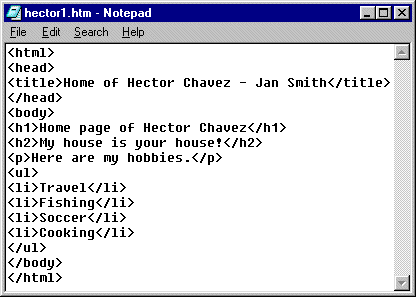
<p>Here are my hobbies.</p>
- Below the paragraph, type the code below to create a bulleted
list:
<ul>

            <li>Travel</li>

            <li>Fishing</li>

            <li>Soccer</li>

            <li>Cooking</li>

</ul> |
 Save
the document to the web folder on your Class
disk as hector1.htm . The full path is
a:\my docs\web\hector1.htm . Save
the document to the web folder on your Class
disk as hector1.htm . The full path is
a:\my docs\web\hector1.htm .
 Print
the page of HTML code by choosing from the Notepad menu
| Print
the page of HTML code by choosing from the Notepad menu
|
Your name should be in the <title> tag!
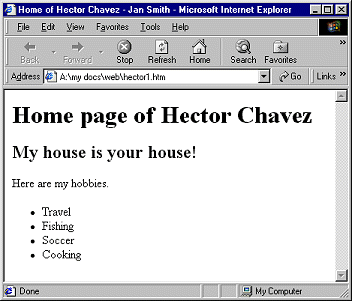
- Open IE first, if necessary. Switch to the IE window.
- In the address bar of IE, type the path
a:\my docs\web\hector1.htm and press the ENTER key. Your new
document loads.
If you page does not look right, open the page in Notepad again and
check the typing of the tags. Did you close the ones that must be
closed? Did you include the required tags <html>, <body> and their
closing tags? Are all the parts in the right order?

 Check the Print Preview. Are the margins and header
and footer acceptable? Check the Print Preview. Are the margins and header
and footer acceptable?
 Print
the page by choosing |
|
from the IE menu. Print
the page by choosing |
|
from the IE menu.
List: Numbered
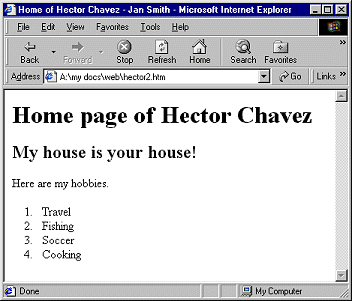
To number the items in a list, start the list with the
tag <ol> from "ordered list" in English. End the list with
</ol>. The items in the list are the same as in the bulleted
list.
- Switch back to the Notepad window.
- Replace the tag
<ul> with <ol> and
the tag </ul> with </ol>.
 From the menu select |
hector2.htm . This will save the revised document with a new
name instead of overwriting the previous version.
Since you just saved to the web
folder, the dialog should show the web
folder still. If you took a break and the correct folder is not showing,
you may type in the full path a:\my
docs\web\hector2.htm
- Switch to IE.
- Change the file name in the address bar to
hector2.htm and press the ENTER key. Your revised page appears.
 Print
the page by choosing |
| Print
the page by choosing |
|
List: Definition
In a list of definitions, the word or phrase
being defined is on one line and the definition or explanation on the next
line but indented from the margin. So a definition list needs three
different tags instead of just two:
<dl> </dl> to start and end the list.<dt> </dt> for the term.<dd> </dd> for the definition of the term. This line
must come immediately after the term line.
Of course these tags can be used for things that
are not actually definitions, though that may confuse some browsers that
read text aloud.
You will now add some text and change your numbered
list to a definitions list. [We are cheating a bit here. These are not
quite definitions!]
-
 Switch
back to Notepad. Switch
back to Notepad.
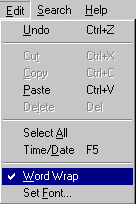
- Click on the menu and be
sure that is checked. If it is
not, click on .
- Change
<ol> and </ol> to <dl>
and </dl>
- Change
<li>Travel</li> to <dt>Travel</dt>
and press the ENTER key to start a new line.
- Similarly, change the remaining
<li> tags to <dt>
and create a blank line below each one.
- On the new line below
Travel type:
<dd>I have traveled to 14 countries on three continents. I have
        traveled by plane, helicopter, train, ship, car, bus, and canoe. I plan
        to add submarine and hot air balloon to the list. I have not seen the
        pyramids in Egypt or the Great Wall of China, so I am not done with
        traveling yet.</dd>
- On the new line below
Fishing type:
<dd>I started fishing with my father when I was 4 years old. He
        had to bait the hook and land the fish for me then. But I held the pole
        all by myself! I still enjoy fishing on a quiet lake or by a babbling
        brook.</dd>
- On the new line below
Soccer type:
<dd>I never played soccer as a child. But now I am a big soccer
        fan. I go to my son's games (Viva los Lobos!) and watch the big teams on
        TV.</dd>
- On the new line below
Cooking type:
<dd>Dad taught me early that if I could catch a fish, I could
        clean and cook it, too. After a few smoky experiences, I have gotten
        rather good at cooking fish on a grill. In fact, I will grill anything
        that is edible!</dd>
 From the menu select |
and use the name
hector3.htm for the filename. This will save the revised
document with a new name instead of overwriting the previous version.
Since you recently saved to the web folder,
the dialog should show the web folder still.
If it does not, you may type in the full path
a:\my docs\web\hector3.htm
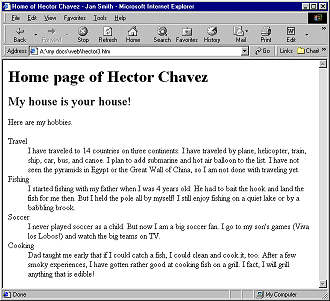
- Switch to IE and change the filename in the address bar to
hector3.htm and press the ENTER key. IE will
display the revised page. Your window may not be large enough to show
the entire page at once.
 Print
the page by choosing |
| Print
the page by choosing |
|
Nested Lists
It is pretty common to have a list that contains
other lists. For example, in a weekly To Do list you would expect to see
each day of the week with its own list of tasks for that day. And some of
those tasks might be lists themselves! HTML handles that quite nicely. You
can even pick different styles for the nested lists.
You can nest a list inside a different kind of list, like
having a numbered list inside a bulleted list.
 Be
extra careful about your ending tags in nested lists. If you leave one out,
the browser will think that the text that follows is part of the list. You
may have a lot more bullets or numbers than you intended. Be
extra careful about your ending tags in nested lists. If you leave one out,
the browser will think that the text that follows is part of the list. You
may have a lot more bullets or numbers than you intended.
|
Examples of nested lists |
|
Bullets |
Numbered |
- Monday
- Pay bills
- Telephone
- Electric
- Cell phone
- VISA
- Haircut
- Tuesday
- Doctor 10:15
- Soccer practice 3:35 - 4:30
- Wednesday
- Computer class
- Term paper due
|
- Monday
- Pay bills
- Telephone
- Electric
- Cell phone
- VISA
- Haircut
- Tuesday
- Doctor 10:15
- Soccer practice 3:35 - 4:30
- Wednesday
- Computer class
- Term paper due
|
Your page is starting to take shape. But it has a long way to go before
you are through! Next you will tidy up your code to make it easier to read. |

![]()
![]()