
Jan's Working with Words
AutoTools: Margins & Breaks
The changes you made with various autotools have affected the way your document text is wrapping. You can make some manual changes to make it flow better and add some helpful titles and more. Tinkering can be fun!
Margins
 You can adjust top, bottom, and side margins for the page by
dragging the boundary on the rulers between the white and gray portions of the ruler or
by using the Page Setup dialog. The ruler applies changes only to the current section, if
you created any sections. Until you create a section, Word considers the
whole document as one section.
You can adjust top, bottom, and side margins for the page by
dragging the boundary on the rulers between the white and gray portions of the ruler or
by using the Page Setup dialog. The ruler applies changes only to the current section, if
you created any sections. Until you create a section, Word considers the
whole document as one section.
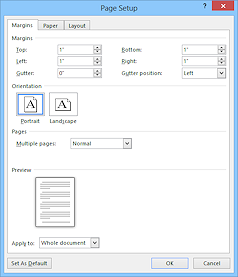 The Page Setup dialog lets you apply
your changes to either the whole document, the selected section, or just the selected
text.
The Page Setup dialog lets you apply
your changes to either the whole document, the selected section, or just the selected
text.
If you set a new margin for selected text, Word will automatically create a section for that text. That makes the selected text start at the top of a page and also forces the text after the selection to start at the top of a page.
You open the Page Setup dialog with the Dialog Box Launcher ![]()
![]() on the Page Layout tab in the Page Setup tab group.
on the Page Layout tab in the Page Setup tab group.
Breaks
 Breaks come
in several flavors.
Breaks come
in several flavors.
- line break
- soft page break (automatic)
- hard page break
- column break
- text wrapping break
- section
break -
- next page
- continuous
- even page
- odd page
All but the first two of these are found in the Breaks list, which you open from the Page Layout tab.
Which Break is Which?
Line break:
 A line break starts a new line
without starting a new paragraph. This is useful when you want to
ensure that a certain phrase starts at the margin or you want to break a
title into two lines at a particular word.
A line break starts a new line
without starting a new paragraph. This is useful when you want to
ensure that a certain phrase starts at the margin or you want to break a
title into two lines at a particular word.
The mark for a line break looks like an arrow with a
right angle bend: ![]() .
.
There is no button or command for this break, only a key combo!
Soft page break:
Word creates a soft page break every time text flows onto a new page. This one is automatic!
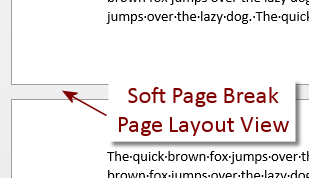
Page Layout View: Shows the bottom edge of one page and the top edge of the next one.
Draft View: A dotted line where a soft page break occurs.
Page break:
 If
you want to start a new page even though there is space on the current page, you must insert a hard page break. Such a break moves the text to the right
of the cursor to the top of the next page. Even if you add or delete material before the hard page break, the flow of text will not be changed after the hard page break.
If
you want to start a new page even though there is space on the current page, you must insert a hard page break. Such a break moves the text to the right
of the cursor to the top of the next page. Even if you add or delete material before the hard page break, the flow of text will not be changed after the hard page break.
The symbol for a hard page break is a dotted line with the words "Page Break" in the middle. This mark won't print, of course.
![]() Problem: New blank line appears
Problem: New blank line appears
Your cursor was at the end of a paragraph. Creating a hard page break also adds a blank paragraph before the first paragraph of text on the new page.
Solution: Position the cursor at the beginning of the paragraph that you want at the top of the next page. Then create your hard page break.

How to create a hard page break:
-
Ribbon: Insert > Pages > Page Break
-
Ribbon: Page Layout > Page Setup > Breaks > Page Break
-
 Key combo CTRL +
ENTER.
Key combo CTRL +
ENTER.
Column break:
A column break forces your text into a new column, if you already have columns created. Otherwise it has the same effect as a page break. Note that when you create columns, you create a Continuous Section break before and after the columns.
How to create a column break:
-
Ribbon: Page Layout > Page Setup > Breaks > Column Break
-
Key combo: CTRL + SHIFT + ENTER
Text-wrapping break:
 A text wrapping
break makes the text drop below any images or other objects that are
aligned at the right or left margin.
A text wrapping
break makes the text drop below any images or other objects that are
aligned at the right or left margin.
The symbol for a text wrapping break ![]() looks like the arrow for a line break in between two vertical bars.
looks like the arrow for a line break in between two vertical bars.
If the image or object is inline instead of floating,
then this break has the same effect as a line break.
Section break:
![]() A section break divides the document into sections to allow
formatting differences, not for any logical or structure-of-the-document reason. For example, you must create a new section to use a different size for
margins for a particular page or pages. You also need to create a section to have a different number of columns, a different header or footer, or a different kind of page
numbering for part of the document.
A section break divides the document into sections to allow
formatting differences, not for any logical or structure-of-the-document reason. For example, you must create a new section to use a different size for
margins for a particular page or pages. You also need to create a section to have a different number of columns, a different header or footer, or a different kind of page
numbering for part of the document.
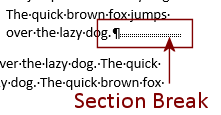
A section break is marked on your display with a double dotted line and the words "Section Break" plus the type of section break.
Next Page section break: Starts the new section at the top of the next page.
Continuous section break: Does not start a new page but allows changes within the page. This kind of break is created automatically when you create a set of columns within a page. You can use this type for indenting some text by using a wider margin.
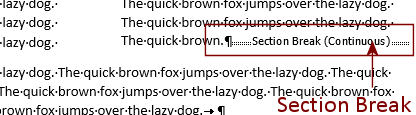
This kind of break can often be hard to see. If the text is close to the margin, then there is not enough room for the words "Section Break (Continuous)" or even the double row of dots to display. You can see columns and know that there is a section break there, but other types of section breaks may be really hard to spot.
Odd and Even breaks: Used for creating headers and footers that are different for odd and even pages. For example, a book might have the chapter title in the header for the right-hand page and the book title in the header of the left-hand page.
|
|
| © 1997-2017 Jan Smith All Rights Reserved |
Site Map What's New |
Privacy Policy Terms of Service Copyright Acknowledgements |
~~ 1 Cor. 10:31 ...whatever you do, do it all for the glory of God. ~~
Last updated: March 22, 2017