
Jan's Working with Words
AutoTools: Format Whole Doc: AutoFormat
In the lesson Word Basics: Getting Started: AutoCorrect you used the AutoFormat and AutoCorrect features to format symbols like © and special characters like 1st.
 You can also apply AutoFormat to a whole document.
Only the items checked on the AutoFormat tab of the AutoCorrect dialog
will be used.
You can also apply AutoFormat to a whole document.
Only the items checked on the AutoFormat tab of the AutoCorrect dialog
will be used.
Especially helpful are the Heading styles and other paragraph styles. AutoFormat will also eliminate extra blank lines and spaces, or at least some of them.
Word needs some clues before it can make any guesses as to what your document should look like. You must indicate which lines are titles, which are headings, and which are lists. Bolding, centering, and indentions also may make a difference in what AutoFormat does.
|
|
Step-by-Step: AutoFormat Document |
|
| What you will learn: | what kind of formatting and paragraph styles
to apply before applying AutoFormat to a whole
document to apply AutoFormat to the whole document |
Start with:
![]() ,
trip_planner2-Lastname-Firstname.docx
,
trip_planner2-Lastname-Firstname.docx
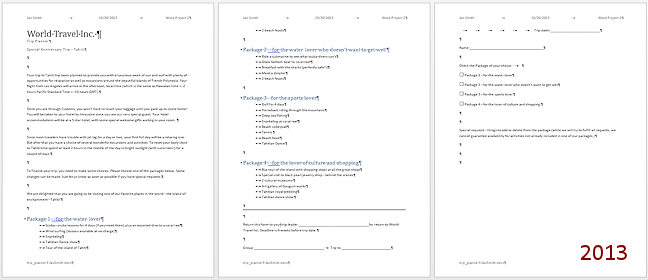
You will apply some basic formatting to your Trip Planner document to let Word know what kinds of paragraphs you have. Then, in the next lesson, you will use some of Word's features to change the look of the whole document.
Title and Subtitles
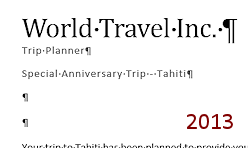
Word 2007 and 2010 have a different default style set than Word 2013 and 2016. The look is quite different!
 Click in the first line.
- On the Home tab, click the Title style from the Style gallery to apply it to the paragraph.
- Select lines 2 and 3.
- Apply the Subtitle style from the Style gallery.
 Save
as: trip_planner3-Lastname-Firstname.docx to your word project2 folder on your Class drive.
Save
as: trip_planner3-Lastname-Firstname.docx to your word project2 folder on your Class drive.
Headings
The text will flow differently in different versions of Word because the styles uses a different font, font size, and spacing.
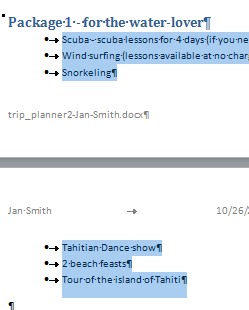
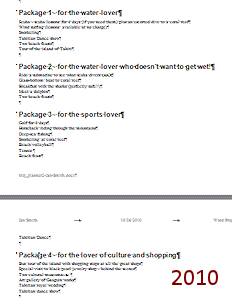 Move the cursor to line 26, which
starts Package 1
Move the cursor to line 26, which
starts Package 1
-
Apply the paragraph style Heading 1 to this paragraph by clicking it in the Styles gallery.
 Or use the keyboard shortcut: CTRL + ALT + 1.
Similar key combos work for other heading styles, with the appropriate number, of course. Problem:
Just a few characters are formatted
Problem:
Just a few characters are formatted
If you select text, then the style's character formatting is applied to the selection and none of the paragraph formatting is applied at all.
Solution 1: Deselect and click in the paragraph without selecting anything. Then apply Heading 1.
Solution 2: Select the whole paragraph, including the paragraph mark at the end of the paragraph. Then apply Heading 1.
-
Repeat for the lines that start with Package 2 , Package 3 , and Package 4 .
The text rewraps to the page as you apply styles. These styles use a larger font size and more white space around the paragraph than the original styles did. - Save.
[trip_planner3-Lastname-Firstname.docx ]
Create Dividing Line
- Move the cursor to the second blank line below the list for Package
4.
- Type
three equals signs = = = and then press ENTER.
Word creates a double line across the page using the AutoFormat feature.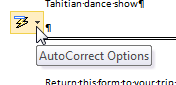 Word
pops up
Word
pops up
 a floating button
for AutoCorrect Options. When
your mouse pointer hovers over this button, a drop list arrow appears.
a floating button
for AutoCorrect Options. When
your mouse pointer hovers over this button, a drop list arrow appears.
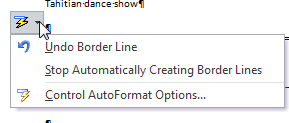 If
you click on the arrow, a short menu appears that allows you to manage the
automatic features. This time we like it!Problem:
AutoFormat did not change === to a line across the page
If
you click on the arrow, a short menu appears that allows you to manage the
automatic features. This time we like it!Problem:
AutoFormat did not change === to a line across the page
A setting in Word Options needs to be checked.
Solution: Open the Word Options dialog: Office button or File tab > Word Options/Options > Proofing > AutoCorrect Options... > AutoFormat As You Type tab > check the box 'Border lines'. - Save.
[trip_planner3-Lastname-Firstname.docx ]
Lists - Bullet and Indent
-
 Select
the lines for the items listed for Package 1.
Select
the lines for the items listed for Package 1.Hint: Click to the left of "Scuba - ..." which is the first item in the list, scroll to see the last item, hold SHIFT down and click to the right of "Tour of the island of Tahiti", which is the last item in the list. Everything between your clicks is selected. This method is great when you want to select a lot of text or across a page break.
-
While selected, on the Home tab in the
Paragraph group, click the
Bullets
 button.
The list turns into a bulleted list, using the shape that was used last. Right now we don't care what that shape is. Mostly likely you will get the solid circle shape.
-
 If
necessary, while the lines are still selected,
click the Increase Indent button
If
necessary, while the lines are still selected,
click the Increase Indent button
 or the Decrease Indent button
 to get the bullets lined up under the "ag" in "Package 1". The exact spacing
is not important yet.
to get the bullets lined up under the "ag" in "Package 1". The exact spacing
is not important yet. -
Repeat for the lists under Package 2, Package 3 and Package 4.
The bullet lists do not have as much space around the paragraphs, so the text moves on the page again.
- Click in the document so that no text is selected.
- Save.
[trip_planner3-Lastname-Firstname.docx ]
Update Field
You just saved the file with a new name, but the filename in the footer did not change. It will update automatically when you close and reopen. There is a way to make it update right now.
- With the cursor somewhere in the body of the document, use the key combo
CTRL + A to select the whole document.
- Press the F9 key to update fields.
Whoops. The footer did not update!
Remember that Word treats the header and the footer as separate documents. CTRL + A did not include the header and footer! - Double-click in the footer.
The cursor is at the left of the footer and the file name has a gray background to show that it is a field.
- Press the F9 key.
The field updates to the new name.
This updates only this field since its the only one in the footer.
- Double-click back in the document to get out of the
footer.
It is not necessary to save again. You just changed the display of the document.
- Save.
[trip_planner3-Lastname-Firstname.docx ]

AutoFormat Document
You need to check on what features Word is willing to AutoFormat. Then you will see whether this is useful or not.
-
 Use the key combo CTRL + A to select the entire document (except the
header and footer as we just learned!).
Use the key combo CTRL + A to select the entire document (except the
header and footer as we just learned!).Alternate Method: On the Home ribbon tab in the Editing tab group, click on Select and then on Select All.
-
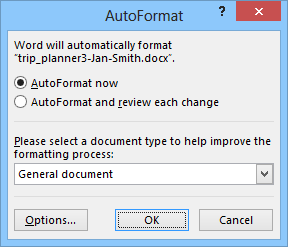
From the Quick Access Toolbar, click the AutoFormat Dialog button


 .
.
The AutoFormat dialog appears.Problem:
AutoFormat Dialog button is not on the Quick Access Toolbar.
Solution: You put it there in a previous lesson. Return to those directions and add this button.
- Read the message and click on the Options...
Button
The Options dialog opens at the AutoFormat tab.
-
 If necessary,
click on the AutoFormat tab. [Not
AutoFormat As You Type!]
If necessary,
click on the AutoFormat tab. [Not
AutoFormat As You Type!]
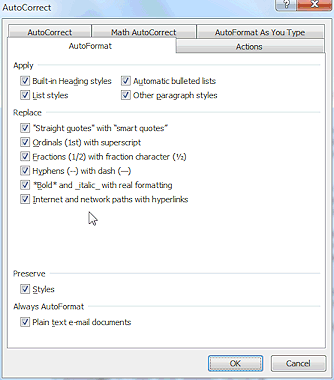
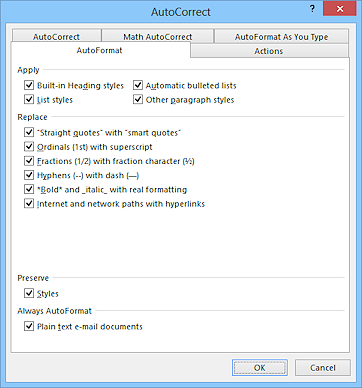
- Check
all boxes, for this exercise.
Now Word will try to format all these parts of your document when you apply AutoFormat.
- Click on the OK button to return to the dialog box.
- Select the radio
button AutoFormat and review each change.
- Keep your eyes on your document and click on the dialog box's OK button to continue with the
AutoFormat.
The document changes and a new dialog box appears.
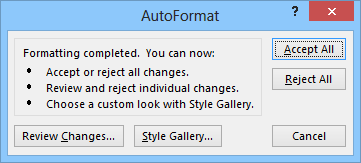
-
Click on Review Changes...
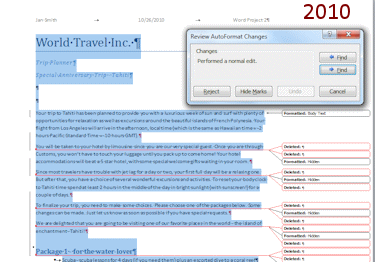

After a brief pause to think, AutoFormat applies its changes and puts up bubbles to show you what was done. -
Scroll the document to see what changed.
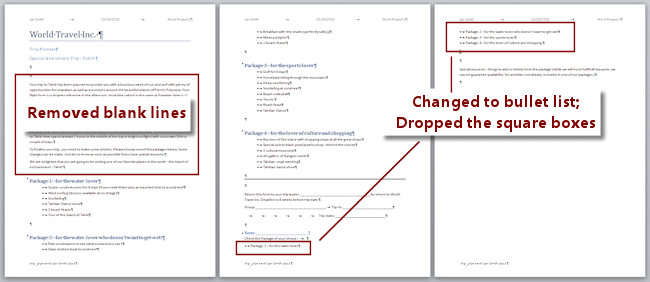
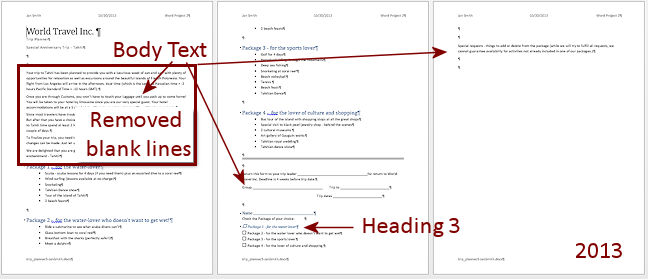
Some blank lines are gone but not all of them.
Body Text style was applied all Normal paragraphs. This style is based on Normal but has Space After of 6 pt instead of 10 pt.
 Word 2007, 2010: The
lines at the end with the check boxes have changed to a bullet list.
Word 2007, 2010: The
lines at the end with the check boxes have changed to a bullet list. 
 Word 2013, 2016: The check boxes are still there on the last page but the first item in the list is formatted as Heading 3 for some reason. You will fix the list issues later. The illustrations may not show your colored, larger text for this line.
- Click on Cancel to close the
Review dialog.
-
Click on the Accept All button.
- Click in the document to deselect.
- Save.
[trip_planner3-Lastname-Firstname.docx ]
|
|
| © 1997-2017 Jan Smith All Rights Reserved |
Site Map What's New |
Privacy Policy Terms of Service Copyright Acknowledgements |
~~ 1 Cor. 10:31 ...whatever you do, do it all for the glory of God. ~~
Last updated: March 22, 2017