
Jan's Working with Words
Getting Started: AutoCorrect
There are a number of actions that Word can take automatically that are part of the AutoCorrect feature. These include automatically correcting spelling, creating bullet or number lists, replacing text with a text block or a symbol, or changing the formatting. A lot that we used to consider AutoFormatting is now included as a type of AutoCorrection.
Help Topics about AutoCorrect
The Help documents for Word will be very important to you as you learn about Word's features. They contain the answers to many of your questions. It takes some practice to learn how to use Help, however. Practice makes perfect, so you will now get some practice in using Help and applying what you learned.
The Step-by-Step section below will guide you to use Help to find out about some of the automatic features of Word. These automatic behaviors are very helpful, but sometimes they are too helpful! You need to learn what Word thinks it is doing, so you won't think that you are the one going crazy!
| |
Step-by-Step: AutoCorrect |
|
| What you will learn: | to search to find a Help article to use the AutoCorrect dialog to use AutoCorrect features in a document to use AutoComplete to use the AutoCorrect Options button to use the AutoFormat dialog to close a document without closing Word |
Start with: ![]()
![]() (Word is open with a blank document.)
(Word is open with a blank document.)
If you worked through the lessons in Working with
Windows, you already have used a flash drive and put several folders
and files on it.
![]() Spare flash drive: Eventually your flash drive may get full
and these small drives are easy to lose, so keep a spare flash drive handy. Don't delete
your work until after it has been graded!
Spare flash drive: Eventually your flash drive may get full
and these small drives are easy to lose, so keep a spare flash drive handy. Don't delete
your work until after it has been graded!
Check it out! If you did the lessons on Windows, your Class drive should currently contain at least the following folders and files: If you did the lessons on Windows, your Class drive should currently contain at least the following folders and files:
|
|
|
Working with Windows -
|
Working with Windows 10
|
While the files you saved in the Windows lessons will not be used again, you do need the subfolders word project1, and word project2. You will make more folders as you go along through these lessons.
It's OK to have other files and folders on your Class device. Just keep a tidy set of folders and be sure you don't fill up the drive. Those MP3 files and videos eat up a lot of space!
Find Help Article: AutoCorrect
Word has the ability to automatically fix some of the most common typing mistakes and to automatically insert symbols when you type certain combinations of characters. It can be quite a surprise if Word "fixes" something and you weren't expecting it. You can turn off some of this automation if it "corrects" things that you don't want corrected. Let's look at Word's Help to see what we can learn about the AutoCorrect feature.


 Word 2007, 2010, 2013: Click the Help button

 on the Title bar.
A search page opens in a new window. It's actually a type of browser window, but you won't see the usual buttons and commands.
This window will behave similarly in the three versions, but the documents will be somewhat different.
 Default Help window: By default the Help window opens without showing a table of contents
in a Navigation pane. But, if
you open the table of contents or resize the window, Word remembers the changes
for the next time it opens Help.
Default Help window: By default the Help window opens without showing a table of contents
in a Navigation pane. But, if
you open the table of contents or resize the window, Word remembers the changes
for the next time it opens Help.
- Word 2007, 2010, 2013: Click in the Search box at the top of the Help window.

 Word 2016: Click in the Help search box on the ribbon, Tell me what you want to do.
- Type autocorrect.
-
Word 2007, 2010, 2013: Press the ENTER key.
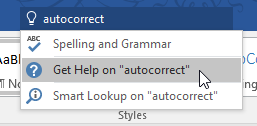 Word 2016: Click on the choice, Get Help on "autocorrect".
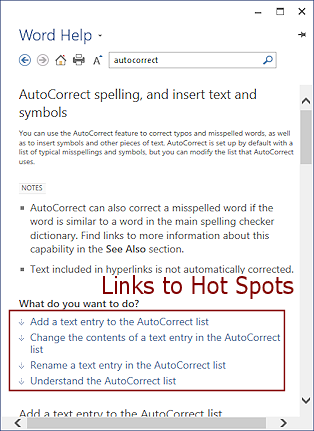
After a brief search, a list of topics appears in the Help window
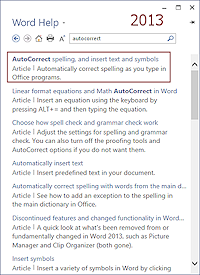
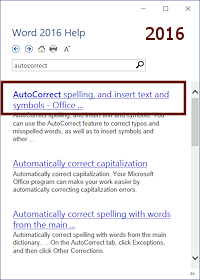
- Click on 'Automatically correct spelling and insert
text and symbols by using words in a list' or 'AutoCorrect spelling and insert text and symbols'
The Help window changes to show a Help article.
-
Read all the topics displayed on the page.
(Yes, the whole page, please!)
Notice the links a short distance down the page, with the down arrows on the left. These are links to spots on the Help page.
- Click the Close button at the top right of the Help window after you have finished reading.
Now let's go take a look at what you read about in action!
Dialog: AutoCorrect
The AutoCorrect dialog has several tabs about things Word can do for you automatically.
We skipped this feature earlier when we looked at the Word Options dialog. It's a bit awkward to get to.
- Open the Word Options dialog:
Word 2007: Click the Office button
 and then on the Word Options button
  . Word 2010, 2013, 2016:
Click the File tab and then the Options item.
. Word 2010, 2013, 2016:
Click the File tab and then the Options item.
The Word Options dialog opens.
-
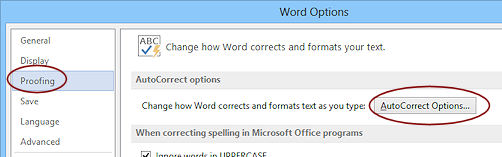 Click in the Navigation pane on Proofing.
- Click on the button at the top right, AutoCorrect Options...
A new dialog opens with several tabs.
These tabs are the same in all three versions except for Smart Tags, which is called Actions in Word 2010 and 2013.
-
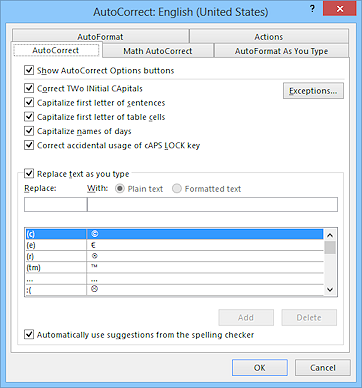 Tab: AutoCorrect - Spelling corrections
Verify that all boxes are checked on the AutoCorrect tab of the AutoCorrect dialog, including the one at the very bottom.
Notice that you can add your own entries for things that you mis-type often. Or you can use this feature to substitute text for an abbreviation. For example, if your business has a long name, you could create an abbreviation that AutoCorrect would automatically replace with the full name. Very helpful! Let's do one of those.
-
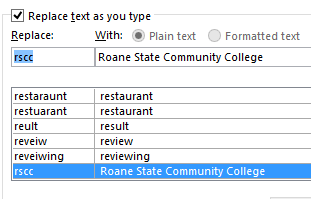 In
the Replace: box, slowly type rscc.
In
the Replace: box, slowly type rscc.
Watch how the list below scrolls as you type.
-
In the With: text box, type Roane State Community College. (This is where I used to teach.)
If you attend this school or work there, this replacement will make it easier to enter the school name accurately in all of your documents... IF you enter it correctly here. This same list works in other Office programs, too, like PowerPoint and Excel. Sweet!
- Click the Add button to add it
to your list.
-
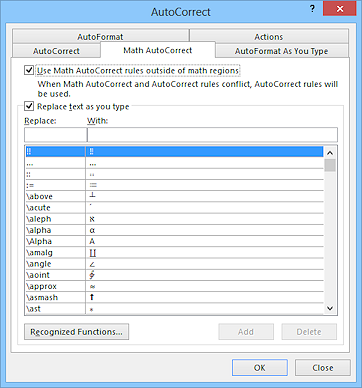 Tab: Math AutoCorrect - Replaces text with math symbols
without having to dig through the Symbols dialog
Tab: Math AutoCorrect - Replaces text with math symbols
without having to dig through the Symbols dialog
Verify that both check boxes are checked.Scroll the list to see what math symbols are available. What looks good to you? Do you see any symbols that you have seen before?
The new Math AutoCorrect looks fabulous to me!! You can type \sqrt and get the square root symbol √ without having to dig through the Symbols dialog! You have to check the box to use these corrections in ordinary text to have the most fun.
-
 Tab: AutoFormat As You Type - Changing the look- bullets, numbered lists, lines, etc.
Verify that there are check marks in all boxes except these four:- Ordinals (1st) with superscript (Off just for this exercise)
- *Bold* and _italic_ with real formatting
- Built-in Heading styles
- Define styles based on your formatting
-
Tab: AutoFormat
Be careful about these two similar tab names!
Verify that all boxes are checked.This tab is nearly the same as AutoFormat As You Type. But choices on the AutoFormat tab are not applied automatically. You have to tell the document to go back and apply these changes. Pressing the F3 key after you type applies the AutoFormat choices.
- Tab: Smart Tags / Actions
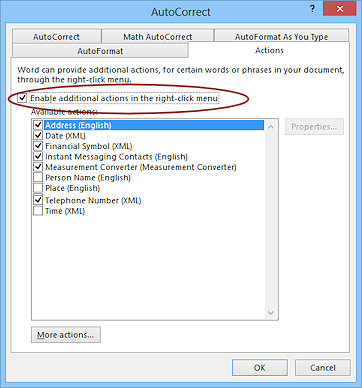 Verify that all boxes
are checked as in the illustration.
Verify that all boxes
are checked as in the illustration.
Your list of smart tags/actions may be different. Some non-Office programs add their own items to this list and there are more that can be downloaded. - Click on OK to close the
AutoCorrect dialog to close and save any changes. Then on OK to close
the Word Options dialog.
AutoCorrect in Action
AutoCorrect does more than just changing spelling. A number of AutoFormat changes are part of this feature, like turning a web address into a clickable link, and replacing text, like turning (c) into the copyright symbol ©.
- If necessary, open a new blank document in Word.

- On line 1 of your
blank document type the words Word Project 1 and press the ENTER key to move to a new line.
- On line 2 type your name and press the ENTER key.
-
Starting on line 3, type the characters at the right EXACTLY as shown in the image at the right, including a space between each 'word'. Press the ENTER key at the end of each line. The dots in between words show that there is a blank space there.
Watch carefully to see how Word changes what you type.
Click here to open an image in a new window of what you need to type. Use the window's Print command, if you want a printed copy.
Note: After the (tm), those faint double dots are colons.
The AutoCorrect and AutoFormat features change your typing except for the one feature that we turned off earlier - the ordinal number.
What your typing should look like after AutoFormat As You Type does its thing:
What changed while you typed:
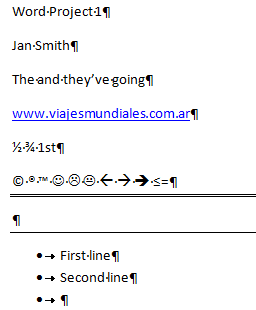 line 3: Spelling corrections
- line 4: Changes web address to clickable link, but ignores the
spelling
FYI: This address is not a working web site. - line 5: Fractions changed to character fractions but 1st NOT
changed to 1st
(That's because we turned off that feature in the previous lesson.) - line 6: Text changed to symbols for copyright, registered,
trademark, smiley face, sad smiley, straight mouth smiley, left arrow, right arrow, bold left arrow, bold right arrow OR less than or
equals sign
Word 2016: If you type <== slowly, you get the symbol for "less than or equal to" like in the illustration.
If you type it fast, you get the bold left arrow. - line 7: Three equals signs changed to a double line across the page
- line 8: Three hyphens changed to a single line across the page
- line 9: Changed the asterisk * to a bullet dot, indented, and capitalized the first word
- line 10: Inherited the bullet format and capitalized the first word
- line 11: Inherited the bullet format
-
With your cursor in the last (blank) line, press BACKSPACE once.
This stops the bulleting of the lines but leaves the indention.
- Press BACKSPACE two more times to get the cursor back to
the left margin.
- Type rscc (with a
space at the end) and press the ENTER key.
The AutoCorrect entry that you created above changes this text to Roane State Community College. This won't happen without the space following the abbreviation.
AutoComplete in Action
Word sometimes offer you a suggestion in a ScreenTip to complete what you are typing. This come from the Building Blocks feature, which you can access using the Quick Parts button on the Insert tab. You only get a suggestion when the first four characters you have typed matches the unique name of the Building Block. Word comes with a number of these pre-installed to format a header, footer, cover page, table, watermark, table of contents, bibliography. You can add to the list yourself, including AutoText entries for long names that you type a lot, like your school or company name, or even your own full name.
You can accept a suggestion by pressing the ENTER key, or just keep on typing if that's not what you want this time.
-
 Start typing the
name of the current month on the last line of your
document.
Start typing the
name of the current month on the last line of your
document.
After the 4th letter, Word's AutoComplete may suggest a completion to what you type in a ScreenTip. Short months get ignored by AutoComplete! Not enough letters. You will have to just be careful when typing those.
- Press the ENTER key to accept the current month.
 Type a space after the
month and wait for a second.
Type a space after the
month and wait for a second.
AutoComplete should offer today's date in the ScreenTip.- Press ENTER to accept what Word suggests.
Of course, you will get the actual current date, not what is in the illustration. - Press ENTER again to create a new blank line.
AutoCorrect Options in the Document
Whenever Word does something automatically, you have the opportunity to reverse what it did... if you are quick about it.
AutoCorrect Options Button:
-
 Type three underscores and press ENTER.
AutoCorrect changes the underscores to a bold line across the page.
There is an AutoCorrect popup button to the left.
- Hover over the AutoCorrect button.
A down arrow appears and a ScreenTip.
-
 Click the down arrow.
A short menu appears with three choices:- Undo Border Line, which is the change Word just made.
- Stop Automatically creating Border Lines
- Control AutoFormat Options... which opens the AutoCorrect dialog to the AutoFormat As You Type tab
-
 Click on Stop Automatically Creating Border Lines.
You last border line is changed back to 3 underscores and changed the choice in the dialog that controls this action. Let's go look to prove this.
- Click on the AutoCorrect Options button to see
the menu again.
The short menu changed. Now your choices are:- Redo Border Line
- Stop Automatically Creating Border Lines has a check mark
- Control AutoFormat Options...
-
 Click on Control AutoFormat Options....
The AutoCorrect dialog opens to the tab AutoFormat As You Type. The check mark is gone from Border lines.
The change will apply to all documents until you change it again.
- Click on OK to close the dialog.
AutoCorrect Options when the button isn't in sight:
If you have continued typing and later spot a place that Word made a change, you can still undo that change... usually.
 Hover the mouse pointer over the first word
in the third line, The.
Hover the mouse pointer over the first word
in the third line, The.
A small blue rectangle appears below the word. This is the AutoCorrect button in its collapsed form.
-
 Hover over the blue rectangle.
The AutoCorrect button appears.
- Click the down arrow to show the menu.
This menu allows you to undo all the corrections to the word or just one of them. - Click in the document to close the menu.
- Repeat the steps above with each item that was changed
by Word.
- Which items do NOT show a collapsed AutoCorrect button??
[the lines across the page.] - What menu items show up?
Did you catch all of the changes as they were being applied?
- Which items do NOT show a collapsed AutoCorrect button??
AutoFormat
The choices you made in the dialog AutoCorrect on the tab AutoFormat can be different from those on the tab AutoFormat As You Type. Confusing?? It's all in the timing!
The choices on the plain AutoFormat tab will not be applied until you tell Word to apply them. This is why we put the AutoFormat... command ![]()
![]()
![]() on the Quick Access Toolbar earlier. That command is not on the ribbon
anywhere.
on the Quick Access Toolbar earlier. That command is not on the ribbon
anywhere.
- Select the characters 1st in line 4 by dragging over them.
- On the Quick Access Toolbar, click the button AutoFormat


 .
.
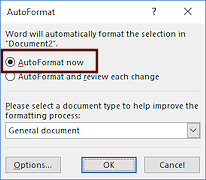 A dialog opens. The default choice is AutoFormat now.
 - Click on OK to close the dialog and apply the AutoFormat choices to the selected text.
The characters st are moved to the superscript position.You might be asking yourself- why not leave these AutoFormat As You Type choices on all the time? Sometimes it's more trouble than it is worth if Word keeps trying to AutoFormat something that you don't want changed. For example, if you really want a set of dashes instead of a border, you have to uncheck the AutoFormat Borders which turns those dashes into a straight line across the page.
Save, Preview, and Print
When you save a new document, you see the Save As dialog. You must choose a location, a file name, and a file type. The defaults for this dialog will be the last location used, the first words in the document for the name, and Word document, with extension docx.
![]() Save before printing. It is
a VERY good habit to save your work before trying to print. If something goes terribly wrong with the print job, you certainly want to be able to try again.
Save before printing. It is
a VERY good habit to save your work before trying to print. If something goes terribly wrong with the print job, you certainly want to be able to try again.
![]() Preview before printing! It is
VERY important that you preview every document and view all of its
pages before you print. Many, many pages of paper have been wasted by printing without looking to see exactly what will be printed.
Preview before printing! It is
VERY important that you preview every document and view all of its
pages before you print. Many, many pages of paper have been wasted by printing without looking to see exactly what will be printed.
-
 Save this document by clicking the Save button

 on the Quick Access Toolbar.
Since this is a new document, you will see the Save As process.
OR
 CTRL + S
- Navigate, if necessary, to select the folder word project1 on your Class storage device.
(Create this folder if it does not exist yet.) -
Name the document mysymbols-Lastname-Firstname.docx , where you substitute your own first name and last name in the file name.
Note: We will not use spaces in file names in these lessons because some of you may be submitting your documents to a teacher electronically. Windows and Office programs don't have trouble with spaces in names, but some course management programs refuse to work with file names that include spaces.
- Click on the Save button at the
bottom right of the Save As dialog.
The document is saved and Word returns you to the document.
-
Click on


 the Print Preview/Print Preview & Print button on the Quick Access Toolbar.
Word 2007: The Print Preview window appears.
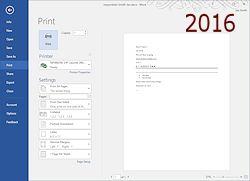
Word 2010, 2013, 2016: The Backstage view opens to the Print page. The preview of the document is on the right. The pane has several controls for managing what prints and how it prints.
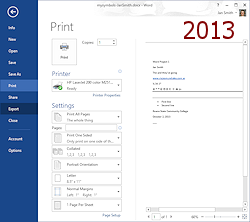
- Check the look of the document and the settings carefully; margins, orientation, paper size. Make any changes that you need to make for your own situation.
-
 To print:
[Follow your instructor's directions about whether to print documents or to submit them electronically]
 Word 2007: Click the Print button
at the top of the Print Preview window. The Print dialog opens. Check
its settings, especially which printer is selected. Click on OK to
actually print with the selected printer.
Word 2007: Click the Print button
at the top of the Print Preview window. The Print dialog opens. Check
its settings, especially which printer is selected. Click on OK to
actually print with the selected printer.
 Word 2010, 2013: Print by clicking the Print button
in the Print pane.
Word 2010, 2013: Print by clicking the Print button
in the Print pane.
The document is sent to the selected printer and the window switches back to the previous view. You will almost certainly have a different printer name than the one showing in the illustration!
A green check mark on the printer's icon means that this is the default printer.
Close Document Without Closing Word
Sometimes you want to close a document but not close Word itself. If you already have two or more document opened in Word, you can just close the document's window and the other document stays open. But when there is only one document currently open in Word, you must be careful.
-
 Word 2007: If necessary, click the Close Print Preview
button at the top right of the Print Preview window.
Word 2007: If necessary, click the Close Print Preview
button at the top right of the Print Preview window.
- Click on the Office ribbon button or the File tab and then
on the Close command at the left.
 The document closes but Word is still open. The document area is empty.
|
|
| © 1997-2017 Jan Smith All Rights Reserved |
Site Map What's New |
Privacy Policy Terms of Service Copyright Acknowledgements |
~~ 1 Cor. 10:31 ...whatever you do, do it all for the glory of God. ~~
Last updated: March 27, 2017
I found a Microsoft Knowledge Base article that helps: http://support.microsoft.com/kb/926927/en-us?FR=1
The title of the article says 'from one computer to another' but the last part of the article actually discusses moving autocorrections from an earlier version into Office 2007.
This is not for the faint of heart! You have to have hidden files showing and be willing to rename hidden files, etc. If you plan to do this, do it before you add any new corrections on the new computer or new version of Office. Those entries would be lost since you are not adding to the list but are replacing the list with your old list of corrections.