
Jan's Working with Words
Images: Image File
Perhaps you could not find a satisfactory image in the Clip Art pane, or perhaps you want to use a picture from another source, or one that you scanned or drew yourself. How do you get such an image into your document? You will need to know where to find it!
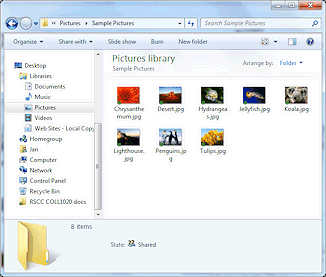
Pictures Library (Windows 7)
| |
Step-by-Step: Image File |
|
| What you will learn: | to delete an image to insert an image from a file to apply a Quick Style to an image to format an image - transparent color, shadow |
The first step will be to remove the image you just inserted (Sorry!), and replace it - twice! You will be saving your changes as two new documents. You're going to get quite a collection!
Start with:![]() , flyer-World Travel Inc-Lastname-Firstname.docx as saved after the previous lesson
, flyer-World Travel Inc-Lastname-Firstname.docx as saved after the previous lesson
Delete Image
- Select the image in your flyer by clicking on it.
- Press the DELETE key to remove the image from the document.
 Save
As: a new name - flyer-World Travel Inc-Lastname-Firstname-beach.docx to your word project1 folder.
Save
As: a new name - flyer-World Travel Inc-Lastname-Firstname-beach.docx to your word project1 folder.
Insert Picture
Now let's go find another image to use on your computer.
-
 With
the cursor still on line 2, from the
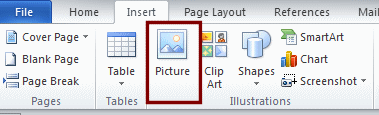
ribbon on the Insert tab in the Illustrations group, click on Picture.
With
the cursor still on line 2, from the
ribbon on the Insert tab in the Illustrations group, click on Picture.
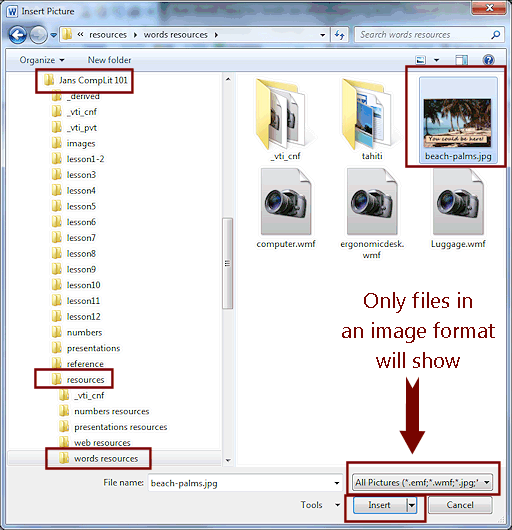
This opens a Windows Explorer window so you can locate an image on your hard disk.The default location:


 WinXP, Vista, Win10: Pictures folder in your user folder
 Windows 7 and 8: Pictures Library
BUT, the Insert Picture dialog will remember where you were recently. (Your folders and user name will be different from the illustrations here.)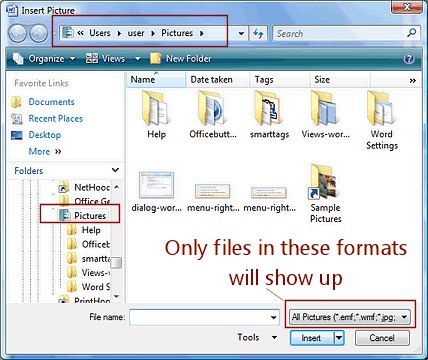
 Missing files: The dialog will
only show files that are in an image format. So don't be scared when you
don't see files that you know should be in a folder!! Missing thumbnails: Windows cannot create thumbnails for some image formats, such as
WMF. Those files will show as a large icon for a graphics program, if you have one installed that can open that format.
Missing files: The dialog will
only show files that are in an image format. So don't be scared when you
don't see files that you know should be in a folder!! Missing thumbnails: Windows cannot create thumbnails for some image formats, such as
WMF. Those files will show as a large icon for a graphics program, if you have one installed that can open that format. - Navigate to the folder for the resource files for these lessons, and select the file beach-palms.jpg.
Where are these resource files?
-
Ask your instructor if these files are already on your computer or network and, if so, where.
-
If you are working from the online lessons at jegsworks.com, the resource files are at http://www.jegsworks.com/Lessons/resources/words%20resources/
Click the link and follow the prompts to download the file that you need. Be sure to save it to a logical location so you can find it after it downloads! If the picture shows up in the browser window instead of downloading, use the browser's File menu to save it to your computer.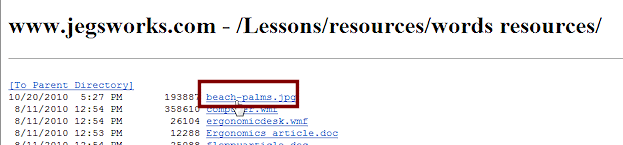
-
If you are working from a full local copy of these lessons, the resource files are on the computer in the lessons. Look for the folder resources and then open it to see the word resources folder.
-
-
 Click on the Insert button.
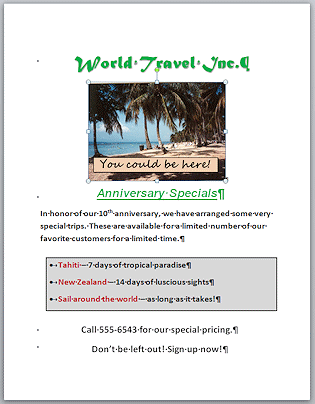
The image appears in the document and those bottom lines move over to a second page 2 again. <sigh>
- Resize the image, as you did the clip art image in the previous lesson to keep
all the text on one page.
- Save.
[flyer-World Travel Inc-Lastname-Firstname-beach.docx]
Format Image: Quick Style
The ribbon has lots of choices for formatting a picture.
-
 Experiment: Styles
With the image selected, on the Picture Tools: Format tab in the group Picture Style, hover over each of the Picture styles on the ribbon and in the gallery. Live Preview shows the effect. If you open the dialog for these effects, there is no Live Preview. A bonus point for the ribbon!When you are ready to continue...
-
 In the group Picture Style, apply the style Rotated,
White
In the group Picture Style, apply the style Rotated,
White
The image gains a white frame, a shadow, and is rotated slightly.
The last lines may wander off the page again. <double sigh> That's because the frame and rotation take up more space than the plain picture did. - Resize the image by dragging the bottom right
handle up and left a bit at a time until the lines
reappear at the bottom of the page.
Note - The handles appear where a non-rotated image would be. This creates a very odd effect when you are dragging the corner handle.
-
 Save.
Save.
[flyer-World Travel Inc-Lastname-Firstname-beach.docx]
Format Image: Shadow, Transparent Color
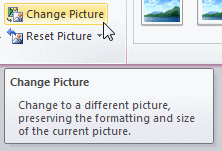
Word has a cool feature when you want to replace an image that you have just gotten sized and formatted just right. The Change Picture button keeps all that formatting and inserts the new image. So sweet!
The Format Picture dialog lists all of the ways an image can be formatted. Live Preview does not work from the dialog, only the ribbon.
- Save
As: flyer-World Travel Inc-Lastname-Firstname-luggage.docx to your word project1 folder.
-
 If necessary, select the image again.
-
On the Picture Tools: Format tab in the Adjust group, click on the Change Picture button.
All of the current formatting will be automatically applied to a new picture.

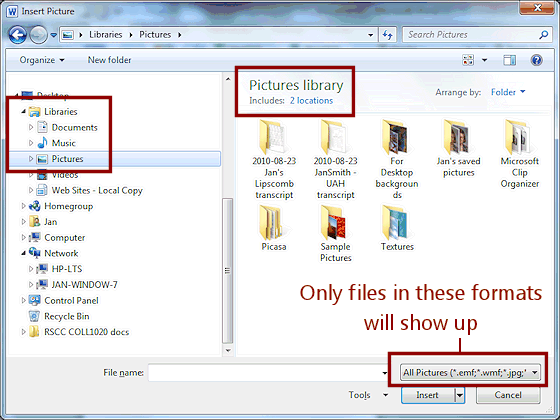
 Word 2007, 2010: The Insert Pictures dialog opens to the same folder you just used. This folder should contain
the resource files for these lessons.
Word 2007, 2010: The Insert Pictures dialog opens to the same folder you just used. This folder should contain
the resource files for these lessons.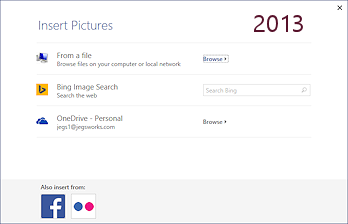

 Word 2013, 2016: The Insert Pictures dialog has a new item, From a file. Click the Browse button.
 - Click on the file Luggage.wmf and then on the Insert button.
A drawing of a suitcase appears.
It has the same size and Quick Style as the previous image. Perhaps being angled is not the best choice for this image.
- On the Picture Tools: Format tab in the group Picture Style, apply the style Drop Shadow
Rectangle.

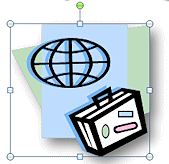
New image with shadow - as a whole; Original image with shadowDid you notice before? The effects are applied to this image as a whole, a rectangle, instead of to just the suitcase. This is different from what happened with the clip art image of the globe and suitcase. Why?
Explanation: The new image does not have a transparent background and the first one did. The background of the thumbnail in Clip Art pane and in the Bing results is white. An image with an white background looks the same on a white page as one with a transparent background... until you apply an effect. Annoying! Happily, Word can fix this.
-
 On
the Picture Tools: Format tab in
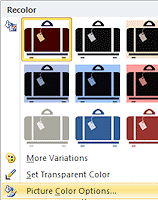
the group Adjust, click on the Color button
On
the Picture Tools: Format tab in
the group Adjust, click on the Color button  .
.
The Recolor gallery opens.
- Experiment: Recolor
- Hover over the various
choices but do not click yet.
These choices turn the whole image into a single color.
In some earlier versions of Word you could select a color to change to a different color. Not anymore.
-

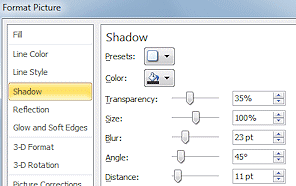
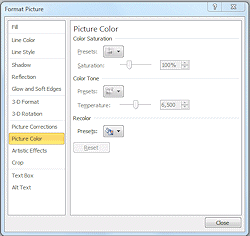 Click on Picture Color Options... at the bottom of the gallery. Word 2007, 2010: The Format Picture
dialog opens. Word 2013, 2016: The Format pane opens.
Click on Picture Color Options... at the bottom of the gallery. Word 2007, 2010: The Format Picture
dialog opens. Word 2013, 2016: The Format pane opens. All of the options on the Picture Tools: Format tab are here and more! There is no Live Preview here to show you the effect of your choices. The effect is applied when you switch to a different page in the dialog/pane or close it.
-
Find the Shadow settings:
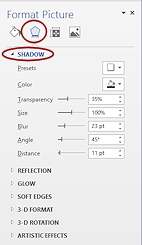
 Word 2007, 2010: Click on Shadow in the navigation pane on the left. Word 2013, 2016: Click on the pentagon shape, Effects, and then on Shadow to expand it.
Now you can see the actual settings for the pre-designed effect you applied. Looks complicated!
- When you are ready to continue, close the dialog.
- If you accidently made changes, use the Undo button to
reverse the changes.
- Hover over the various
choices but do not click yet.
-
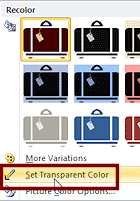 Open the Recolor gallery and click on Set Transparent Color.
Nothing much seems to happen. - Move your mouse over the selected image.
The mouse pointer changes to the Set Transparent Color shape .
.
-

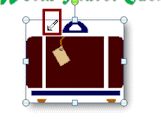 Click on the picture in an area that has the color you want to be
transparent, in
this case, white.
Click on the picture in an area that has the color you want to be
transparent, in
this case, white. TaDa! The background is now invisible and the shadow effect is applied to the parts that make up the suitcase instead of the rectangle. A much different effect!
- Click off off the image to de-select it.
-
 Save.
Save.
[ flyer-World Travel Inc-Lastname-Firstname-luggage.docx] - Close the document.
|
|
| © 1997-2017 Jan Smith All Rights Reserved |
Site Map What's New |
Privacy Policy Terms of Service Copyright Acknowledgements |
~~ 1 Cor. 10:31 ...whatever you do, do it all for the glory of God. ~~
Last updated: March 27, 2017