
Jan's Working with Words
Printing: Printer
There are 3 dialogs that affect what and how you print.
- Print dialog or Print in Backstage view
- Printer's properties dialog
- Word Options
Where to Change Print Settings
Dialog: Print or Preview and Print pane - Choose which printer to use, which pages to print or to print just the selection, how many copies to print, whether to collate the pages.
Examples: Print dialog (Word 2007); File > Print (Word 2010)
 Dialog:
Printer Properties - Varies a lot depending on the particular
printer and manufacturer.
Dialog:
Printer Properties - Varies a lot depending on the particular
printer and manufacturer.
A color printer
will have a way to choose color or black and white only or maybe gray scale. There may be a
choice for photos and for how many dots per inch to use for images. You can choose the size of paper, such as
envelopes or index cards or Letter. You can tell the printer the type of
paper, such as greeting card stock, glossy photo paper, or transparency sheets. The result is MUCH better when the printer correctly manages the ink or toner to match the media.
 Dialog:
Word Options > Advanced > Print - The Advanced page on Word's
Options dialog has Print section which has a number options that affect how your Word document
will print.
Dialog:
Word Options > Advanced > Print - The Advanced page on Word's
Options dialog has Print section which has a number options that affect how your Word document
will print.
Some printers handle some of these on their own, such as handling duplex printing or reversing the order of pages so that the stack winds up in the correct order.
Why print in reverse order: With an ink jet printer the pages usually land face up on the output tray. That gives the ink time to dry before the next page hits. But page 1 will be on the bottom of the stack unless you make the printer print the pages in reverse order.
![]() Quick Print button: If you put the Quick Print button
Quick Print button: If you put the Quick Print button ![]()
![]()
![]() on the
Quick Access Toolbar, clicking it starts printing immediately, using the current settings. You do not get the chance to see what those settings are.
Do NOT use this button unless you are VERY sure what Word will do.
on the
Quick Access Toolbar, clicking it starts printing immediately, using the current settings. You do not get the chance to see what those settings are.
Do NOT use this button unless you are VERY sure what Word will do.
| |
Step-by-Step: Printer Settings |
|
| What you will learn: | to use the Print dialog (Word 2007, 2010) or Print pane (Word 2013, 2016) to use the Properties dialog for the selected printer to use the Word Options dialog to control printing to print a document |
Start with:![]() ,
, ![]() , flyer-World
Travel Inc-Lastname-Firstname.docx completed
, flyer-World
Travel Inc-Lastname-Firstname.docx completed
Save
-
 Save the document.
It is a very good idea to save your work before printing. Sometimes computers lockup during the printing process. This would lose your document entirely if it has not been saved. Of course, you should be saving it all along as you create it, too!
Dialog: Printer
You have a lot of choices of what and how to print. One of the installed printers is set as the default printer. But Word will remember what you used last. So you have to LOOK each time your print.
- Start to print:
 Word
2007: Click Office
button > Print
Word
2007: Click Office
button > Print
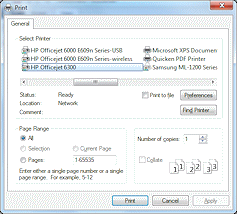
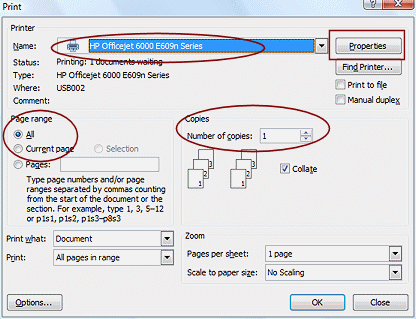
The Print dialog box appears. Notice where you can select the printer, the number of copies and which pages to print.


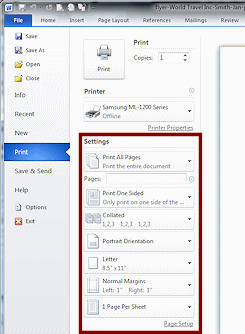
 Word 2010, 2013: Click the File tab >
Print
Word 2010, 2013: Click the File tab >
Print
The Print Preview and Print pane appears. Notice where you can select the printer, the number of copies and which pages to print.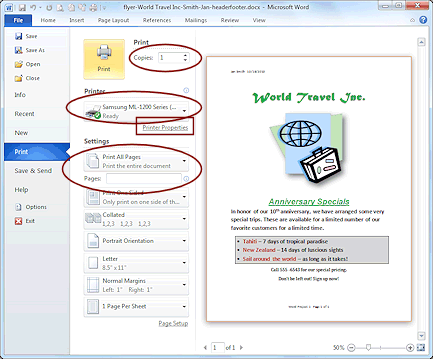
The printer you last used is selected.
You may have more than one printer to choose from, especially if you are on a network. Some of these "printers" create a file instead of actually printing on paper.
What you will change the most often here is the Page Range and the number of copies.
- Click the arrow to the right of the printer's name to see what printers are available. Before you choose a network
printer, be sure you know where that printer is physically. Can you
can go get the printed pages? Sometimes your normal printer will not
be the one showing in this box at first! Always LOOK.
- Click on the printer you want to
use this time.
-
Select All under Page Range and 1 copy.
Do not close the dialog or pane yet.
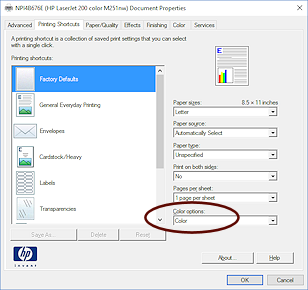
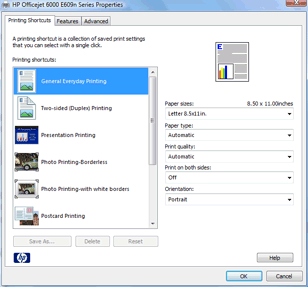
Printer Properties
The Printer Properties dialog looks quite different for different printers, even for those from the same company. Commonly you will at least be able to set page orientation, the type and size of paper, the color and quality of the printing.
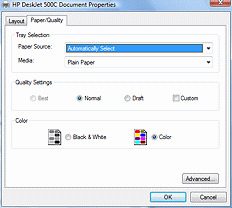
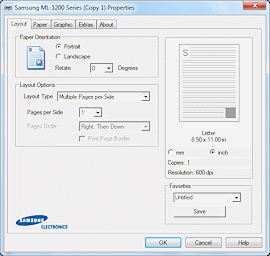
The values shown in the properties ought to agree with what you set in Page Setup, but sometimes printers and word processors have trouble communicating. Check to see how well yours get along. Probably you will find that they agree, so you'd only have to look in one place. But if you forgot to look earlier, here's another spot to look.
- To see the settings for the particular printer:
Word 2007: Click on Properties button at the upper
right of the dialog. Word 2010, 2013, 2016: Click the Printer
Properties link under the Printer text
box.
- Make changes, if needed.
Colored ink and toner is much more expensive than black and color printing is slower also. Be sure you have permission before choosing to print in color.
- Click on OK to close the Printer Properties dialog.
That dialog closes and you are back to the Printer dialog or the Print Preview and Print pane.
Options > Print
-
Open Word Options:
Word 2007: Click on the Options button
 at the bottom left of the
Print dialogThe Word Options dialog opens. Word 2010, 2013, 2016: Click on the Options link on the left of Backstage view.
at the bottom left of the
Print dialogThe Word Options dialog opens. Word 2010, 2013, 2016: Click on the Options link on the left of Backstage view.
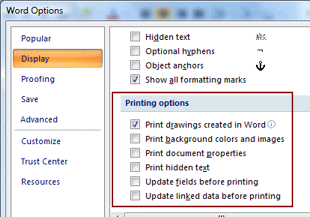 Click on Display in the list of pages.
- Verify the settings in the section Print options.
The settings are the same for all three versions.
 Print
background colors and images: Only check this box if you
really mean it! It takes a lot of ink to print a color or
background image for the entire page!
Print
background colors and images: Only check this box if you
really mean it! It takes a lot of ink to print a color or
background image for the entire page!
Update
fields or linked data before printing: Check this only if
a field in your document might have changed since you last updated
the field while working on the document, the time stamp for
example.
-
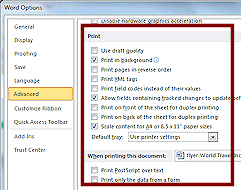
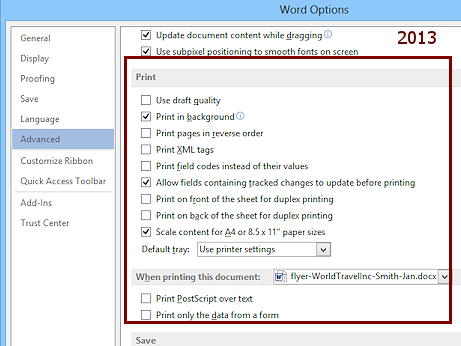 Click on the Advanced page in the Word Options
dialog and scroll to the Print section.
Click on the Advanced page in the Word Options
dialog and scroll to the Print section. - Verify that the settings match the illustration.
Word 2013 and 2016 have one more item than 2007 and 2010.Print in background: Allows you to work on other things
while the computer sends information to the printer. With this box
unchecked, you would have to wait for the printer to finish before you
could do anything else! You will notice the delay only on long
documents.Print in reverse order: Prints the page from last to first, which is useful option for some
ink jet printers. While pages come out of a laser printer face
down, a
page printed by most ink jet printers comes out of the printer face up.
This give the ink a second to dry before the next page lands on
it. If the printer prints the pages in normal order
(1, 2, 3...), you have to re-sort the whole stack to get page
one on top. This is not much of a problem for 2 or 3 pages, but it's a
real pain for 20 or 30, especially if the pages are not numbered! Some printers will automatically change the print order for
you, so check that out before marking this option. -
Click on the OK button to close the Word Options dialog.
Word 2007: You are back in the Print dialog. Word 2010, 2013, 2016: You are back in the document instead of print preview. Click the
Print Preview and Print button on the Quick Access Toolbar to get back to
that pane.
Check with your instructor about which documents to submit and how to submit them - printed or electronically.
-
 To actually
print (at last!): Word 2007: In the Print dialog, click on OK.
To actually
print (at last!): Word 2007: In the Print dialog, click on OK. Word 2010, 2013, 2016: Click the big Print button on the Print Preview and Print pane.
The print job will start, using the default settings for the printer you chose unless you made changes.
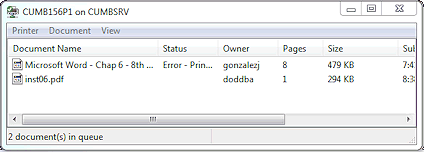
 An
icon for the printer appears in the Notification Area of the Taskbar. If
you double-click the icon, a window appears that lists all of the print
jobs that are waiting for this particular printer and gives you the
status of the job, sort of.
An
icon for the printer appears in the Notification Area of the Taskbar. If
you double-click the icon, a window appears that lists all of the print
jobs that are waiting for this particular printer and gives you the
status of the job, sort of.
 If
several computers share the same printer, your print job will have to
wait its turn in the queue.
If
several computers share the same printer, your print job will have to
wait its turn in the queue. The illustration shows the print queue for a networked computer. The Status columns shows "Error - Printing", but does not give any clues as to what is wrong. It could be as simple as needing more paper. The printer could have a paper jam, or be turned off or not be connected to the network. Whatever the cause, the second job in the queue won't print until the first job prints or is canceled and the problem is fixed.
Once the computer has sent the data on the document to the printer's memory, it thinks that the job has been done and the job vanishes from the list. But the printer may not have printed any of it at all!
 Do
not close your document until your print job is finished AND you have
checked that the page(s) printed correctly!
Do
not close your document until your print job is finished AND you have
checked that the page(s) printed correctly! - Collect your printed document from the
printer's out tray.
- Check for errors.
- If all is fine, close the document and close Word. If prompted to save the document, say Yes. (That means Word
thinks you made a change since the last save. Even a click counts. Did
you click inside the document after saving the last time?)
-
 Backup your Class disk, that is, copy all the files on the Class
disk to your Backup device.
Backup your Class disk, that is, copy all the files on the Class
disk to your Backup device.Make it a habit to have at least two copies of your documents. When one copy gets trashed or the device is lost, it won't be a disaster if you have a backup copy.
Consider keeping a copy at a cloud-based storage service like Dropbox, iCloud, OneDrive, or Google Drive. If you have space on a network server for storage, use it for backup copies of all your work.
|
|
| © 1997-2017 Jan Smith All Rights Reserved |
Site Map What's New |
Privacy Policy Terms of Service Copyright Acknowledgements |
~~ 1 Cor. 10:31 ...whatever you do, do it all for the glory of God. ~~
Last updated: March 27, 2017