
Jan's Working with Words
Report: Works Cited
In this report you will be using MLA guidelines for the citations in the text and the sources at the end of the report. You will not be sticking completely to all MLA styles. At the end of your report you need a Works Cited page that lists the references you used.
The MLA Guidelines have specific rules for what information to include in the citation for any type of reference - a book, a magazine article, an encyclopedia article, a web site, a personal interview, etc. These can get confusing when you throw in works that have several authors or are part of a series or which you found in an electronic format.
Basically the rules boil down to giving the information someone would need to find the exact resource you used. That would normally mean the author's full name, the complete name of the resource, the publication date, and who published it. For online resources you need to include the article title and the site name. The complete URL (web address) is optional in the guidelines for now but it is helpful to include it, especially when the site and page are hard to find.
Happily, Word makes creating a source just a matter of filling in some text boxes!
The sources for the report you will create are fictional.
Always keep in mind that web sites rotate their articles and may not keep online archives of past issues. Save a copy yourself of any online sources that you use and make good notes about when and where you found the information. A printed resource is more likely to be findable at a later date.
| |
Step-by-Step: Works Cited Page |
|
| What you will learn: | to add a page at the end to create source in Word's master list to insert a bibliography to edit source with Source Manager to remove source with Source Manager to create a new style |
Start with: ![]()
![]() , report-WorldTravelInc2-Lastname-Firstname.docx from the previous lesson
, report-WorldTravelInc2-Lastname-Firstname.docx from the previous lesson
Create New Works Cited Page
Word can give you serious help with creating a list of the sources for your citations.
 Save as report-WorldTravelInc3-Lastname-Firstname.docx on your
Class disk in the word project4 folder.
Save as report-WorldTravelInc3-Lastname-Firstname.docx on your
Class disk in the word project4 folder. - If
there is not a blank line at the end of all the text, add a blank line.
- Insert a Page Break after the blank line, using CTRL +
ENTER.
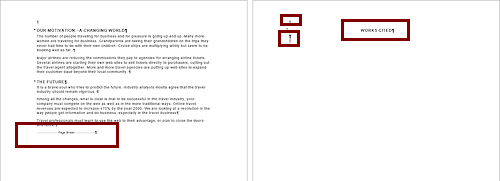 Type Works Cited and apply Heading 1 to it.
- Center the line.
- Press the ENTER key to create a new line below.
- Save.
[report-WorldTravelInc3-Smith-Jan.doxc]
Create Source
Word has a very helpful set of dialogs that show you just what you need to include for a reference in a bibliography. Word can create the reference in the report's text for you, including proper punctuation and spacing. One of the worst parts of writing a formal report is getting those picky details exactly right.
Remember that the goal is to include all the information another person would need in order to find the source information for themselves. Sometimes the recommended fields do not quite fit the situation. You may need to click on Show All Bibliography Fields.
The sources used for the document you are creating in this lesson are fiction but are designed to show some of the types of information you can run into, especially with web-based resources. These lessons cannot possibly illustrate the full range of resources that you might use in a real-life report.
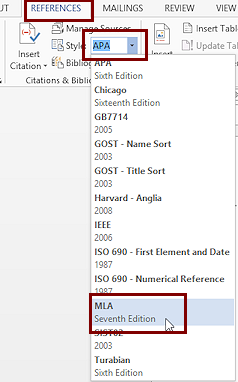 On the References tab in the Citations and Bibliography tab group, click the arrow in the Style box.
Notice the various styles that are available.
-
If necessary, change the Style box to show MLA Seventh Edition.
This list apparently gets updated when you do Office updates as my copies of Word 2007 and 2010 did not have the seventh edition in years past. Sweet!The newer versions of this list offer more bibliography/citation styles than earlier versions did. You really MUST know which style rules are needed for what you are doing. A teacher or publisher may have very, very specific requirements!
-
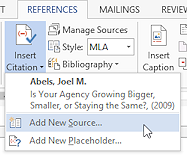
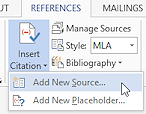 Click on the button Insert Citation and then on Add New Source.
The Create Source dialog appears.At the top of the dialog is a drop list of types of sources.
-
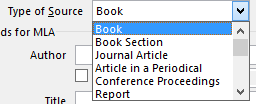 Click the arrow to open the list Type
of Source and scroll to see what options are listed.
Click the arrow to open the list Type
of Source and scroll to see what options are listed.
-
Select Book at the top of the drop list.
(You may need to scroll up to see this choice.)The dialog re-loads with text boxes for the information Word recommends for that kind of source. The items showing are not all that Word could use.
-
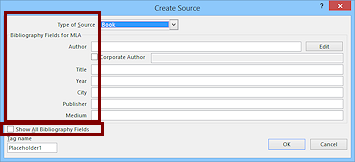 Check the
box at the lower left, Show All Bibliography
Fields.
Check the
box at the lower left, Show All Bibliography
Fields.
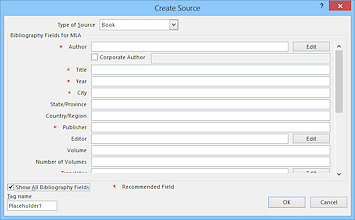 The dialog now
shows all possible fields. The ones with a red asterisk * are
recommended, but you may need to include some of the other fields in
particular situations.
The dialog now
shows all possible fields. The ones with a red asterisk * are
recommended, but you may need to include some of the other fields in
particular situations.
-
Repeat to select each of the other source types and inspect what fields are available.
You have to know what you will need for the bibliography while you are working with the source. It's not fun to get back from a research excursion only to find out that you don't have a required piece of information about your source!
After you have viewed them all...
- Select Web site in the list of types of sources.
- If necessary, check the box Show All
Bibliography Fields.
You need one of the hidden fields, Name of Web Site.
It seems obvious that you would ALWAYS want to include that information in the bibliography! The URL is considered to be optional since web sites are often rearranged.
-
Fill in the following information for your first source.
If you want abbreviations for the months, you must type them that way.
Author: Joel M. Abels
Name of web page: Is Your Agency Growing Bigger, Smaller, or Staying the Same?
Name of web site: Travel Trade Online
Date of publication: March 30, 2009 (These parts go in the Year, Month, and Day boxes.)
Date accessed: July 17, 2010
URL of site: http://traveltrade.com/editorial/edit1_20100330.html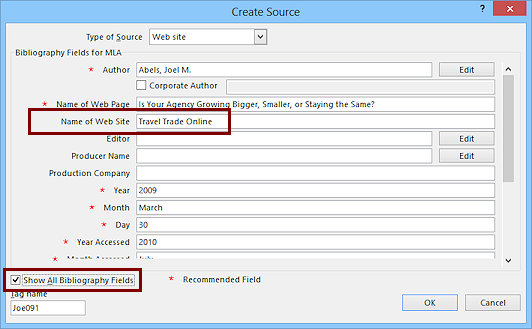
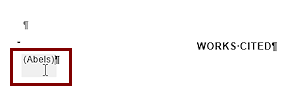
Click on OK.
Word adds this source to its master list of sources and inserts a parenthetical reference, (Abels) where the cursor was. Not at all what we wanted, but you can fix it easily shortly.Even if you cite this source many times, you only have to enter this information once. You can even cite this source in a different document without having to recreate it.
Info also needed for later: To create a citation in the document when the source has more than one page, you also will need to know what page(s) your information came from. That does not apply to this source, which represents an online article on a single web page.
-
 Similarly, add new sources using the information below. The button's drop list
shows sources in the master list for this document as you add them.
If you will look at this list carefully as you go, you won't create
a duplicate source. You only need one entry per source, no matter
how many different times you use the source in a parenthetical
reference.
Similarly, add new sources using the information below. The button's drop list
shows sources in the master list for this document as you add them.
If you will look at this list carefully as you go, you won't create
a duplicate source. You only need one entry per source, no matter
how many different times you use the source in a parenthetical
reference.Notice that you will not have to type in the quotation marks or underlines that will appear around articles, book names, etc. Word handles that for you... IF you put the data in the correct text box.
You can enter the author's name in normal order, like Joel M. Abels, or in alphabetizing order, like Abels, Joel M. Word is now smart enough to figure it out both ways!
Source 2:
Type of source: Web site
Author: Michael Pina
Web page name: Where are the Jobs in the 21st Century?...
Web Site name: Travel Industry Association of America.
Date published: Nov. 19, 2009
Date accessed: 17 July 2010
URL: http://www.tia.org/press/191119travelt1.htm
Comment: news release.
Source 3:
Type of source: Article in a periodical
Author: Vernon Pauley
Title of article: Slow down? Never!
Name of periodical: Golden Years Magazine
Published: Summer, 2010 (put Summer in the Month text box and leave the Day box blank)
Pages for article: 2-4
Source 4:
Type of source: Web site
Author: Pina, Michael
Web page name: New TIA Report Says Online Travel Jumps 200% in 2008...
Web site name: Travel Industry Association of America
Date published: Oct. 6, 2009
Date accessed: 12 July 2010
URL: http://www.tia.org/press/jobs08.htm
Comments: news release
Source 5:
Type of source: Article in a periodical
Author: Miller, Joseph
Title of article: Who's Traveling
Periodical name: Business Travel Guide
July 10, 2010
Pages: 1 - 3
Source 6:
Type of source: Document from web site
Author - Corporate: IBM (no particular author was named)
Web page name: Living in the Information Society: How Travel & Transportation Will Change in a Networked World
Web site name: IBM
Publication date: Aug. 24, 2009
Access date: July 18, 2010
URL: http://www.ibm.com/ibm/publicaffairstravel/changing.ppt
Comment: PowerPoint Presentation
Source 7:
Type of source: Interview
Interviewee: Harley Fredrickson
Title: Using the web to grow your business
Interviewer: Sarah Lockman
August 14, 2010
-
Delete the parenthetical references from the Works Cited page.
This method of adding references is best for when you are putting in the citations as you write.The Manage Sources button opens a dialog that is good for adding references all at once, without having to delete the unwanted parenthetical references.
- Save.
[report-WorldTravelInc3-Lastname-Firstname.docx ]
Insert Bibliography
Now that the sources are all entered into Word's list of sources, you can create the bibliography list that goes on the Works Cited page.
- If necessary, put the cursor at the blank paragraph
that follows the line "Works Cited" on page 4.
There should NOT be any parenthetical citations on the page.
- On the References tab in the Citations and Bibliography tab group, click on the button Bibliography and then on Insert Bibliography.
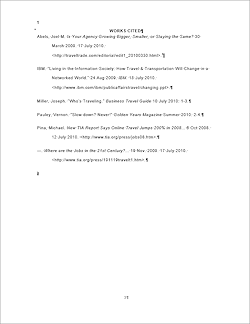
A list of your sources shows up at the cursor location, in neat alphabetical order and properly punctuated, if you did not mess up the typing!
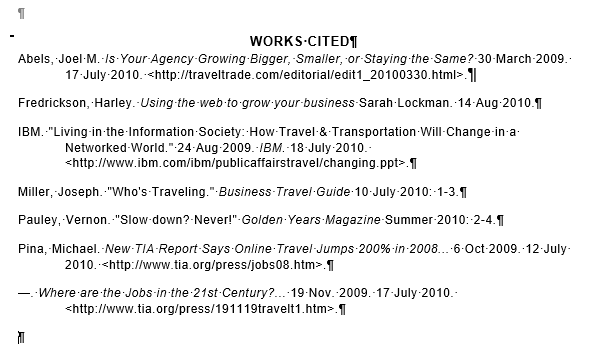
Notice: The Comments did not show up in the bibliography. But that information can still be useful to you as you work on your document.
Notice: A second source by the same author did not repeat the author's name but used an em dash where the name would be.
-
Read your sources carefully, making note of any typing errors.
Do not make corrections directly on the page! In the next section you will learn the best way to make corrections.This method puts ALL sources that you have attached to the document in the bibliography. If you have entered sources for other documents, you will have to get rid of some of these. You will learn shortly how to pick and choose sources and how to remove a source from the document without deleting it from the master list.
Edit Source in Master List
It is easy to make a mistake when typing data into Word's Create Source dialog, especially getting the dates entered in the wrong boxes. There two ways to make changes:
-
(Rarely) Type corrections directly on the page:
This is good only for adding data that did not fit in Word's dialog. There so many new sources for information that is hard for Word to keep its dialog up-to-date.
Disadvantage: If you update fields, all your corrections, additions, and formatting are lost! -
Edit the source in Word's master list:
This is the best way to update data on your sources and it's the ONLY good choice if you mistyped the author's name. Correcting the source in Word's list lets Word put the correct data in for citations in the body of the document as well as in the bibliography. Sources can be used in other documents and this method makes sure they will be correct in those other documents, too.
Disadvantage: You have to remember where to go to get to the list! If you have entered a large number of sources for various document, it is tedious to wade through the list to find the one you need to fix. Do it anyway!
Next you will alter the data for one of the sources. If you make errors when entering the source data, use this method to correct them in the master list.
-
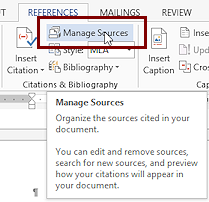 On the References tab
in the Citations and Bibliography tab group, click on the button Manage
Sources.
On the References tab
in the Citations and Bibliography tab group, click on the button Manage
Sources.
A dialog appears that lists the sources in the master list on the left and the sources attached to the current document on the right. Notice that there is are several buttons in the middle, including New... Here is another way to create a new source.If Word has been used before to create sources, your Master List may not look like the illustration.
-
Select the source by Michael Pina, New TIA Report... in the Master list on the left.
The preview at the bottom shows how this source will look in a bibliography entry.
-
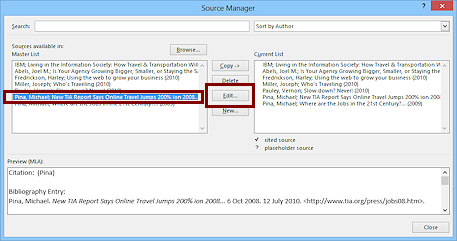 Click the Edit... button in the middle.
The Edit Source dialog opens. It looks remarkably like the Create Source dialog! -
Change the year of publication to 2008 and click on OK.
A message box says that the source is in both the master list and the current document. Do you want to update the information in both? Normally one would! -
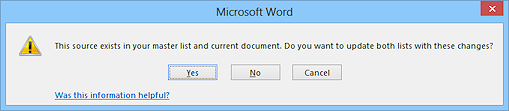 Click on Yes in the message box.
You are back to the dialog. The preview shows the new date.
-
Click the Close button and look at the source on the Works Cited page.
Your change did NOT automatically shown on the page!
-
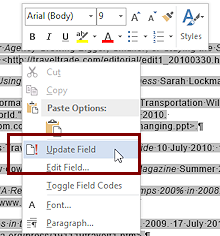 Right click on the
bibliography list (it is all one field) and select Update field.
Right click on the
bibliography list (it is all one field) and select Update field.
Alternate Method: Click anywhere in the list and press the F9 key.
The sources are updated to use the current source information and the default style is reapplied, Bibliography + Left.
If you had applied any formatting, you would have to reapply it. Ouch. -
Save.
[report-WorldTravelInc3-Lastname-Firstname.docx ]
Remove Source from Document
As you edit a report or other document, you may find that you entered a source but are not using anything from it any more. You can remove the source from the document and still leave it in the master list. You might change your plans and need that source later. This way you don't have to create the source all over again. Sweet!
-
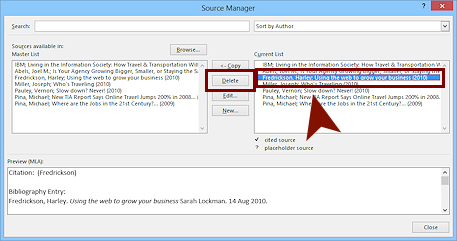 Click on the Manage Sources button again.
- Click on the interview of Harley
Fredrickson in the Current List, on the right.
This is the list of sources for the current document.
-
 Click the Delete button in the middle of the
dialog.
Click the Delete button in the middle of the
dialog.
The interview vanishes from the list on the right, but it is still there in the master list on the left.
- Click on Close.
- Update the bibliography field.
The Frederickson interview is gone from the Works Cited page. 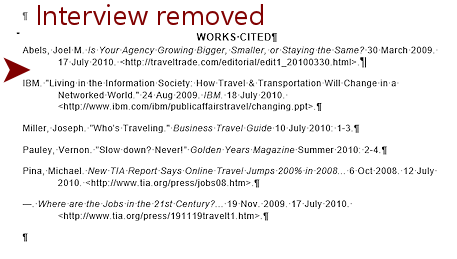 Save.
Save.
[report-WorldTravelInc3-Lastname-Firstname.docx ]
Create Style - works cited
For some reason the style Word uses for the Works Cited page does not include the double spacing that MLA format calls for. Also, the font size is pretty small for such technical writing. You can fix those issues.
-
Select the first source on the Works Cited page.
What is highlighted depends on one of the Word Options settings:
Options > Advanced > Show document content > Field shading
The choices are Never, Always, and When selected.
If the setting is 'When selected', then the whole set of sources gets a gray background. This tells you that they are part of a field. But, they are NOT all selected. The selected part has an additional highlight. This is confusing at first!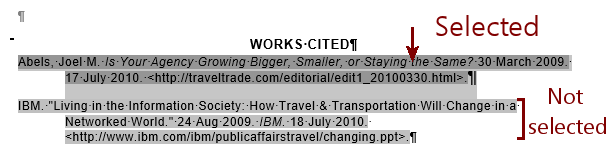
- Change the following features:
- Line spacing = Double spacing
- Hanging Indent 0.5"
- Font Size = 10 pt
-
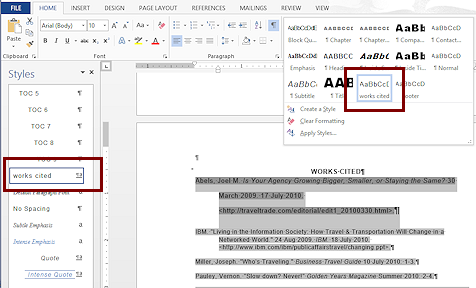 Create a new style from this paragraph
named works cited .
Create a new style from this paragraph
named works cited .
 Problem: Word freezes while trying to create a style
[January 2016: Word froze up several times while I was trying to create a new style from the formatted bibliography item.]
Solution: Save document, close Word, and reopen the document. The new style was there. I wonder if this is related to the Styles pane issue I have been having. - Check the Styles gallery and the Styles pane for the new style.
Your new style may show in a seemly random spot or not at all! It depends on how your Styles pane is set. Usually the pane is set to show Recommended styles. It might be easier to just alphabetize the list.
-
 Apply the new style to the rest of the sources.
- Make sure that there is a blank line after the Works Cited.
The whole page should be double spaced.
-
Save.
[report-WorldTravelInc3-Lastname-Firstname.docx]
|
|
| © 1997-2017 Jan Smith All Rights Reserved |
Site Map What's New |
Privacy Policy Terms of Service Copyright Acknowledgements |
~~ 1 Cor. 10:31 ...whatever you do, do it all for the glory of God. ~~
Last updated: March 22, 2017