 |
 |
Step-by-Step:
Format Linked Text Boxes |
 |
What you will learn: |
to change the AutoShape of a text
box
to format colors and lines for a text box
to format
text
inside a text box
|
Start with:
  ,
textboxes.doc ,
textboxes.doc
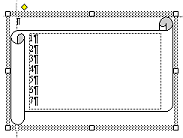
Change AutoShape
When you first create a text box, it is always a
simple rectangle. You can change that boring shape by applying a different
AutoShape with the | command.
 If you pick a shape first from
the AutoShapes menu and then draw it, you have just an AutoShape, not a
text box. To add text to the shape, you must right click and pick
from the popup menu. If you pick a shape first from
the AutoShapes menu and then draw it, you have just an AutoShape, not a
text box. To add text to the shape, you must right click and pick
from the popup menu.
-
 Select Text Box
1 at the upper left of textboxes.doc. Select Text Box
1 at the upper left of textboxes.doc.
- On the Drawing bar select | | | . This is easy!
- Drag one of the text box
handles
 . The height and width of the text
box change. . The height and width of the text
box change.
 To keep the same proportions as you resize
the text box, hold the SHIFT key down while you drag a
corner
handle. To keep the same proportions as you resize
the text box, hold the SHIFT key down while you drag a
corner
handle.
- Play with the shape and then undo your changes.
Adjust AutoShape
-
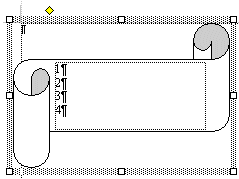
 Move your pointer over the
yellow adjustment handle. The pointer changes to a delta
shape Move your pointer over the
yellow adjustment handle. The pointer changes to a delta
shape  for
editing a vector drawing. for
editing a vector drawing.
If you don't see the yellow diamond,
click
on the box border.
- Drag in various directions.
The figure
shape changes, but the overall height and width of the figure do
not change! Is this not too cool!!??
For this shape it's the
tightness of the scroll and the height of the "paper"
that the changes when you drag the yellow diamond. All but the
most basic AutoShapes have a yellow diamond handle like this. The effect
varies depending on the shape.
- Apply a different shape to each of the other text boxes. Experiment
with changing the sizes. Adjust the shapes with the adjustment handle.
Have a little fun!
Format Text Box
- Experiment with
formatting your text boxes. Make each one different.
Use all of the formatting tools on the
Drawing bar: background color, line color, line style, shadow, 3-D. Try to arrive
at an attractive, or at least interesting, combination.
- After you have finished formatting the text boxes themselves,
format the text inside using the tools on the
Formatting bar.
 If you format the
text first and then format the text boxes, you may find your text
moves into the next text box. Your formatting choices may not work well
in a different text box! If you format the
text first and then format the text boxes, you may find your text
moves into the next text box. Your formatting choices may not work well
in a different text box!
- Preview.
Keep in mind that if you print in
black and white instead of color, some of your color choices may look the same.
This can make text disappear! Make changes, if necessary, so that your print
out will be clear.
-
 Save
as textboxes2.doc in the word project3 folder of your Class
disk. Save
as textboxes2.doc in the word project3 folder of your Class
disk.
 How to handle a full disk
Problem: Page Setup Grayed Out
When you think you are ready to print, you generally need to check Page
Setup. You might have a shock...
-
 Select a text box and open | . Whoops! It's grayed out!
You can't do this now! Why?? Select a text box and open | . Whoops! It's grayed out!
You can't do this now! Why??
- Click out of the text box and try
again .
Now you can select and check the
settings. That's all it takes to solve that
problem!
 The same problem occurs if an
image is selected when you try
to view Page Setup. The same problem occurs if an
image is selected when you try
to view Page Setup.
- Print
Preview.
-
 Print. Print.
|

