|
 |
Step-by-Step: Create & Link |
|
What you will learn: |
to create a text box
to size a text box
to link text boxes
to break a
link
why text can vanish in a text box
how
to tell if
a
text box is linked
|
Start with:
  (cannot be Word
95) (cannot be Word
95)
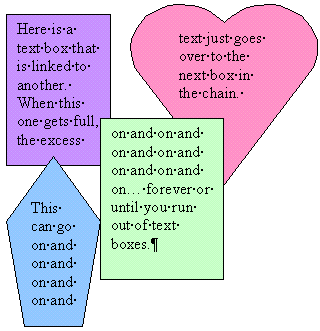
You are going to create 4 identical text boxes. You will
link them and insert some text to show how the flow of text goes from
one box to another.
Create a Text Box
- If necessary, show the Drawing toolbar by clicking on
 the Drawing button. the Drawing button.
- If necessary, open a
new blank document.
- Click on
 the text box button on the Drawing toolbar. The pointer changes to
 the precision tool.
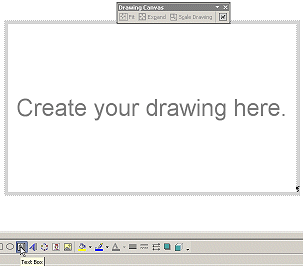   In Word 2002/2003 you will see the Drawing Canvas
toolbar and a drawing canvas box in your blank document. Unexpected!
In Word 2002/2003 you will see the Drawing Canvas
toolbar and a drawing canvas box in your blank document. Unexpected!
 Drag to
create a text
box in the upper left of
the blank document. A text box is always a rectangle to start with.
You will change its size shortly. Drag to
create a text
box in the upper left of
the blank document. A text box is always a rectangle to start with.
You will change its size shortly.
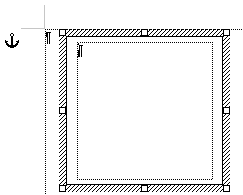
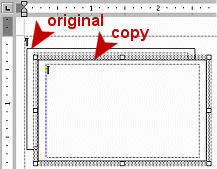
Drag from a position that is
NOT in the drawing canvas. The drawing canvas vanishes.The anchor symbol
 at the left
in the illustration shows where the text box is attached to the
page. at the left
in the illustration shows where the text box is attached to the
page.
A textbox is actually a kind of drawing object and is surrounded by a
drawing canvas. The drawings you create on a
drawing canvas are treated as a single group. The drawing canvas will vanish if you create
your
textbox outside the canvas.
Selecting a Text Box
A text box has two different kinds of selection.
You can select the whole text box or you can select it for editing its
contents. The border looks different.
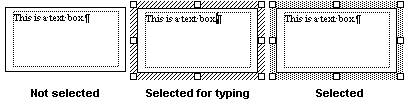
- Click on a blank area of your document
to unselect your text box.
- Move the mouse pointer over the border
of the text box. The pointer shape changes to the Move shape:

- Click the border of the text box. You
have selected the whole text box. The border is now a wide band of
dots.
 If you drag
when you click, you will move the text box. That's
why the pointer has the Move shape. If you drag
when you click, you will move the text box. That's
why the pointer has the Move shape.
- Click out of the box to unselect
it.
- Click inside the text box. It
is now selected for editing. The border is now a wide band of diagonal
lines and the cursor is blinking on the text line. Simple ... when
you know what is going on.
Size a Text Box
-
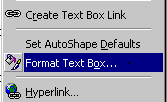 Right click the text box border and choose . The Format Text
Box dialog opens. Right click the text box border and choose . The Format Text
Box dialog opens.
-
 Click on the
Size tab and set the height to 2" and the width to 3". (or use 5 cm by 7.5 cm)
Type the unit of measure along with the number. Click on the
Size tab and set the height to 2" and the width to 3". (or use 5 cm by 7.5 cm)
Type the unit of measure along with the number.
- Click on the other tabs and look at what else you can
format about a text box:
Color and styles of
lines around the text box, its position on the page, how other text
wraps around the text box, the internal margins of the text box.
You will use some of
these in the next
lesson. Keep the defaults for now, except for Size.
- Click on OK to close the dialog.
Copy a Text Box
- Select the whole text box. Copy it with the key combo CTRL +
C.
 Click off the text box in a blank area of the document to unselect the text box. The cursor
will remain in the text box. Click off the text box in a blank area of the document to unselect the text box. The cursor
will remain in the text box.
- Paste
with the key combo CTRL + V. A duplicate
text box appears on top of the original, but it is offset to the
right and down.
 If you don't
click in a blank area first, your paste will go into the selected text box itself. This is a common error. Just
undo, click elsewhere, and try again. If you don't
click in a blank area first, your paste will go into the selected text box itself. This is a common error. Just
undo, click elsewhere, and try again.
 Drag the new text box by its border to the right
of the first one. Drag the new text box by its border to the right
of the first one.
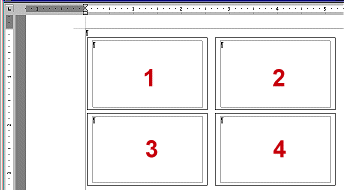
- Repeat the paste two more times, arranging
the text boxes in two rows of two boxes
each. Of course,
since these boxes are identical, no one can tell which one you positioned
first! It doesn't matter yet which is which but it will once they are linked.
Link Text Boxes
- Move the mouse pointer over the
border of the first text box. The pointer shape changes to the Move
shape:
- While your pointer has the Move
shape, right click on the border
of the text box and from the popup menu choose .
If your click misses the border, the command won't appear on the menu.
Keep trying. The border really is there!
The pointer changes to the pitcher shape. The pitcher
represents excess text that you want to "pour" from one box to
the next. the pitcher shape. The pitcher
represents excess text that you want to "pour" from one box to
the next.
Alternate method: Click
in the text box and from
the Linking toolbar click
 the Create
Link button. the Create
Link button.
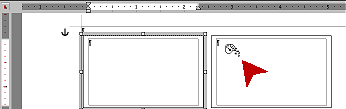
- Move the
pointer to Text Box 2 at the right. The pointer changes
to
 the pouring shape when your pointer is over a text
box that is available for linking.
You cannot link to a text box that already has text in it or that
is already in the chain. You cannot link backwards, only forwards. the pouring shape when your pointer is over a text
box that is available for linking.
You cannot link to a text box that already has text in it or that
is already in the chain. You cannot link backwards, only forwards.
-
 Click on Text Box 2 to link Text Boxes 1 and 2. Text
that is entered into the first box will flow into the second, when there
is no more room in the first. Click on Text Box 2 to link Text Boxes 1 and 2. Text
that is entered into the first box will flow into the second, when there
is no more room in the first.
 Suppose you start to create a link but
change your mind. How do you get your pointer back?? Press the ESC key.
Suppose you start to create a link but
change your mind. How do you get your pointer back?? Press the ESC key.
- Right click on the border of Text Box 2, choose again. Click in Text Box 3,
which is directly underneath Text Box 1.
- Repeat to
link Text Box 3 to Text Box 4, which is directly under Text Box 2. Hmmm.
The text boxes don't appear to have changed any at all. How can you tell if they are linked? The next section has some clues.
Problem: Is it linked?
Word has not yet made
it easy to see whether or not a text box is linked, and if it is,
to what. There are three ways to see if a text
box is linked. None of these will tell you which text box is linked to which.
<sigh>
-
 First text box in a
chain: First text box in a
chain:
Right click on the border of Text Box
1. A menu and a toolbar appear.
Look at the linking choices on the popup menu. Clearly this box is
already linked. Only a Next link is mentioned, so
this box must be first in the chain. Logical thinking!
If you
don't see any links choices in the popup menu and the Linking menu is
not visible, your click missed! It is very easy to miss the
border. If you click inside the box, the Linking toolbar will
still pop up but the popup menu has text editing choices
only.
-
Press the ESC key to get out of the
menu.
-
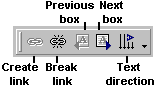 Look at the new toolbar. Look at the new toolbar.

 Linking toolbar
Textbox toolbar.
If you do not see the toolbar,
right click on another toolbar. The list of available toolbars appears.
Click on Linking or Textbox.
Icons are grayed out for actions that can not be
done
to this text box. If a Previous or
Next box are colored, then the text box is linked. Logic again!
-
 Middle text
box in a chain: Middle text
box in a chain:
Right click on the border of Text Box
2. The popup menu is somewhat
different. It lists a Next and a Previous Text Box. So, this one must be somewhere
in the middle of the chain. The same choices are enabled on the Linking
toolbar.
Notice that you can only break the Forward link, not the one
to the Previous text box.
-
 Last text box
in a chain: Last text box
in a chain:
Right click on the border of Text Box 4. Different
again! Since there is no Next Text Box but there is a Previous one, this
text box must be last in the chain. Another clue is
that you
can create a new text box
link. The same choices show on the Linking toolbar.
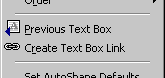
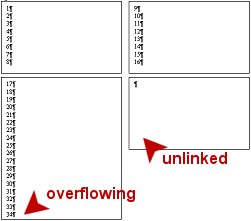
- Unlinked text box:
Draw a new text box (Text Box 5) somewhere on the page.
While your new text box is selected, click
the Create Text
Box Link button. Move your pointer over
each of the other boxes. DO
NOT CLICK YET. Can you tell whether you can link to any of
them? Which ones? The pointer shape must change to
the pouring shape for you to link.
- Click in Text
Box 3. No visible changes, but in the next section you will see
that something did change. A link was broken!
Breaking links: Until you put text into
your text boxes, you can change the linking by just clicking again. The
old link is broken without a warning, but
nothing looks
different! Once you have text in the text boxes, it's not so easy to
break the chain accidentally.
Problem: What is linked to what?
The easy way to tell which box is linked to which is to run the chain
with the Next and Previous commands.
- Select Text Box 1.
- Click
 the Next
Text Box button on the Linking/Textbox toolbar. The next text box in the
chain (Text Box 2) is selected. Cool! the Next
Text Box button on the Linking/Textbox toolbar. The next text box in the
chain (Text Box 2) is selected. Cool!
- Repeat. Which
Text Box is selected now? Did you expect box 3 or 4 to be selected?
When you linked Text Box 5 to Text Box 3 in the previous section,
you broke the link from Text Box 3 to Text Box 2. So what about Text Box
4?
- Select Text Box 3. The Linking
toolbar shows both a Previous and a Next Text Box button! Click the
Previous Text Box button. The selection moves to Text Box 5. Click the
Next Text Box button. Back to box 3. Click it again. Your selection is
now Box 4!
Remember what you link to what!
Join Two Chains
- Select Text
Box 5 and delete it by pressing the DELETE key.
- Select Text Box 2
and link it to Text Box 3. The chains are joined.
- Check to see that
you can go through the boxes in order with the Next Text Box
button : 1 -2 -3 -4.
- Go back through the chain with the Previous Text
Box command.
Vanishing Text in Text Boxes
- Click in Text Box 1.
- If necessary, on the toolbar, set the font size to
12 and the font to Times New Roman.
-
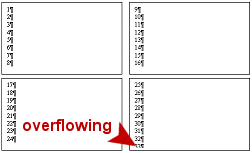 Type the numbers 1 to 40 . one per line. Watch how the text flows through the linked text boxes. Type the numbers 1 to 40 . one per line. Watch how the text flows through the linked text boxes.
If you set your box heights correctly and the font size to 12, the last several numbers don't show anywhere. There
is no warning in Word that
there is not enough room for all of the text in the final text box.
These lines still exist but are hidden below the visible lines in Text
Box 4. If you enlarged the text box, they would
display.
Publishing programs like MS Publisher do have a symbol at the bottom of a text box that shows that there is overflow text hiding there.
Always check carefully that ALL the text did display and is not hiding out of view below the bottom of the last text box.
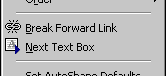
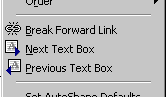
Break Forward Link
-
 Right click on the border of Text Box 3 and choose from the popup
menu. Right click on the border of Text Box 3 and choose from the popup
menu.
The numbered lines disappears from Text Box 4 and overflow out the bottom of Text Box 3.
- Drag the bottom handle of Text Box 3 downward to verify that more numbers are hiding down there.
Create Folder in Save As
- Put in the header on the left your name, the date,
and on the right type Word Project
3 .
-
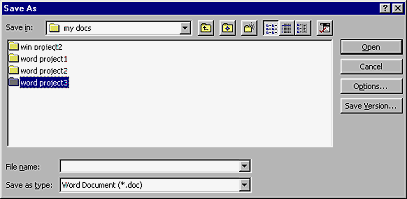 On the
menu select
| . On the
menu select
| .
- Display the contents of your my docs folder on
your Class disk.
- Create a new folder named word project3 using
 the New
Folder button. the New
Folder button.
-
Save this document to your Class disk
in the word
project3 folder as textboxes.doc
 How to handle a full disk
 Print. Print.
|