|

|
Step-by-Step: Move
|
|
|
What you will learn:
|
to move by dragging to empty cells
to move by cut and paste
to move cells to non-empty cells
to move with right drag
to move with menu commands
to move a sheet
|
Start with:
 trips16.xls - Sheet1 (saved in
previous lesson)
trips16.xls - Sheet1 (saved in
previous lesson)
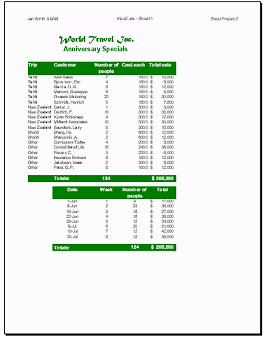
Whether you are moving a single cell, a range, a row, or a column, the
same methods apply. The method you choose will depend on whether the destination
is blank or already has data and on whether you want to replace the data or move it
aside to insert the new data.
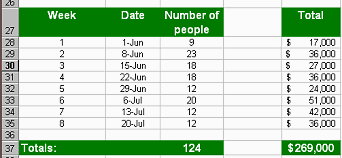
To practice moving data, you will first move the Total column away from
the lower table. Then you will put the table back together again by moving
its other columns. You will switch the positions of the Customer and Trip
columns in the upper table and then of the Week and Date columns in the lower
table. Your final move will be to move the sheet Tickets Sold Chart.
Move: Drag to empty cells
-
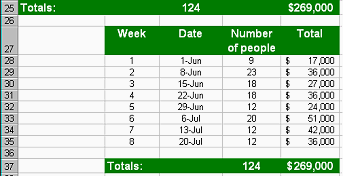
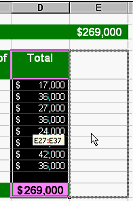 Select range D27:D37, the Total column of the second table.
You will move these cells to underneath the Total Sale column of the
first table, which is in Column E. Select range D27:D37, the Total column of the second table.
You will move these cells to underneath the Total Sale column of the
first table, which is in Column E.
-
 Drag
the border of the selection to the right. Drag
the border of the selection to the right.
- When the border of range E27:E37 is highlighted in gray, release
the left mouse button to drop the cells.
All of the formulas still work! The cells in D27:D37 are now blank
and are not formatted.
Move: Cut & Paste
-
 Select range A27:C37 and cut it by clicking Select range A27:C37 and cut it by clicking
 the Cut button or use
the key combo CTRL + X. You will paste them so that the table is back together
again. the Cut button or use
the key combo CTRL + X. You will paste them so that the table is back together
again.
- Select cell B27, which will be the upper left cell for
the new location.
- Paste with
 the Paste button or use the key combo
CTRL + V. the Paste button or use the key combo
CTRL + V.
When you pasted, you pasted both the cell contents and the formats.
The now-empty cells in column A have lost their formatting. So cool!
Move: Drag to nonempty cells
-
 If necessary, click in a blank cell to deselect what you pasted. If necessary, click in a blank cell to deselect what you pasted.
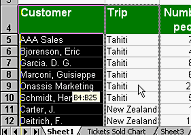
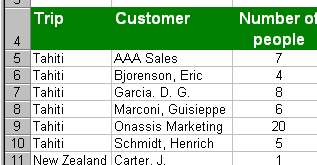
- Select range A4:A25, which is the column of Customers in the
first table. You want to move this to the right so that it is between
the columns for Trips and Number of People.
-
 Drag
the selection by its border to the right until the range B4:B25
has its border highlighted in gray. Release the mouse button. Drag
the selection by its border to the right until the range B4:B25
has its border highlighted in gray. Release the mouse button.
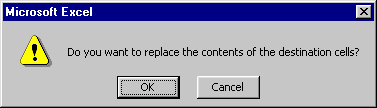
 Instead
of the cells being dropped, you get a message asking if you want to replace
the contents of the destination cells. No! You don't want to do that. Instead
of the cells being dropped, you get a message asking if you want to replace
the contents of the destination cells. No! You don't want to do that.
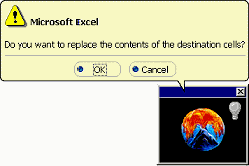
You see the plain gray message box when Office Assistant is not on.
- Click on Cancel since you don't want to erase any
data.
The selection goes back to its original place, but it is still selected.
Move: Right Drag
-
 Right drag the selection by the border to the right until the
range B4:B25 has its border highlighted. Right drag the selection by the border to the right until the
range B4:B25 has its border highlighted.
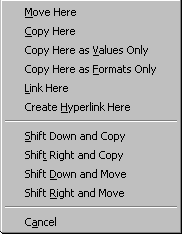
- Release the mouse button. A popup menu appears with many choices.
The Shift commands will move what is currently in the destination cells,
the Trips cells. But none of the choices will shift the Trips cells to the
left where you want them! Only right and down are available. Rats! You will
have to do this another way.
- Select .
Clearly you must plan how you are going to drag cells so
that the existing data can shift right or down. Let's try moving the Trips
column instead of the Customer columns.
- Select range B4:B25, which is the Trips column, and
right drag to the left until the range A4:A25 has its border
highlighted. Release the mouse button. The popup menu appears again.
-
 Select
.
Hurrah! The Trips cells are moved to the left and then the Customers
cells are shifted right. Just what you wanted. Select
.
Hurrah! The Trips cells are moved to the left and then the Customers
cells are shifted right. Just what you wanted.
The column widths did not change to match the new contents.
- AutoFit columns A and B by double-clicking the
right edge of the each of the column headings.
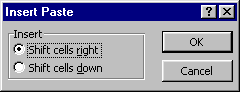
Move: Cut & Insert with menu
- Select range C27:C37, the Date column in the second table.
You want it to switch places with the Week column. That is, you want to
insert the selected data and move the Week data over to the right.
- Cut. The selected range now has a blinking border.
 If you press ESC
now, your data is not cut after all and the blinking border is removed. If you press ESC
now, your data is not cut after all and the blinking border is removed.
- Click on cell B27, the top of the Week column.
-
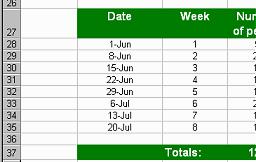 From
the menu select |
. The Date column is now on
the left, followed by the Week column. From
the menu select |
. The Date column is now on
the left, followed by the Week column.
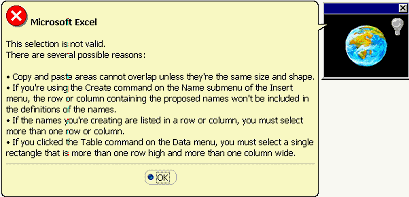  If you forget to select a destination before you choose
| from the menu, you will confuse Excel and get an error message. None of
the reasons listed in the message sound like what you did. Just click on
OK and try again.
If you forget to select a destination before you choose
| from the menu, you will confuse Excel and get an error message. None of
the reasons listed in the message sound like what you did. Just click on
OK and try again.
When you
copy cells (instead of cut) and forget to choose a destination before choosing
| , you get a list of choices for what you can do.
-
 Save as trips17.xls on your Class disk in the excel
project3 folder.
Save as trips17.xls on your Class disk in the excel
project3 folder.
 How to handle a full disk How to handle a full disk
-
 Preview and Print
Sheet1 on one page in Portrait orientation. Preview and Print
Sheet1 on one page in Portrait orientation.
Move: Sheet
- Drag the tab for the sheet Tickets Sold Chart to the right. A small black arrowhead appears above the
sheet tabs and the pointer now includes a sheet of paper icon.

- When the arrow is at the far right of the last sheet tab, release
the mouse button to drop the sheet.
-
Save. [trips17.xls]
How to handle a full disk
|