 |
Tables can be very helpful in organizing information and in positioning items on your page. The easiest way to create a table is
 the Insert Table button on the Standard toolbar. This button creates a default table with equal size columns and rows that stretch all the way across the page. After creating the table, you can adjust the height of rows and the width of columns to suit your needs. the Insert Table button on the Standard toolbar. This button creates a default table with equal size columns and rows that stretch all the way across the page. After creating the table, you can adjust the height of rows and the width of columns to suit your needs.

|
|
Where you are:
JegsWorks > Lessons > Word97-2003
Before you start...
Project 1: Word Basics
Project 2: Auto Tools
Project 3: Brochure
Project 4:
Report
MLA Guidelines
Create Report
Tables 
Tables & Borders bar
Table Tasks
 Table- Button Table- Button
Table- Draw
Table- Format
Finish
Report
Summary
Quiz
Exercises
Search
Glossary |
|
 |
Step-by-Step: Create a Table |
|
|
What you will learn: |
to create a table with Insert Table
button
to resize a table
to resize column width
to resize row height
to sort table rows
to center
table on the page
to center text vertically in the cell
to AutoFormat a
table |
Start with:   , blank
document , blank
document
Create Table: Table button
-
 Use
the
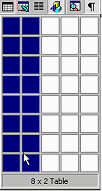
Table button on the Standard toolbar to create a table with
2 columns and 8 rows. (Click on button. Drag across 2
columns and down 8 rows. The palette will expand as you drag.) Use
the
Table button on the Standard toolbar to create a table with
2 columns and 8 rows. (Click on button. Drag across 2
columns and down 8 rows. The palette will expand as you drag.)
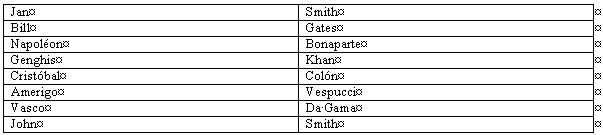
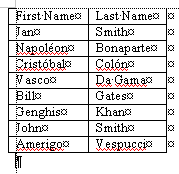
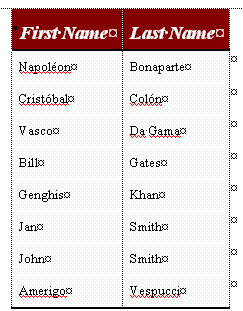
- Enter the text as shown below. (Isn't
the author in most interesting company?)
Don't
worry about the letters with accent marks if your keyboard does
not make it easy to type these.
Size: Drag
-
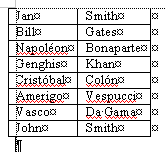 Resize the first column by moving the
pointer over the right-hand vertical edge until it turns into Resize the first column by moving the
pointer over the right-hand vertical edge until it turns into
 the
resize shape, then drag to the left. Make the column just wide enough to hold the names. the
resize shape, then drag to the left. Make the column just wide enough to hold the names.
- Repeat for the second
column.
Sort
-
 Select the
second column. Select the
second column.
-
From the Tables and Borders bar, click on
 the Sort
Ascending button. the Sort
Ascending button.
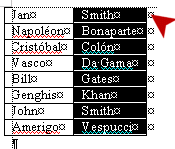
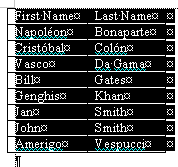
Rows are kept together as the values in
column 2 are sorted. But the top row is not sorted! Any guesses as
to why? The Sort button assumes that there is a Header row,
containing labels for the columns. You certainly don't want your
column labels sorted into the middle of the table! So, we need a way to
tell Word that we have no labels.
 Text that is not in a table can be sorted, also. Text that is not in a table can be sorted, also.
- Undo.
 With column 2 selected, select the menu
| . The Sort dialog
appears. With column 2 selected, select the menu
| . The Sort dialog
appears.
Note the two radio
buttons at the bottom.
-
Drop the list in the Sort by box. It
only shows Column 2, since that is the only column selected. The
dialog shows that you can sort on three different columns. Just
what you need for alphabetizing names by Last Name, First Name,
Middle Name. But we will need to make a change or two.
-
Click on Cancel.
- Click in a cell that isn't selected to remove the
selection from column 2.
-
 Move the cursor to the top row and
insert a new row above it. Move the cursor to the top row and
insert a new row above it.
- In the new row type First Name
in the first cell and Last
Name in the second
cell.
 Cell
is too narrow to hold the text: Cell
is too narrow to hold the text:
Widen the column.
You may have to drag the right edge of the table before Word will let you
resize the first column.
- Open the Sort dialog again. Look at the
list in the Sort by and Then by boxes. All columns
should be listed.
You can choose to sort by up to three columns in
Word.
-
 Set Sort by to Column 2 Text
Ascending and Then by to Column 1 Text
Ascending. This will sort
on Last Name first and then on the First Name, which is the normal
way to sort names. Set Sort by to Column 2 Text
Ascending and Then by to Column 1 Text
Ascending. This will sort
on Last Name first and then on the First Name, which is the normal
way to sort names.
- Click the radio button Header row to select it.
The
names change in the drop lists to use your column labels instead
of column numbers. Neat!
-
 Click on OK.
Check the sorting - on Last Name and then on First Name Click on OK.
Check the sorting - on Last Name and then on First Name
Format Column Headings
-
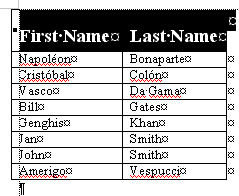 Select the first row and apply
Heading 4 (just type
the name in the Styles box since it won't show up in the list
yet). Select the first row and apply
Heading 4 (just type
the name in the Styles box since it won't show up in the list
yet).
 Word
97 uses Arial in Heading
4 but Word 2000 uses the same font that the Normal style
uses. Word
97 uses Arial in Heading
4 but Word 2000 uses the same font that the Normal style
uses.
- Widen the
columns: Move your mouse over the right border of
Column 1 until the pointer changes to
 the Resize
shape. Double click. The AutoFit feature resizes the column just wide enough
for the widest text. Repeat for Column 2. the Resize
shape. Double click. The AutoFit feature resizes the column just wide enough
for the widest text. Repeat for Column 2.
You can
also drag the column borders. This is a better choice if you need
some cells to have more than one line of text.
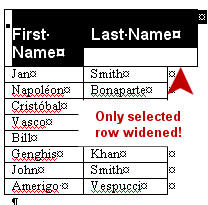 Only
one row changed size: Only
one row changed size:
If you
drag a column edge while a row is selected, you will enlarge only that row! You don't have to unselect
the row. Just drag
from an unselected section of the table.
Format Row Height
Word 97 and later versions are a bit
different about how to set cell height and width.
- Select all the rows of names in the table (Rows 2 - 9).
- You will set the row
height. Word 97 and Word 2000/2002
work differently here.
-
Click on OK
to close the dialog. All text rows are taller.
Center Text & Table
You will make the text float in the middle of the cell
vertically. Again, Word 97 and Word 2000/2002 handle this
differently.
- Align text in vertical
center of cell:
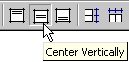  With the same text rows still selected, from the Tables
and Borders bar, click on Center
Vertically. With the same text rows still selected, from the Tables
and Borders bar, click on Center
Vertically.
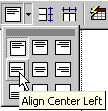    From the Tables and Borders Bar, select, Align Center Left.
- Select the entire table and click on the
Center button on the Formatting bar to
center the table on the page.
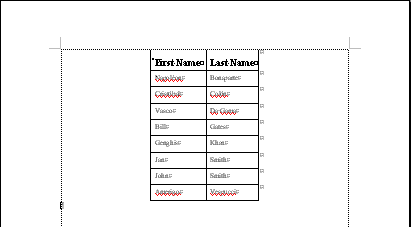
Table AutoFormat
-
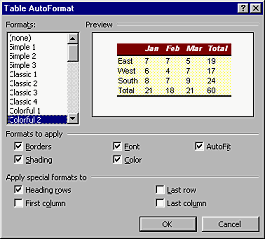 With the
cursor in the table but nothing selected, click on With the
cursor in the table but nothing selected, click on
 the Table AutoFormat button on the
Tables and Borders bar. the Table AutoFormat button on the
Tables and Borders bar.
- Click on each of the Formats in the list
and look at the Preview. Notice that you can
use only parts of the formatting, if you wish, by checking only
some of the boxes.
- Uncheck the boxes for First column,
Last row, and Last column.
These are useful when these parts need to be formatted
differently from the rest of the table. Totals columns or rows are
usually formatted at least a little differently.
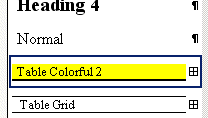
-
 Select the format Colorful 2 or
Table Colorful 2 for your
table and click OK or Apply. Lots of color is
applied to your table and it is back on the Left. Select the format Colorful 2 or
Table Colorful 2 for your
table and click OK or Apply. Lots of color is
applied to your table and it is back on the Left.
 Notice the new styles that show in the Styles and Formatting Task
Pane. You have a basic grid style and one for this particular
style: Pattern 20% with yellow foreground and white background.
Notice the new styles that show in the Styles and Formatting Task
Pane. You have a basic grid style and one for this particular
style: Pattern 20% with yellow foreground and white background.
-
Center the table on the page again.
Finish
-
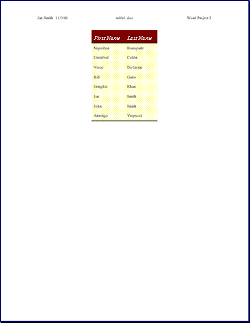 Open the Header and type your name, 2
spaces, the date, TAB, from the menu | , select ,
TAB, Word project 4 . Open the Header and type your name, 2
spaces, the date, TAB, from the menu | , select ,
TAB, Word project 4 .
- Check Print Preview. Make corrections if needed.
-
Save as table1.doc
on your Class disk in the folder word project4.
 How to handle a full disk
 Print.
|
|

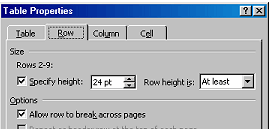
On the Row tab:
Height = at least 24 pts.
Alignment = Left.